Chocolate Caramel Fudge

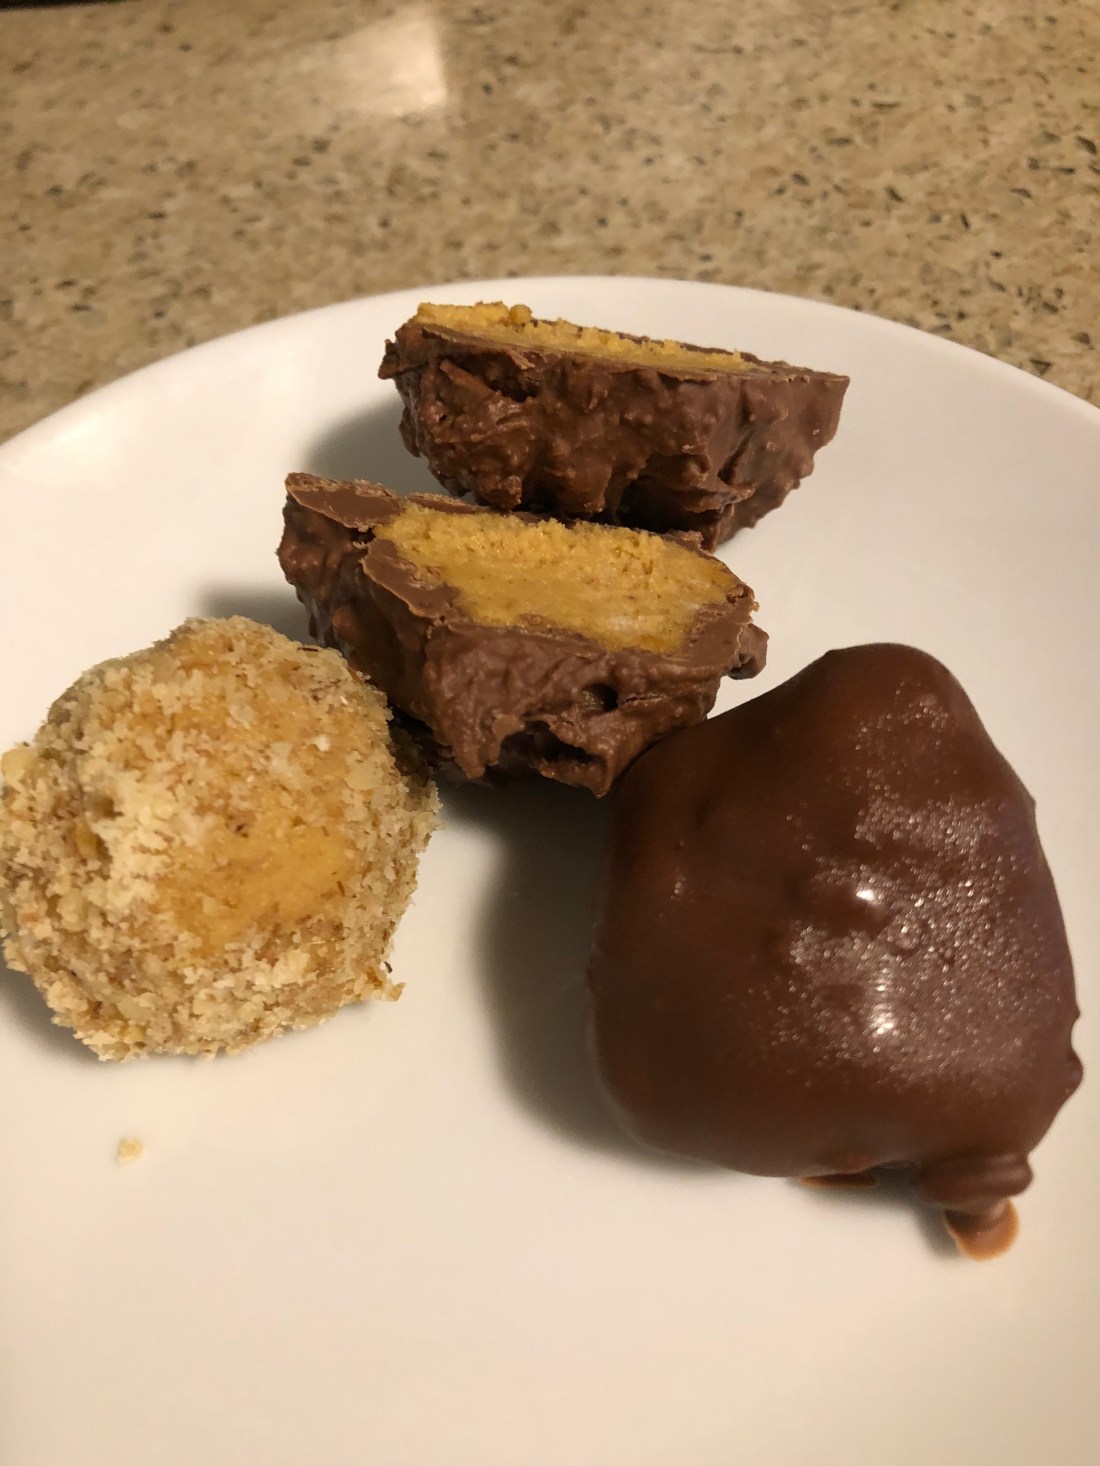
Well, here’s a little change of pace for everyone this holiday season. This recipe isn’t allergy free so although I was able to make it (had a bit of an upset stomach later in the day from inhaling chocolate fumes), I couldn’t taste it to tell you if it’s any good but, judging by the recipe, who could lose with chocolate and caramel! I started making hand-dipped and hand-molded filled chocolates when I was twelve years old. The woman who I learned with, Carol, just turned 80 and has lost most of her sight. So, not needing her recipes anymore, she sent them to me earlier this year. Mostly fudge recipes. Well, I tried for years to make fudge, even the never-fail kind with the marshmallow but I was never able to succeed at it. That’s the reason I learned how to make filled chocolates. I had an uncle that I adored and every Christmas I made him a pan of fudge and every year, he stood there with a spoon eating it and told me it was the best fudge he’d ever had. So, after about four or five years of that, I learned how to make chocolates and he was very pleasantly surprised that Christmas. So, it’s been decades since I attempted to make fudge. My daughter-in-law has two favorite candies – chocolate fudge and chocolate covered caramels. This recipe should be perfect for her so after putting it off for several days, I finally tried it today and was very pleased to find that it actually worked!

Spray an 8×8″ baking pan with non-stick spray being sure to coat the sides as well as the bottom. In a medium sized microwave safe bowl combine:

1/2 cup vegan butter

1/4 cup brown sugar (or you could try date sugar)

1/3 cup baking carob or cocoa

1/4 cup non-dairy milk (or regular milk)

Microwave on high until the mixture comes to a boil, approximately 3 minutes. Immediately stir in:

3 cups confectioners sugar (I used the monkfruit confectioners sugar)

1 1/2 teaspoons vanilla extract

Mix thoroughly (I added 1 cup at a time) until all the sugar is incorporated. Mixture will be thick. Spoon into the prepared baking dish and smooth out the surface. In a smaller microwave safe bowl combine:

30 unwrapped caramels (I know there are sugar-free ones available but unfortunately not dairy free)

1 tablespoon water

Microwave on high for approximately 2 minutes until caramels are melted. Immediately pour over the fudge mixture in the baking pan. If desired, add 1 cup of chopped nuts to the caramel before spreading it. Lastly, into another microwave safe bowl, put:

1/2 cup semi-sweet carob or chocolate chips

1/2 cup milk chocolate chips (if preferred and you want sugar free and dairy free ones, use all semi-sweet)

Microwave on high for approximately 1 1/2 minutes until chips are melted. Stir to combine and spread over the caramel. Refrigerate for about 2 hours until the fudge is set. Cut into pieces. I cut it in quarters, then the quarters in half and then each slice in thirds so I got 42 pieces total. It’s easiest to cut it with the chocolate side down so the tops won’t be as smooth and pretty as one might like.

I’m thinking, since the actual fudge can be made with the monkfruit confectioners sugar, that I might substitute a nut butter, perhaps cashew, for the caramel, 1 cup of nut butter and 1/4 to 1/2 cup of monkfruit confectioners sugar.

Easy No Bake Tiramisu Cookies

I remember as a child my mother would give us mocha in place of cocoa or coffee. Of course, back then, decaffeinated coffee didn’t exist and parents were told caffeine was bad for growing children. Thankfully, it didn’t occur to her that chocolate has as much caffeine as coffee! So she would put a little instant coffee into our cocoa. I must admit to this day, I much prefer mocha to plain cocoa. Now that chocolate is no longer on my menu, I’ve substituted carob in it’s place and I think it works just fine. These are more like a flat fudgy truffle than a cookie. Very quick and easy to make using a food processor. These are the perfect “cookies” to make during the summer when no one wants to turn on their oven.

In the bowl of a food processor, combine:

1 generous cup gluten-free rolled oats

1 tablespoon carob powder (of course you could also use cocoa powder)

1 tablespoon instant coffee or expresso

1/4 teaspoon sea salt

1/4 cup protein powder

2 tablespoons date sugar

1/4 cup pumpkin seeds*

1/4 cup seed or nut butter

1 teaspoon vanilla extract or vanilla powder

Blend until the mixture is slightly crumbly and most of the oats are ground along with the whole pumpkin seeds. Slowly pour in the non-dairy milk, about 1-2 tablespoons at a time, until the mixture forms a dough. It should be a little sticky but mostly dry. Scoop out about 1 to 2 tablespoons, depending on how large you’d like the “cookies”, roll into a ball and then flatten in your palm. Place on a sheet of waxed or parchment paper after coating each cookie with a mixture of:

1 tablespoon carob powder

1 tablespoon crushed instant coffee or expresso powder

1 tablespoon date sugar

I mixed the above in a small bowl and then coated each side with the carob mixture by putting the cookie flat into the bowl and then turning it over. The mixture stuck just fine without any pressure. Makes 10-12 depending on size. Remove to a large plate or small baking dish and refrigerate for about 15 minutes. Store in zip-lock bags in the refrigerator.

*I used pumpkin seeds and pumpkin seed butter but any type of seed or nut will work – sunflower seed butter and sunflower seeds would be just as good.

Easy No-Bake Carob Quinoa Bites

If you’re looking for a delicious, easy to make snack, this just might work for you. It’s very easy to put together and has a wide variety of possible flavors. I made carob bites but mocha, coffee, vanilla, pumpkin, etc., etc., etc., would work. It’s very easy to do.

First, line a small baking sheet with waxed paper. In a medium bowl combine:

1 cup cooked quinoa (I packed my 1 cup measure like one would brown sugar)*

1/4 cup carob powder (or other powder of choice, see variations below)

1/4 cup date syrup (agave, coconut, maple or honey all would work depending on the flavor desired)

1/4 cup seed or nut butter (again can vary depending on flavor)

1 tablespoon whole chia seeds

1/2 teaspoon vanilla extract

1/8 teaspoon sea salt

Mix all the above together until well combined. Using a small cookie scoop (mine was 1 tablespoon), scoop out the mixture and drop on the prepared baking sheet. Freeze for 1-3 hours depending on size. My 1 tablespoon scoop produced 24 bites and they froze within 1 hour.

*Quinoa is very quick and easy to cook. For this recipe combine 1/2 cup quinoa, a pinch of salt, and 1 cup of water in a small saucepan over medium heat. Bring to a boil, cover, and reduce heat to low. Cook for approximately 15 minutes or until water is gone and quinoa is translucent.

VARIATIONS:

COFFEE: Use 1/4 cup instant coffee and delete the vanilla extract, add coffee extract or a little water if mixture is too tight

MOCHA: Use 2 tablespoons instant coffee and 2 tablespoons carob powder (or cocoa if possible)

PUMPKIN: Use 1/4 cup pumpkin flavored protein powder (not pumpkin seed protein powder which has no taste)

VANILLA: Use 1/4 cup plain or vanilla protein powder; I would suggest using white quinoa and white chia seeds for vanilla as well as agave nectar

ALMOND: Use 1/4 cup almond butter, a 1/4 teaspoon almond extract and plain protein powder

MAPLE: Would probably work best with 1/4 cup maple syrup, maple extract instead of vanilla and the mildest of butters, perhaps tahini or cashew with plain or maple flavored protein powder

Use your imagination! As many combinations as we can think of would be possible for these bites.

Chickpea Frozen Dessert

I love chickpea brownies and carob chip cookies but it never occurred to me to use them in a frozen “ice cream” until I saw a recipe on Pinterest. I’ve had to adapt it slightly to omit the nut butter and chocolate but it is very delicious, lusciously smooth and creamy. I added some carob powder but flavor it any way you like – some strong coffee in place of half the non-dairy milk, carob chips, or using various seed or nut butters will add various flavors. Also, using various extracts or oils could add different flavors, instead of vanilla extract, use some mint, orange, lemon, or even butterscotch flavored extracts.

In the bowl of a blender place:

1 15 ounce can chickpeas (garbanzo beans), drained

1/2 cup dates (I used chopped but if using whole dates, be sure to soak them if they’re dried so that they will break down in the blender)

1/4 cup seed butter – tahini, pumpkin seed, sunflower seed, etc.

1/3 cup protein powder (any kind or flavor)

1/4 cup carob powder

1 cup non-dairy milk

1 teaspoon vanilla extract

Blend until the dates are broken down and the mixture is smooth. If one is available, put mixture into an ice cream freezer for 30-40 minutes and then transfer to individual serving dishes to freeze or eat immediately. If an ice cream freezer isn’t available, transfer to individual serving dishes and freeze for 1-2 hours or until you want to eat it!

Carob Pudding

This is a very quick and easy pudding to make and tastes creamy and rich just like one made with milk and cream. I garnished mine with roasted pumpkin seeds but if you can have one of the plant based whipped creams, that would work even better.

Put in a medium saucepan (2 quart):

2 cups oat milk (any milk EXCEPT soy would work)

about 1/8 teaspoon sea salt

1/4 cup carob powder

1/4 cup agave nectar (or 1/3 cup honey or date syrup)

Whisk until well blended. Place over medium high heat. In a small bowl whisk:

1/2 cup oat milk

3 tablespoons arrowroot or tapioca flour

When the carob mixture begins to steam showing that it’s getting hot, pour in the arrowroot mixture and begin whisking the pudding as it will thicken quickly once the mixture comes just to a boil. Continue whisking until it thickens. Remove from heat and add:

1/4 cup carob chips (Optional but makes for a richer pudding)

1 tablespoon vegan butter or margarine

1 teaspoon vanilla extract

Whisk until smooth. Pour into ramekins and cool. Cover with small amounts of plastic wrap to keep the pudding from forming a skin (I actually like the skin the best so I don’t mind it). Makes 4-6 servings depending on the size of your ramekins (or old-fashioned pudding bowls!).

Sweet Potato or Pumpkin Blondies

I’ve never had a blondie since I’ve always preferred bars made with chocolate. Now that I no longer can have chocolate, it seems like a good time to check out blondies. I understand from watching people make them on TV that they should be very dense and moist, almost fudgy, rather than cake-like. This recipe, adapted from thebigmansworld.com, doesn’t have any flour and can be made without any sweetener as well. I opted for some date sugar which I think pumpkin really needs and added some vanilla to the mixture as well but if you want to intensify the pumpkin or sweet potato flavor, a teaspoon of pumpkin pie spices would go well. Be sure to chill them thoroughly before slicing and removing from the pan. And, the smaller the pan, the thicker the blondies will be (I used an 8″ square pan for the pumpkin and an 8″ round for the sweet potato.

Preheat oven to 350 degrees. Spray with non-stick cooking spray, a small baking pan (8″ or less). Put into a medium sized, microwave safe mixing bowl:

1/2 cup pumpkin seed butter (or any other butter your family likes)

Heat for about 1 minute which should thin it out a little. If you’re using roasted (brown) pumpkin seed butter or a thicker butter such as sunflower, this may take longer to melt. Add to the butter:

1 cup pumpkin or sweet potato puree

2 tablespoons carob powder

1/4 cup fine date sugar

1 teaspoon vanilla extract

Stir until all ingredients are combined. Pour into the prepared baking dish and bake for about 20 minutes depending on the size of your baking dish – the 8″ pans took the full 20 minutes in my oven. They will puff up slightly when they are cooked. Cool on the counter for 15-20 minutes and then refrigerate and chill completely before slicing and serving. Number of pieces will also depend on the size of the pan you used – I got 9 pieces from the square pan.

Oatmeal Cookies

My husband’s favorite cookie was oatmeal raisin. These are very easy to make (if you have a food processor) and very tasty. And they don’t have very many ingredients, also a pretty good thing. If you have dried dates which most of us do since fresh dates are not always available, soak them in boiling water for 5-10 minutes to soften them before using them in this recipe.

Preheat oven to 350 degrees. Spread a medium size cookie sheet with parchment paper. In the bowl of a food processor, add:

1 1/2 cups gluten-free old fashioned oats, preferably organic

1/2 cup seed butter like sunflower or pumpkin butter or tahini

10-12 softened dates, medium sized

1/4 cup date syrup (or if you don’t have date syrup, use some of the water from soaking the dates just increase the number of dates if you want a sweeter cookie)

1/4 teaspoon sea salt

1 teaspoon vanilla extract (optional)

Blend until combined and the oatmeal is partly ground and a dough forms. This should take only about a minute. Remove from the food processor to a bowl and stir in:

1/2 cup carob chips (optional)

1/4 cup raisins or dried cranberries (optional)

Scoop out several tablespoons (to a 1/4 cup depending on how large you’d like the cookies) of the dough and form into a flat, round disc. Repeat with the remaining dough. The recipe should make approximately 12 cookies. Bake for 10-12 minutes. Let cool for about 5 minutes before removing from the baking sheet.

Vegan Carob Soufflé

I would never have thought I could make a soufflé without eggs but here it is! And delicious although perhaps not quite as fluffy as an egg soufflé. Very easy to make, just be sure it’s coming out of the oven immediately before you want to serve it because it does fall quite quickly as it cools off. Impress your vegan friends with this one! And of course, you can use chocolate instead of carob.

First, preheat oven to 350 degrees. This makes only 3 soufflés but is easy enough to double. Prepare the ramekins but spraying with a non-stick spray and then dusting them with a mixture of:

1 teaspoon carob powder

2 teaspoons date sugar

This allows the soufflé mixture to rise without being gripped by the ramekins surface. Next, mix together:

1 tablespoon psyllium husk (I used flaked)

3 tablespoons cold water

Whisk together to mix and set aside. The next step is to melt together:

1/2 cup unsweetened carob chips (or chocolate chips)

1/4 cup vegan margarine or butter (I used 1/4 cup of avocado oil)

Melt in either a double boiler over (not in) water over low heat or place a metal bowl on top of a pot of simmering water. Keep over low heat so that there isn’t a lot of steam emerging which could break the carob or chocolate. While this melts, in a medium sized bowl beat:

1/2 cup cold water

2 teaspoons aquafaba powder*

3 tablespoons date sugar

1/4 teaspoon guar gum

1/4 teaspoon cream of tartar

If you don’t have any aquafaba powder, use a cup of liquid aquafaba that you’ve reduced over heat to 1/2 cup. This requires a stronger mix of aquafaba so the powder is the easiest way to go. [It’s readily available online.]

Start beating the mixture on the lowest speed of your hand or stand mixer. Beat on low for 2-3 minutes then increase the speed to medium, again beating 2-3 minutes before finally increasing the speed to the highest setting and again beating 2-3 minutes. Trust me, you’ll say after the second stage that the mixture looks like stiff peaks but don’t stop there! This needs the third stage of the beating to keep it’s fluffy texture when folded into the carob mixture.

Once the chips are melted, remove from the heat and whisk together the fat and carob before adding:

1 teaspoon vanilla extract

3 tablespoons date sugar (optional depending on your family’s sweet tooth!)

1 tablespoon all purpose gluten-free flour

2 tablespoons carob powder

1/4 teaspoon sea salt

the psyllium mixture you set aside earlier

Whisk together to combine and then spoon in the aquafaba mixture. Carefully fold in the whipped aquafaba (it’s okay if a few streaks remain). Spoon into the prepared ramekins. Mixture should reach almost to the top of the ramekin. Bake for 20 minutes – DO NOT OPEN THE OVEN WHILE COOKING – the mixture should reach the top of the ramekin. Serve immediately.

Pumpkin Cheesecake Bites

This is a very simple recipe although it’s not quick because of the need to chill the dough before forming the balls. I can’t tell you how delicious these are since I couldn’t eat them – all the non-dairy cream cheeses on the market contain either soy, coconut or are made from a nut milk, none of which I can eat. However, my daughter-in-law tells me they are scrumptious.

In the bowl of a food processor:

22-24 gluten-free pseudo graham crackers (see recipe under Appetizers and Snacks)

Pulse until the crackers are nothing but crumbs. Remove and measure them. The crumbs should measure about 2 cups. Add to the food processor:

8 ounces non-dairy cream cheese (I used the Kite brand and it’s quite soft so I needed to add the full 2 cups of graham cracker crumbs)

1/2 cup pumpkin puree

1/3 cup fine date sugar

1 teaspoon pumpkin pie spice (or 1/2 teaspoon cinnamon, 1/4 teaspoon nutmeg, and 1/4 teaspoon ground ginger)

1 1/2-2 cups pseudo graham cracker crumbs (depending on the softness of the non-dairy cream cheese you use)

Pulse until well blended. The mixture should come together into a cookie dough like consistency. It may be slightly sticky. If so, add a little more cracker crumbs. Remove from the food processor into a medium bowl, cover and chill in the refrigerator for several hours. Line a medium baking tray with parchment or waxed paper and drop dough by tablespoons onto the paper. If the dough is firm enough, just chill again until set. If the dough is still very soft, freeze for 1/2 to 1 hour. At this point, these can be just rolled in ground nuts or seeds or covered with carob or chocolate.

In a double boiler, over not in hot water, melt 16 ounces carob chips (or if chocolate is possible, use whatever brand of chocolate chips you like). I know that many people now use the microwave to melt chocolate but I find it makes it grainy so I don’t recommend it. When the balls are firm and the chips melted, spoon the melted carob over each ball to cover and then sprinkle with ground nuts or seeds (pumpkin seeds would work very well here). Chill again until the carob sets. Place in an airtight tin and keep in the refrigerator (it is after all cheesecake!). Makes 30-36 balls.

FYI: Since my daughter-in-law loves milk chocolate, I used milk chocolate chips when I made these for her. I also tried dipping the balls into the chocolate but found that they began melting into the hot chocolate so I suggested pouring the carob or chocolate over the balls instead of dipping them.

Rice Crispy Bars

This is a rice bar that is carob rather than marshmallow based so it’s much simpler to make. Quick and easy it makes a tasty treat. I cut them, put several into a baggie and put them in the freezer so I can take one out when I really need something sweet.

Prepare an 8×8 or 9×9 baking dish by lining it with parchment paper. Into a medium size bowl place:

1/3 cup avocado oil

2/3 cup tahini (thicker rather than thinner tahini) or pumpkin butter (or any seed or nut butter you like)

1/4 cup agave or coconut nectar, date or maple syrup

1 teaspoon vanilla extract (or 1/4 teaspoon mint extract if a minty flavor is desired)

Whisk together until smooth. Add:

1/2 cup carob powder (or cocoa if you can have it)

1/4 cup pumpkin seeds (or any other seed or nut chopped that your family enjoys)

1 1/4 cup puffed rice cereal (or any puffed cereal your family likes)*

Stir to combine. (*More or less cereal may be needed depending on the consistency of the butter added.) Spread in the prepared dish and put in the freezer for 1 hour or until it is solid when you lift the parchment paper out of the dish. Slice and enjoy!