Chicken Bouillabaisse

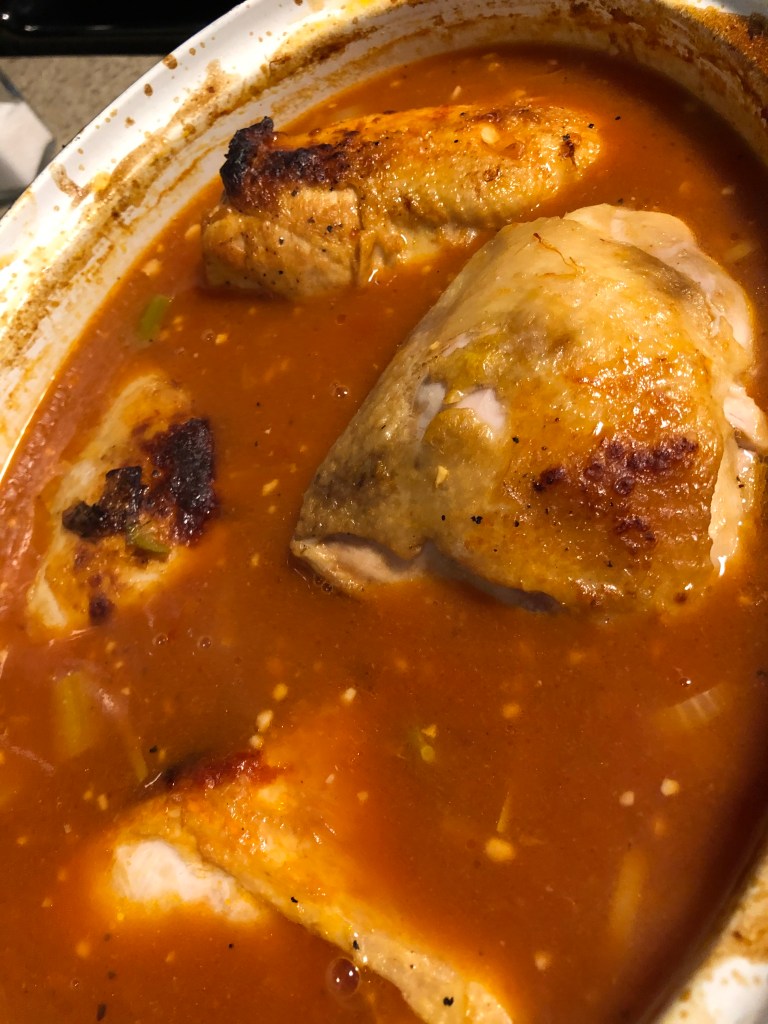
Traditionally, this French stew (although it’s more of a soup) contains fish and shrimp. Here’s one that varies since it’s made with chicken. It’s fairly easy to make and tastes delicious. Longest time is the oven time but even so less than 90 minutes and it’s done, mainly because it uses cut up chicken pieces. Serves 4-6 depending on the size of your chicken pieces, the cooking time will also vary because of this as well.

Preheat oven to 350 degrees. In a large Dutch oven, over medium high, heat:

2 tablespoons olive oil

Pat dry and then salt and pepper:

6 chicken breasts, bone-in and skin on OR

8 chicken thighs, bone-in and skin on

(or a combination of both, about 3 pounds of chicken total)

Add to the hot oil, skin side down and brown, 5-8 minutes per side. Remove from the oil and add:

1 large leek, sliced and cleaned

1 small fennel bulb, halved and sliced thin (discard the stems although save some fronds for garnish)

Reduce heat to medium and cook until the leek is tender and the fennel begins to soften. Stir in:

2 teaspoons minced garlic

1 tablespoon tomato paste

1 tablespoon all purpose gluten-free flour

1/4 teaspoon saffron threads, crushed

1/4 teaspoon cayenne pepper

Stir into the vegetables and cook for about 30-45 seconds. Whisk in:

3 cups chicken stock

Whisk until the sauce is smooth. Add:

1 14.5 ounce can diced tomatoes, drained

1 cup sliced carrots OR 1 cup potatoes cut into pieces

1 strip of orange peel, about 2-3 inches long

Bring to a simmer and cook for about 10 minutes. Add the chicken parts, skin side up trying to keep them above the liquid so that the skin stays crispy. Bake for about 25-30 minutes or until breasts register 160 degrees and thighs 170 degrees. Remove from oven. Turn the broiler of the oven on and broil the chicken until the skin sizzles and gets crispy (I had to remove the chicken from the Dutch oven to do this since they kept sinking into the liquid).

Stir in:

1 tablespoon chopped parsley

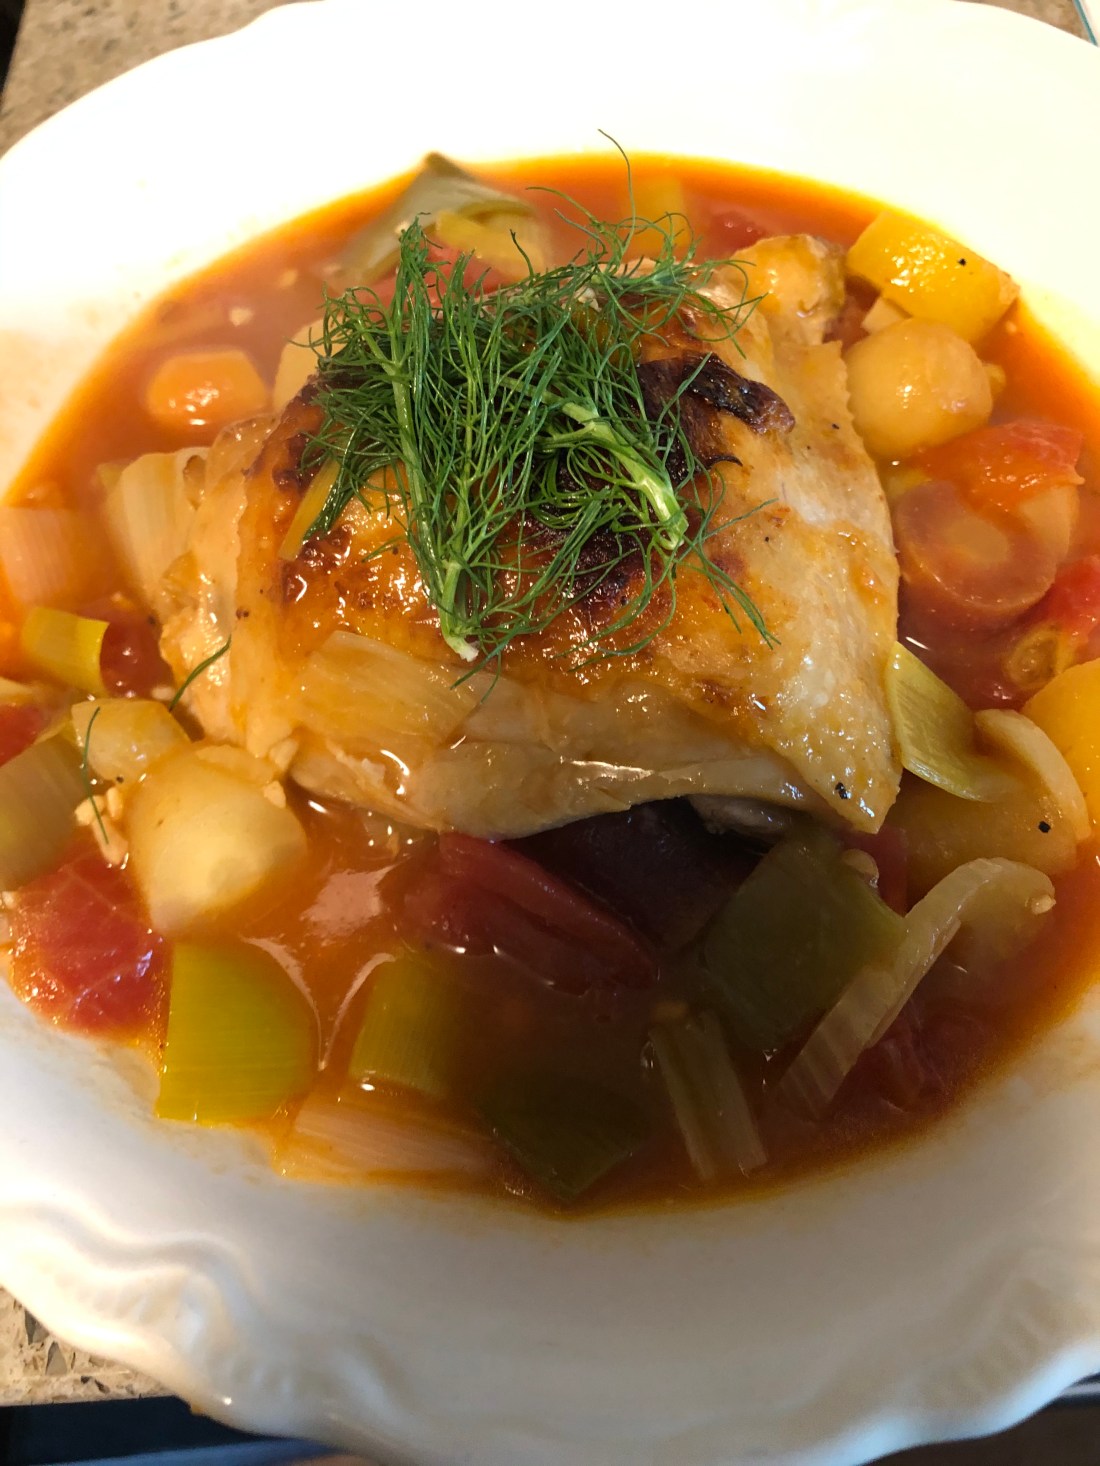
Serve with the fennel fronds as garnish.

Honey Oatmeal Quick Bread

Like many people who have to live gluten free I’ve searched long and hard for a tasty gluten-free bread that doesn’t feel like a brick! Right? Most weigh a ton and most of the recipes I’ve tried also come out like bricks. And the ones that don’t weight a ton have eggs in them. So I was quite surprised by this recipe adapted from “Feelin’ Fabulous with Kayla”. It is fairly light in texture, great for eating warm from the oven with a spread, French toast, or for grilled sandwiches. I don’t recommend that you put it in your toaster because it can be quite crumbly. But it is DELICIOUS! And I do promise you I will continue to seek a allergy-free bread that we can enjoy that isn’t heavy and stays together when we want a sandwich. Feels like it’ll take my lifetime to find it but it is my one of my most sought after goals.

In a medium large bowl combine:

2 tablespoons ground golden flax

1/3 cup aquafaba

Let sit for 5 minutes until flax gel forms. Grease a GLASS loaf pan, for some reason for this bread glass works better than the metal pans. Whisk into the flax gel:

1 cup rolled oats

1 cup vegan mayonnaise less 1 tablespoon

1 tablespoon vinegar

1/4 cup honey

1/4 cup avocado oil

Whisk until combined and then add:

3/4 cup non-dairy unsweetened milk

Whisk in the milk. In a separate bowl combine:

2 1/3 cup gluten-free all purpose flour (use King Arthur’s Measure4Measure, Cup4Cup or Bob’s Red Mill’s 1:1)*

2 1/4 teaspoons baking powder

1/4 teaspoon baking soda

1 teaspoon sea salt

Mix to combine before adding to the wet mixture. Stir to combine wet and dry mixtures. Spoon into the prepared loaf pan. Sprinkle with oats. Set aside for 15-20 minutes while the oven heats to 350 degrees. You want to let any gluten-free dough sit for a few minutes before cooking so that the dry can absorb some of the liquid or the end result will be too moist.

Bake 45-60 minutes or until a toothpick inserted in the center comes out clean. Let cool in the loaf pan for about a half hour and then let cool completely before cutting (center may still be slightly warm).

*We want to use one of these all-purpose gluten-free flours because we’re not adding any guar gum or xanthan gum and other various flour mixtures will measure differently.

Honey Mustard and Pear Glazed Chicken

I was looking through The Chicken Bible this afternoon looking for another recipe to make and saw one that gave me inspiration, it was a honey mustard glazed chicken. I remembered I had about a quarter cup of pear puree in the refrigerator that I had to use up and decided to add that to the glaze. And the recipe called for rosemary and I don’t like rosemary so I used thyme which goes well with both pears and honey. Turned out delicious! Hope you enjoy it. If you don’t like pears, use some apple butter, sauce or jelly instead.

Enough for 5-6 chicken thighs or 1/2 breasts.

Preheat oven to 350 degrees. Spray a baking dish large enough to hold the chicken with non-stick spray. Clean the chicken and remove any excess fat that’s visible.

Mix in a small bowl:

1/4 cup pear puree (or apple)

2 tablespoons honey

1 tablespoon vinegar

1 tablespoon mustard

1/2 teaspoon dried thyme

1/2 teaspoon sea salt (or herbamare)

1/4 teaspoon ground pepper

Place the chicken pieces in the baking dish (if you’re using both thighs and breasts, be sure to place the breasts on the inside of the dish and the thighs around the edge). Spoon about 1 tablespoon of the glaze on each piece of chicken and spread around to cover the top. Bake for 45-50 minutes or until the breasts register 160 degrees and the thighs 175 degrees.

Sprinkle with some chopped scallions or chives and serve.

Fusilli with Turkey, Swiss Chard, and White Beans

Hope all my followers aren’t getting tired of pasta dishes! Here’s one that’s even more delicious than the last two. I do love Swiss chard, such a great flavor; I do choose rainbow or red chard because I can’t eat green leafy vegetables but feel free to use any chard you find at your market. And the meat and beans can be changed around as well, depending on your family’s taste – chicken, pork loin, even a sausage would work great in this recipe as well as any canned beans.

Start an 8 quart pot of water to boil. When boiling, add:

1 teaspoon sea salt

8 ounces gluten free fusilli (or whatever pasta you have on hand)

Cook the pasta per package instructions, usually between 8-10 minutes for fusilli. When the pasta is el dente, add to the boiling pot:

12 ounces of Swiss chard, washed with the leaves from the rib and broken into pieces (discard the ribs)

Bring back to the boil and cook for 1-2 minutes. Drain the chard and the pasta and return to the pot. Drizzle 1-2 tablespoons of olive oil over the pasta so it doesn’t stick together. Set aside.

In a 10″ skillet heat:

1 tablespoon olive oil

Add:

12 ounces cooked and diced turkey (or chicken, pork, or sausage)

2 teaspoons minced garlic

15 ounces cannellini beans with the liquid

1/2 cup chicken stock

1 teaspoon dried mixed Italian herbs

Bring to a boil over medium heat and simmer until the sauce is reduced by about half. Pour over the pasta and chard along and add:

1/4 to 1/2 cup non-dairy shredded parmesan cheese

juice of 1/2 a lemon

Stir to combine and serve. Have some extra cheese to top each serving. Serves 4-6.

Penne with Chicken and Artichokes

I eat a lot of chicken. Probably out of my 21 meals a week, I eat chicken for at least 12 of them. So finding new and different ways to prepare chicken is something I never stop doing. My brother sent me a Barnes and Noble gift card for my birthday and I finally made it over there (now that I’m fully vaccinated) a few days ago and imagine how wonderful it was when I found The Chicken Bible, by the America’s Test Kitchen. A cookbook with 500 different ways to prepare chicken! I’m in heaven looking through this cookbook every day searching for a new way to make my chicken taste delicious. And this one is a definite winner. If someone needs to watch salt intake, skip the olives. Serves 4.

Cut into thin strips (or chunks if preferred realizing they’ll have to cook longer):

1 pound (2 large boneless breasts, split or 6 boneless chicken thighs – remove skins before slicing)*

Dry the chicken with a paper towel and sprinkle with:

1/2 teaspoon sea salt

1/8 teaspoon ground black pepper

In a medium Dutch oven, over medium high heat:

2 tablespoons olive oil

When hot add the chicken and cook, without stirring, until it starts to brown. Then stir and continue to cook until just about cooked through. Using a slotted spoon, remove to a bowl and cover. To the pot, add:

1 tablespoon olive oil

1 medium onion, diced

Cook until the onion is translucent then add:

2 teaspoons minced garlic

1/2 teaspoon dried Italian herbs (basil, oregano and thyme)

pinch of red pepper flakes (optional)

Cook about one minute or until you can smell the garlic then add:

4 cups chicken stock

Bring to a boil and add:

8 ounces gluten-free penne

Reduce heat to medium and continue on a slow boil until penne is al dente, about 6-8 minutes depending on the brand used. Stir frequently, sauce should reduce and thicken while the penne is cooking. Stir in:

6-8 ounces artichoke hearts, quartered (I used the vacuum packed ones available at Whole Foods but frozen will work just as well)

Cook an additional 5-8 minutes or until sauce sticks to the pasta. The sauce should be quite thick, not at all soupy (see example below). Add:

Chicken pieces

12 ounces of cherry or grape tomatoes, halved or quartered depending on size

1/4 cup kalamata olives (chopped)

1/4 cup Parmesan cheese, grated (Follow Your Heart makes a delicious vegan Parmesan already grated)

Cook until chicken is reheated, tossing the pasta lightly. Add:

1/4 cup chiffonaded basil leaves (roll the leaves into a log and thinly slice)

Toss the pasta once again to mix in the basil, taste and add additional salt and pepper if needed and serve.

This is not what you want, see the sauce on the bottom of the plate, too soupy!

This is what it should look like. See how the sauce sticks to the pasta.

*Whenever I need to slice chicken, if I’m using frozen chicken, I try to catch it when it’s still just slightly frozen because its much easier to slice when its partly frozen. If using fresh chicken, try putting it in the freezer for 15-20 minutes before slicing.

Chicken Saltimbocca

If you like sage, think about your Thanksgiving stuffing, you will LOVE this recipe! I especially enjoyed the fried sage on the top, something I’d never done but oh how delicious! This recipe is fairly easy as long as each individual step is followed and the chopping and slicing is done in advance.

This recipe serves four:

3 tablespoons olive oil

4 ounces prosciutto, sliced

8-10 large sage leaves, plus 3 tablespoons minced (or 3 teaspoons dried sage)

1 pound boneless chicken, breast and/or thighs, sliced (the thinner its sliced the faster it will cook)

1/4 teaspoon sea salt

1/8 teaspoon ground black pepper

1 onion, minced

2 teaspoons minced garlic

1 tablespoon all purpose gluten-free flour

3 cups chicken stock

8 ounces gluten-free vermicelli or spaghettini

2 tablespoons capers, rinsed (optional)

2 tablespoons butter substitute

1/2 teaspoon lemon zest plus 3 tablespoons juice

First, in a large skillet (or a Dutch oven) with high sides, heat, medium high, 1 tablespoon olive oil until it shimmers. Add the prosciutto pieces as individually as possible because unlike bacon, they will not fully separate as they cook, cook until crisp, about 4-5 minutes, reducing heat slightly if needed. Remove the prosciutto from the skillet and place the sage leaves in the oil and cook them until crisp, about 30-40 seconds. Place prosciutto and sage on a paper towel.

Next, dry the chicken, then sprinkle with the salt and pepper. Heat another 1 tablespoon of oil in the skillet, again medium high heat, add the chicken in a single layer and cook, not stirring, until it starts to brown, 1-2 minutes. Then stir it and cook until nearly cooked through, about 2-3 minutes or longer depending on thickness. Remove to a bowl, cover and keep warm.

Add the last tablespoon of oil to the skillet and add the onions. Cook over medium heat until translucent and starting to brown. Stir in the garlic and minced sage and cook until just fragrant, about 30-40 seconds. Stir in the flour and cook for about 1 minute. Add 1 cup of chicken stock, scrape down the sides of the skillet and stir to smooth out any lumps, simmer until reduced by about half, about 5-6 minutes.

Stir in the remainder of the stock and the pasta. Increase heat to medium high and cook at a slow boil until pasta is tender, about 10-12 minutes. Stir frequently. The sauce should thicken more during this cooking.

Lastly, add the chicken back in along with the capers (if used), butter substitute, lemon zest and juice, stir to combine and cook for another minute or two until the chicken is heated. Remove from heat and add any additional salt and/or pepper that may be needed. Cover and let sit for about 5 minutes and it will absorb any extra sauce into the pasta.

Sprinkle with the prosciutto and fried sage leaves and serve.

Creamy Chicken Stew with Asparagus

This is a hearty dish that will warm you through and through on those colder days. Perhaps that’s what made me think of it this past week here in Minnesota – after a wonderful few weeks in the 50s and 60s, it suddenly fell back into the 30s! Not difficult to make and so delicious to eat. Feel free to change up the vegetables to ones your family prefers.

Cut vegetables:

1 medium onion, diced

3 stalks of celery, diced

2 medium to large carrots sliced

1 large parsnip (or 2-3 smaller ones), sliced and/or diced depending on size

1 medium purple top turnip, diced

3 garlic cloves, minced (or 1 tablespoon pre-minced garlic)*

In a medium Dutch oven, heat:

2 tablespoons oil

Add the diced onions and celery and cook for 3-5 minutes. Add the remaining vegetables along with:

3 cups chicken stock

Simmer over medium low heat until the vegetables are cooked through. Add:

2 cups cooked and diced chicken

1 pound asparagus, cut into 1-2 inch pieces**

1 cup frozen green peas

1 teaspoon dried thyme

1 teaspoon dried basil

1 teaspoon dried marjoram

Simmer until chicken is heated through and the peas are cooked, 5-6 minutes, then increase heat to medium and add slurry made with:

3 tablespoons gluten-free all purpose flour

1 cup non-dairy milk (any milk EXCEPT soy)

Cook, stirring constantly, until thickened. Serve over pasta, mashed potatoes, or rice or even as a filling for a chicken pot pie. Makes 6 servings.

*This stew can be “summerized” by using zucchini, yellow squash, green beans, mushrooms instead of the winter root vegetables.

**If preferred, the asparagus can be cooked whole in a skillet until tender and served alongside the stew. If the stalks are quite thick, peal the asparagus before cutting into pieces.

Zucchini Cupcakes

I think if I’m going to continue to post cupcake recipes, I need to buy a regular size muffin pan! Again, I just placed the cupcake papers in a rectangular pan and once again I have cupcakes of all shapes and sizes. But delicious cupcakes nonetheless. This is a very thick batter so the dry mixture will need to be combined with the wet using a spoon instead of a mixer.

Preheat oven to 350 degrees. Makes 15-24 cupcakes depending on size so line appropriate number of muffin pans with paper cupcake liners.

In a large bowl combine:

9 tablespoons ground flax

1 cup aquafaba (I use a powdered aquafaba which you can find on on-line so I used 1 tablespoon aquafaba powder and 1 cup of warm water)

Let sit until it forms flax gel, about 3-5 minutes. Add:

1 1/3 cup date sugar

1/2 cup oil (I used olive but any oil will work)

1/3 cup orange juice

2 tablespoons rice vinegar

1 teaspoon vanilla extract

Mix using a hand mixer until well combined. In a separate bowl stir together:

2 1/3 cup all purpose gluten-free flour

1 teaspoon xanthan gum

2 teaspoons ground cinnamon

2 teaspoons baking powder

1 teaspoon baking soda

1 teaspoon salt

1/2 teaspoon ground cloves

Add the dry ingredients and the zucchini to the wet and mix until thoroughly combined. Depending on the amount of moisture in your zucchini, you might need to add a few tablespoons of water or flour but mixture should be very stiff. Fill the cupcake papers 2/3 full and smooth top if possible. Bake for 25-30 minutes depending on size. Cool completely before frosting. I used carob ganache but 7 Minute Frosting would also be good if you want a very sweet frosting.

Tater Tots

I know, I know, another fried recipe! I try not to fry too many things because it’s not the healthiest way of cooking but some things, like potatoes, just love being fried. And they taste soooooooo good! I found a recipe for “Grown Up Tater Tots” in my aquafaba cookbook* and thought I’d give them a try. Of course, I had to make it my own, for some reason all my life, I’ve never been able to follow a recipe exactly, always changing something about it to make it my own and this one is no exception. The recipe, depending on the size of the potato you use and the size of your “tots” will make 10-12 pieces.

You’ll need:

1 large baking potato

Salt and pepper to taste

1 tablespoon vegan margarine

2-3 tablespoons potato STARCH

1/4 cup aquafaba

1/2 to 2/3 cup gluten-free bread crumbs

1/4 teaspoon garlic powder

1/2 teaspoon sweet paprika

1/4-1/3 cup non-dairy parmesan shreds (Follow Your Heart makes an excellent one)

Olive Oil, about 2 cups to fill a skillet 1/2″

First, naturally, peel and dice the potato. Boil until soft (be sure to always start boiling potatoes in cold water so that they cook evenly and only put in enough water to cover them with about 1/4″ to spare). Add a little salt to the water as well. This should take only about 10-15 minutes; be sure to reduce the heat once they come to a boil to medium. Drain and be sure there’s no water left in them.

Mash the potato (I used my immersion blender) but a ricer or masher will work as long as there are no lumps in the potato. It needs to be very smooth and creamy. Add salt and pepper to taste (I used my herbamare instead of salt), the vegan margarine, cheese, and the potato starch. Stir to combine. The final mixture should hold together in a ball but it might be a little gummy. If it’s too gummy or soft, add another tablespoon of potato starch.

Place the aquafaba in a shallow bowl and the bread crumbs, seasoned with some salt, pepper, garlic powder and the paprika in another bowl.

With wet hands, using about 1-2 tablespoons of the potato mixture, roll into logs, repeat until all the mixture is rolled. Then roll each log in the aquafaba being sure to moisten all sides. Roll in the seasoned bread crumbs. I suggest you do each one in both processes before doing another log. Wet your hands frequently (I actually wet them between each log, washing off the breadcrumbs).

Heat the olive oil to about 375 degrees. If you don’t have a cooking thermometer, the oil will shimmer when it is close to the right temperature. If you heated it on high, be sure to reduce it to medium high before adding the tater tots. Cook each tot for approximately 3-5 minutes per side or until golden brown. If the tots are getting too dark too quickly, your oil is too hot and will cause the tots to burst.

Remove them from the oil when browned on all sides, about 10-12 minutes, onto paper towels and sprinkle with salt. Serve as a side dish or use as a topping for a casserole.

TIP: To make them more flavorful, add some finely diced green onion or chives; bacon bits; or a small piece of non-dairy cheese in the middle of the log – or even all three! If you’re a fan of parsley, some dried parsley would also work well in these tots.

*Rebecca Coleman, Aquafabulous; 100+ Egg-free Vegan Recipes Using Aquafaba (Toronto, Canada: Robert Rose, 2017)

Stuffed Tomatoes

Sorry I haven’t blogged in a couple of days. The other main activity in my life is learning the craft of screenwriting and I’ve been at a virtual screenwriting summit all weekend. Just ending today so I have a little time to put up an old recipe of mine that I learned from a friend who was a caterer. Very easy to do and can be used as an appetizer or an entrée. Stuffed tomatoes can be stuffed with any kind of salad you like, egg, chicken, ham, etc. Tip from my caterer friend, use your food processor to process the meat into a well grated product so that it’s easier to stuff into the tomato, especially if you’re using very small tomatoes. It can also be put into a piping bag to fill the tomatoes. Use any size of tomato you like. I prefer to use Campari tomatoes, large for smaller tomatoes and large enough for 2 bites, a good size for an appetizer. If I’m making this as an entrée, a larger tomato is of course needed, like a Big Boy.

If you want the tomatoes to sit neatly on the plate, you can cut a very small amount from the bottom. Just be careful not to cut through the meat of the tomato.

Begin by making the salad. Put into the bowl of a food processor:

1 pound of ham, 1 large chicken breast, 8-10 hard boiled eggs, etc., cut into large chunks

1 large celery stalk, cut into large chunks

2 tablespoons dill relish (this is a sugar free relish; for a sweeter salad, add a little sweetener rather than use a sweet relish which contains sugar)

1-2 scallions, cut into large pieces

Blend until the meat is in small pieces. Add:

1/2 to 2/3 cup vegan mayonnaise

Blend until well mixed, be sure to scrape down the sides of the bowl before finishing processing. Remove the completed salad to either a piping bag or a medium bowl.

For the tomatoes:

16-20 Campari tomatoes

36-48 grape tomatoes

or 2-4 large tomatoes

Begin by washing the tomatoes.* Then cut off the very top of the stem end of the tomatoes. Then, using a small sharp knife, cut around the inside of the tomato next to the meat and use a sharp ended spoon to scoop out the seeds and veins of the tomato.

Set the tomatoes on a paper towel, upside down so that some of the moisture drains out. Leave for about 5 minutes before filling. Place on a plate, garnish with scallions, chives, or thin slices of dill pickle.

*I hope all my followers know that you should NEVER store tomatoes in the refrigerator! Take this from a girl who grew up on a farm. Refrigerating them steals their flavor and also toughens the skins. Also when buying tomatoes, smell them. If they don’t smell like a tomato, they won’t taste like a tomato. Same with most fruit that has a distinct odor like strawberries.