Chicken with Rice and Vegetables

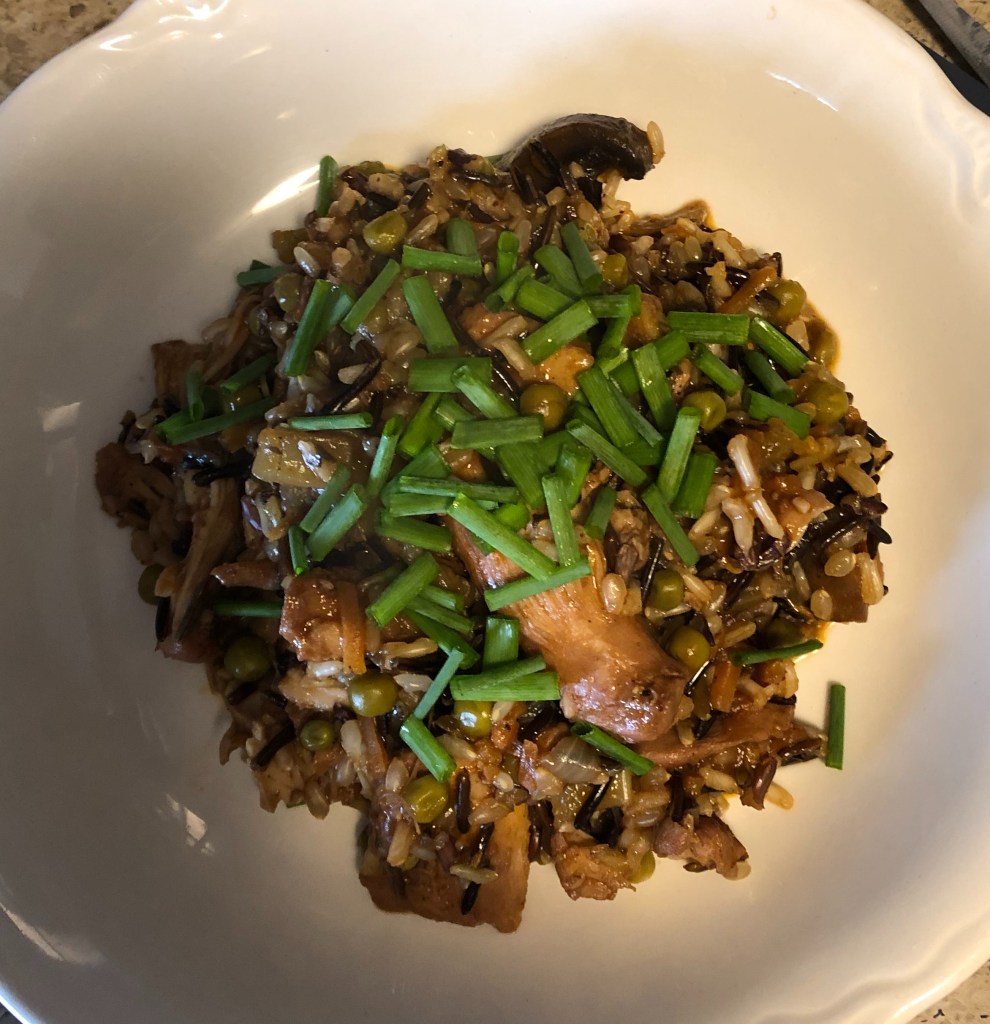
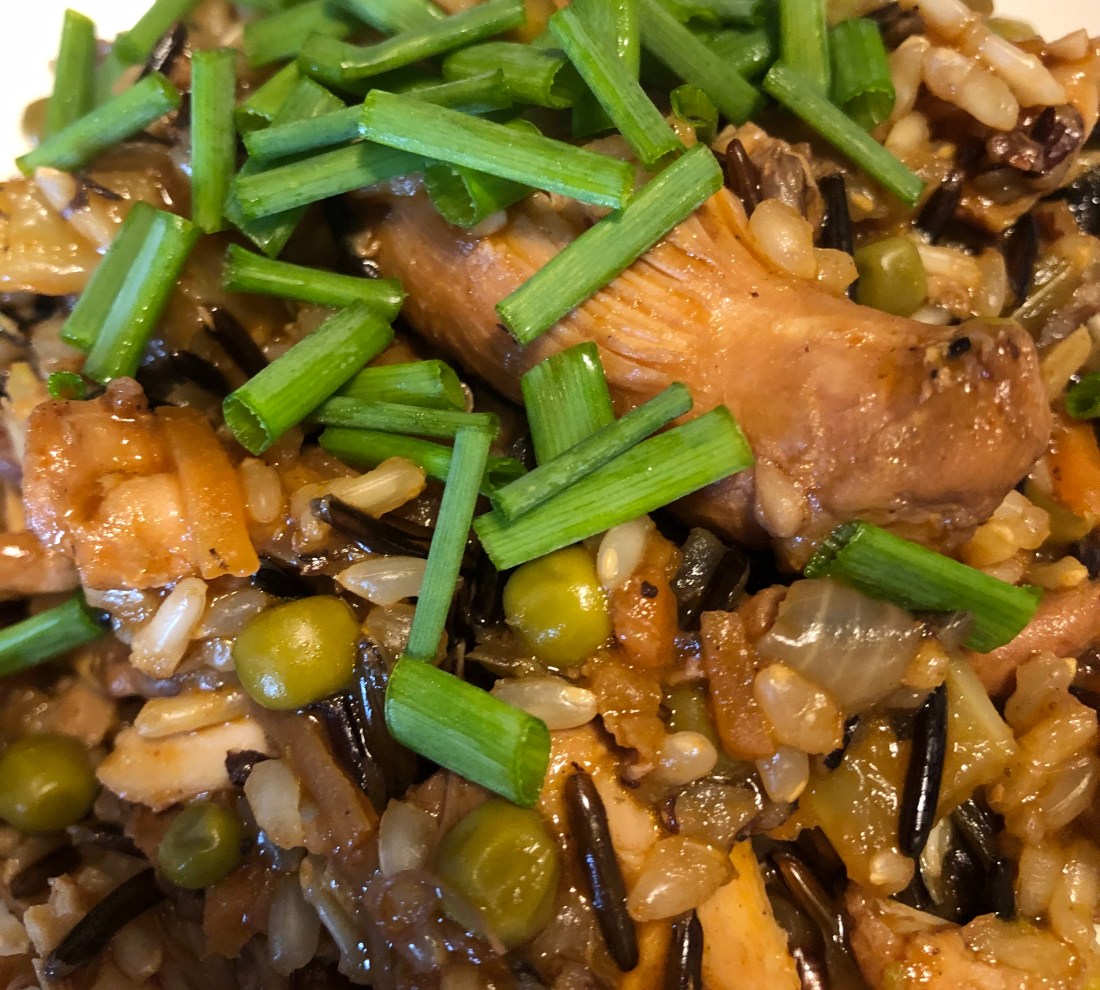
I’ve been making rice with meat for years. It’s a convenient, easy way to stretch meat when you don’t have much of it and lots of people to feed. And a great way to use up extra vegetables because it’s an adaptable recipe where any combination of meat and vegetables works fine. The recipe feeds 6 or 4 generously.

This will be my last blog post for several weeks as I now need to concentrate on finishing my screenplay which was due today but I’m not happy with it yet so have to concentrate on that for the next few weeks.

In a Dutch oven, heat over medium high heat:

2 tablespoons olive oil

Add:

6 boneless skinless chicken thighs or breasts seasoned with salt, pepper and garlic powder (if using breasts cut into large cubes

The object is to brown the meat and build flavor as well as sear the meat to keep all the juices in it. This should take about 5 minutes, 2 1/2 minutes per side. When browned, remove the chicken pieces to a plate and add to the pot:

1 medium onion diced

6-8 stalks of celery diced

1/2 cup chopped carrots (or grated)

1 cup diced mushrooms

Sauté for several minutes until onion starts to brown. Add:

1 teaspoon minced garlic

2 tablespoons tomato paste

1/2 teaspoon ground allspice

1/8 teaspoon ground cloves

2 teaspoons to 2 tablespoons sweet or spicy paprika depending on your taste

2-3 bay leaves

1 cup frozen or fresh peas (if using fresh, add with the rice)

2 cups chicken stock (or, if possible, 1 cup of white wine and 1 cup of stock)*

1 tablespoon date syrup or date sugar

Stir to mix and add the chicken back into the pot along with any juices that are on the plate. Cover and simmer on low heat for approximately a half hour until chicken is cooked. Stir in:

1 cup rice (I used a wild rice blend but feel free to use whatever rice you prefer)

Simmer covered until rice is cooked, stirring frequently to be sure rice doesn’t stick to the bottom of the pot. This should cook out all the liquid but if not, cook uncovered until most of the liquid is gone. If the rice isn’t cooked but the liquid is all absorbed, add 1/4 cup stock and continue cooking covered until rice is done. Remove the bay leaves, taste and add additional salt if needed. Serve garnished with chives.

*If using wine, deglaze the pan with the wine before adding the stock. This will cook off the alcohol.

Carob Filled Cookies

Who doesn’t like chocolate cookies and marshmallow? But those of us with chocolate and egg allergies have long given up such things. Here’s a delicious alternative. Like most allergic friendly recipes, this takes a little more effort than the “normal” but it’s well worth the effort.

For the cookies, line a large cookie sheet (or 2 smaller ones) with parchment paper and preheat oven to 375 degrees. In a small bowl whisk together:

1 tablespoon ground flax

3 tablespoons aquafaba

Let sit for at least 5 minutes. In a medium bowl mix with a hand mixer:

1/2 cup vegan shortening (or margarine) softened

3/4 cup date sugar

1 tablespoon date syrup

Blend until smooth and slightly fluffy. Add the flax gel and

1 teaspoon vanilla extract

Beat until smooth. Add to this mixture:

1/3 cup brown rice flour

1/4 cup sorghum flour

3 tablespoons arrowroot

1 tablespoon potato starch

1 teaspoon xanthan gum (or guar gum)

2 teaspoons Ener-G egg replacer

1/2 teaspoon baking soda

1/4 cup carob powder

1/4 teaspoon salt

Mix until blended, dough will be crumbly. Add, one tablespoon at a time:

Non-dairy milk (I only used 1 but add another one or two if your dough doesn’t come together with the first one)

Form the dough into balls, about 1 tablespoon of the dough for each ball. Flatten them into disks making sure all the disks are the same depth so that they cook evenly. Also make them about the same size since we’ll be putting two of them together with the frosting. Bake about 8 minutes, do not overbake or they will be dry. Cool on tray for a few minutes before moving to a cooling rack.

To make the frosting, in a double boiler (or heat proof bowl over a pot of water if you don’t have a double boiler), mix together over the boiling water:

1/4 to 1/3 cup agave nectar (depending on how sweet your family likes things, remember agave is much sweeter than cane sugar)

1/3 cup aquafaba

1/2 teaspoon cream of tartar

Using a hand mixer on high, beat the mixture for 7-10 minutes until very fluffy and the frosting forms ribbons when whipped. Remove from heat and continue to whip for 2-3 minutes. Add 1 teaspoon vanilla extract and beat another minute. This should be very thick, like marshmallow! I know, when I started making it, I thought this is never going to work, but after about 6 minutes the mixture actually started to form ribbons and after 9 minutes, it was thick and creamy. Continuing the whipping off the heat will make it even thicker. Chill while the cookies cool completely and it will set up even more.

Spread about a tablespoon of the frosting on the bottom of one cookie and let sit until frosting sets up a little before placing a second cookie on the top. Repeat with the remaining cookies. This recipe will make 6-8 pairs.

Orange and Maple Grilled Salmon

This marinade smells wonderful! And what’s not to smell great with fresh orange juice and maple syrup along with some fresh grated ginger. Be sure to have your butcher scale the fish so that you can cut the skin into triangle cuts before cooking without serving scales, not very edible. Makes 2 servings.

Whisk in a small bowl:

1/4 cup fresh orange juice

1 teaspoon orange zest

1 tablespoon maple syrup (or honey)

1 tablespoon olive oil

1 teaspoon minced garlic

1/2 teaspoon fresh grated ginger (or you can use 1/4 teaspoon ground ginger)

Salt and pepper, about 1/4 teaspoon sea salt and just a shake of ground pepper

Pour the marinade into a gallon food storage bag and add the fish. Let the fish sit in the marinade for at least a half hour in the refrigerator. Remove from the marinade and dry the skin side lightly on a paper towel while heating, on medium high heat, a grill pan:

1 tablespoon oil wiped into the pan

Place the salmon in the pan, skin side down. Cook on medium high for 3-6 minutes depending on how thick the salmon filets are before turning them over (the salmon will release easily from the pan when its ready to turn over) to cook on the other side over medium heat for an additional 3-6 minutes (I usually cover the pan at this point for several minutes). And because I covered the pan to make sure the fish cooks inside, I usually turn it over onto the skin side again for a minute on high to crisp up the skin again. Ready to serve.

Braised Pork Loin with Figs and Pears

This recipe takes some time since the pork loin is marinated but worth the effort and wait. The gravy is lick the plate good! Now I’m thinking I should add fruit puree to all my gravies. Yum, yum. Braising cooks food slowly so be sure that the loin is well seared (browned) before cooking so that it doesn’t lose all its juices. And since I love figs and pears, and I know they go well together, I thought how about braising them with the loin. This recipe would also work with a turkey breast or apples instead of pears.

At least 4 hours before the cooking starts, put in a gallon food storage bag:

1/4 cup seasoned vinegar or apple cider vinegar

1/4 cup water

2 tablespoons olive oil

1 teaspoon salt (or herbamare)

1/4 teaspoon ground black pepper

1 tablespoon dried thyme

6-8 dried figs

Add:

1 1/2-2 1/2 pound pork loin

Seal and let sit in the refrigerator at least 4 hours. If you are using a chicken, duck, or turkey breast, you can put this directly into the cooking vessel – either a roasting/baking dish with a cover, or the bowl of a slow cooker.

Preheat oven to 325 degrees if the loin is going in the oven. I cooked mine on the stove top in a medium size Dutch oven. Remove the pork loin (or turkey breast) from the marinade. Dry thoroughly and rub with:

1 teaspoon salt

1/4 teaspoon ground black pepper

2 teaspoons ground cumin

In a 10″ skillet or one large enough to hold the loin, heat:

2 tablespoons olive oil

Turn the oil down to medium heat and add the loin (or turkey breast). Sear (brown) on all sides. Remove the meat and add to the skillet:

1 medium onion chopped

1/2 bag of baby carrots, cut into bite size pieces

1 large or 2 small (I used one small sweet and one small white) potatoes

2 teaspoons minced garlic

Sauté the vegetables for about 5 minutes. Add:

figs from the marinade (or 6-8 other fresh or dried figs)

Add the meat back into the cooking vessel along with:

1 to 1 1/2 cups chicken or turkey stock

Cover the pot or dish and cook over low heat (simmer) until the meat reaches 145 degrees for pork or 165-170 for poultry. On the stovetop in the Dutch oven, my just under 2 pound pork loin took just over an hour. When the meat is cooked, remove the meat and vegetables and add to the stock:

1 diced medium pear (peeled or not doesn’t matter)

If the meat was cooked in the oven, pour the stock into a small saucepot before adding the pear. Turn up the heat to medium and cook, covered, until the pear is soft. Add:

A slurry made with 1/2 cup turkey or chicken stock whisked with 2 tablespoons all purpose gluten free flour

Stir until the gravy thickens and the pear pieces are integrated into the gravy, this should only take a couple of minutes. Cook over low heat for about 5 minutes so that the flour cooks completely. Slice the pork loin (or other meat) and place on a platter surrounded by the vegetables and figs. Pour some of the gravy over the pork and serve.

Prune and Carob Squares

Here’s another bar that’s downright delicious! Not something to eat with fingers, there’s too much soft, gooey filling in them for that. Of course, if wanted, other dried fruit (like dates or figs) would work just as well as prunes and be equally tasty. And like the raspberry bars, refrigerating the baking dish overnight or even for several hours before cutting will help the crust firm up and make removing them from the dish easier.

Preheat oven to 350 degrees. Line the bottom of a 9×9″ baking dish with parchment paper or spray with a non-stick cooking spray. Blend in a food processor:

1/3 cup pumpkin or sunflower seeds (lightly roasted)*

1/4 cup date or coconut sugar

1 cup gluten-free organic old fashioned oats

1/3 cup millet flour

1/2 teaspoon xanthan gum

1 tablespoon cinnamon

1/8 teaspoon sea salt

Pulse until the oatmeal mixture resembles ground nuts or cornmeal. Add:

1/2 cup avocado oil or 1/2 cup melted vegan margarine, or melted coconut oil

Pulse until the mixture begins to form clumps. If the mixture is too dry and doesn’t clump add:

up to 1/4 cup water, 1 tablespoon at a time

Remove from the food processor and add:

1/2 cup gluten-free organic old fashioned oats

1/4 cup hemp hulls (or if nuts are possible, ground nuts)

Stir to combine. Pour half the mix into the bottom of the prepared baking dish and press down to make a firm bottom. Reserve the other half for the top of the bars. In the food processor bowl blend:

1 16 ounce drained can of beans (whatever kind you like, I used chickpeas but any bean will work)

2 cups prune puree**

Blend until the beans are creamy so the softer the bean used, the less time and creamier this mixture will be. Add:

1/4 cup carob powder

1/3 cup date or coconut sugar (if using dates, this added sugar isn’t necessary)

1/8 sea salt

2 tablespoons ground flaxseed

1 tablespoon lemon juice and zest from 1/2 lemon (optional)

Pulse until the mixture is combined. Scoop out and spread on the crust in the baking dish. Cover with the remaining oat mixture and bake 35-40 minutes until the top is browned. Remove and cool on a cooling rack until no heat is felt on the bottom of the baking dish. Refrigerate for several hours or overnight before slicing.

*To roast seeds or nuts, heat oven to 350 degree, place seeds on a dry baking sheet and roast until you smell them, usually not more than a few minutes.

**To make prune puree (or puree with any dried fruit), place the fruit in a saucepan large enough to hold the fruit and enough water to cover it. Bring to a boil over medium heat and then reduce heat to low and simmer, covered, for 15-30 minutes depending on how much fruit used. When the fruit begins to dissolve into the water when stirred, it’s sufficiently cooked. Turn up the heat and boil, uncovered, several minutes to reduce the liquid until, when stirred, very little liquid is visible. If a smooth puree is needed, use an immersion blender. For this recipe, that’s not needed since the mixture will be going into the food processor.

Mint Double Carob Chip Cookies

I revamped this recipe because chocolate and mint is a combination that my grandson absolutely loves! And I have to admit, they are pretty good. Be careful or you won’t have any batter to cook, the raw dough is that tasty!

Makes 24-30 depending on the size.

Preheat oven to 350 degree. Put parchment paper on the bottom of 2 cookie sheets (unless you have a large one that will hold 2 dozen at a time). Lightly spray with non-stick cooking spray.

In a small, heat safe bowl, soak 16-18 dried prunes in boiling water (approximately 1 cup should be enough). Be sure all the prunes are covered. Let sit for at least 5 minutes. While they are soaking, put together the flour mixture in a gallon food storage bag mix:

1 2/3 cups millet flour

1/3 cup sorghum flour

2/3 cup chickpea flour

2/3 cup arrowroot

2/3 cup potato starch (NOT flour)

Seal the bag and shake to thoroughly mix the flours. Be sure to refrigerate the unused flour mixture.

In a medium size food processor add:

Prunes

2 tablespoons of the prune soaking water

1/2 cup date or coconut sugar

1/3 cup agave, honey, date or coconut syrup

1/2 teaspoon mint extract (or about 2 dozen fresh mint leaves torn)

2 teaspoons vanilla extract

1 teaspoon vinegar

Blend until the prunes are smooth and the mixture has combined. Don’t worry if the prunes are entirely smooth since they will continue to blend with the next steps. Add:

1/3 cup avocado, sunflower, palm, or coconut oil (melted)

Blend again until the mixture is smooth. If the food processor is large enough add (if not scrap the prune mixture out of the food process and into a medium size bowl and add the dry ingredients):

1 1/2 cups gluten free flour mix (see above)

1 teaspoon xanthan gum

1/4 cup carob powder

1 teaspoon baking powder

1 teaspoon baking soda

1/4 teaspoon sea salt

Pulse until the flours are combined. Remove the dough from the food processor and stir in:

1/4 to 1/3 cup unsweetened carob chips

Mix thoroughly. Using a tablespoon measure or small cookie scoop, measure out the dough and form into approximately 1 inch balls (although slightly sticky, it’s easy to shape into balls using damp hands). Place the balls on a cookie sheet approximately 2 inches apart and, again with a slightly damp hand, flatten them to about a 1/2 inch in depth. Bake for 8-10 minutes; 8 minutes will give you a chewy, fudgy, softer center while 10 minutes will be chewy but not as fudgy in the center. Cool on the sheet for a few minutes before moving to a cooling rack.

Raspberry Bars

I’ve always preferred making bars instead of cookies, takes less effort and time and tastes just as good. So I was pleased to find a recipe for raspberry bars (my favorite berry) that I think came out pretty good with revamping.

Preheat oven to 375 degrees. Generously grease a 9×9″ baking dish being sure to grease at least a 1/2 inch up the sides. Combine in a food processor:

2/3 cup white rice flour

1/3 cup brown rice flour

3 tablespoons potato starch

2 tablespoons tapioca flour

1/3 cup date sugar

1/4 teaspoon salt

1/4 teaspoon xanthan gum

Pulse until blended. Add by spoonfuls:

2/3 cup shortening or vegan margarine

Pulse until combined and mixture forms pea like bits (it looks a lot like pastry crust. Remove 1/2 cup of the mixture to a small bowl. Press the remaining mix into the bottom and up the sides of the prepared baking dish.

Bake for 15-18 minutes until golden brown. While it’s baking, stir into the 1/2 cup of mix reserved:

2 tablespoons date sugar

1/4 cup hemp hulls (or any seed your family likes such as pumpkin or sunflower, chopped)

1/4 cup gluten-free old-fashioned oats

Set aside. In another small bowl mix:

1 cup sugar-free raspberry jam

1 cup fresh raspberries

zest of 1/2 a lemon

juice of 1/2 a lemon

Stir together, breaking up some of the raspberries, until combined. Spread this over the top of the hot crust when it’s comes out of the oven. Sprinkle the reserved flour/hemp/oat mixture over the top of the raspberries. Bake another 20-25 minutes until the top has browned and the filling is starting to bubble. Cool on a cooling rack and then in the refrigerator at least 2 hours before cutting into squares.

TIP: I left the other half of the bars in the baking dish, covered them and left them in the refrigerator overnight and they came out of the dish much cleaner the next day, keeping more of the bottom layer intact.

Sweet and Spicy Chicken

I’m always looking for new chicken recipes and here’s one that has some sweetness from a touch of honey, agave, maple or date syrup, some spice from the cumin and ground pepper, and a touch of citrus from orange. I was pleasantly surprised at that hint of orange in the flavor, very umami! And quite an easy recipe to make. Any chicken parts can be used however, I would recommend not mixing them so either thighs, drumsticks, or breasts. Serves 2-4.

In a 1 gallon food storage bag (or small mixing bowl, mix together:

1/2 cup sugar free ketchup (such as Organicville)

1/4 cup agave, honey, maple or date syrup

1 teaspoon orange zest (zest from 1 medium orange)

1/3 cup orange juice (from one orange)

1 teaspoon Herbamare (don’t have it? Use 1/2 teaspoon salt and 1/2 teaspoon of your favorite herb mix)

2 teaspoons minced garlic

2 teaspoons ground cumin

1/2 teaspoon ground black pepper

Dash of hot sauce (optional)*

Swish around in the bag (please zip-lock it first!) until combined.

Add:

6-8 chicken parts

Again swish around to be sure the chicken is thoroughly immersed in the marinade. Refrigerate for at least 30 minutes but I left mine for about 2 hours. [If you’re unsure about using the marinade that the chicken sat in, instead of mixing it in the bag, use a small bowl and when you add the chicken to the bag, only add half the marinade and reserve the other half to pour over the chicken for baking.]

Preheat oven to 375 degrees. Spray a baking dish with non-stick cooking spray and dump the entire contents of the bag into it, making sure the chicken is in a single layer in the dish. Bake 30-40 minutes depending on the size of your chicken pieces or until the internal temperature of the chicken reaches 165-170 degrees.

*A dash is generally around 1/8 of a teaspoon.

English Muffins

As I’ve previously mentioned I haven’t had much luck making gluten-free breads. I found a new method in a cookbook entitled The How Can It Be Gluten Free Cookbook. Their flour blend however includes dry milk powder which doesn’t work for those of us allergic to dairy. It’s also heavy on the carbohydrate flours – white rice, potato starch and tapioca. And their English muffin recipe includes eggs and cornmeal (for dusting the muffins). So I gave it a go and here’s what actually worked. I left their flour mixture the same, same ratios without the milk powder.

It took me awhile to try this because it is quite a long recipe and somewhat complicated but I finally decided if I took it step by step it wouldn’t be bad and it wasn’t. In fact, it was quite simple, just took a while to complete all the steps but the tasty muffins are definitely worth it. The frozen ones I was buying were tough on the outside, almost impossible to slice while these are easily split with a fork. Says it makes 10 but I got 11 and several of them are quite small so I think next time I make them, I’ll increase the individual muffins and perhaps only get 9 instead.

Prepare 2 medium size baking sheets by dusting with ground millet (or if you can use it, cornmeal which is the traditional coating for English muffins). It takes approximately 1/2 cup so process the whole millet in a food processor to a medium grind (coarse is too little and fine makes flour which doesn’t work either, we want it the consistency of cornmeal. Sesame or poppy seeds would also work.

In a large bowl combine:

4 tablespoons ground flaxseeds

2/3 cup aquafaba

Let sit for several minutes to form flax gel. While that happens, in a smaller bowl combine:

1 1/2 cups white rice flower

3/4 cup brown rice flour

1/2 cup potato starch (NOT potato flour)

1/4 cup tapioca flour or starch

3 tablespoons powdered psyllium husk

2 tablespoons date sugar

2 1/2 teaspoons instant yeast (or 1 packet which is 2 1/4 teaspoons)

Stir to mix in the yeast before adding:

2 teaspoons baking powder

1 1/2 teaspoons salt

Whisk into the flax gel:

2 cups warm water (approximately 110 degrees)

2 tablespoons oil or melted vegan margarine

In increments, with a hand mixer or heavy spoon (stand mixer would be better with a paddle if you have one), mix the flour mixture into the wet mix. When it gets too thick for the hand mixer, use your hands (with gloves) and keep mixing until the dough comes together. It’s about the consistency of cookie dough.

With wet hands form about 1/3 cup of dough into balls (I’ll probably do 1/2 cup of dough next time) and set them on the dusted baking sheets widely spaced, about 5 per sheet (so they have room to rise). I heated my oven by setting it at 170 degrees for approximately 2-3 minutes before turning it off. Cover the muffin balls with a clean kitchen towel and place in a warm place to rise for about 1 to 1 1/2 hours.*

Remove them from the oven and make sure the rack is on a lower-middle setting. Preheat oven to 350 degrees. Uncover the dough and using a greased spatula, flatten the balls to approximately 3/4 inch disks. Dust the tops with the millet (or cornmeal).

Spray a 12″ skillet with non-stick cooking spray. Heat over medium heat before placing 4-5 muffins in the pan. Brown over medium heat and brown on each side (about a minute per side). Repeat with the remaining muffins. If the muffins begin to puff up, gently press them down, doming isn’t what we want and means you’re probably cooking them too long. Transfer to a clean baking sheet lined with parchment paper.

Bake until firm, about 30-35 minutes, rotating baking sheet half way through cooking. Cool on a cooling rack for at least 15-20 minutes before splitting with a fork and toasting. Store unsplit muffins in a zip-lock bag for up to 3 days. I put 2 per sandwich bag, sucked out the air and then put the sandwich bags into a gallon freezer bag and put the extras in the freezer.

*In a previous life, when I lived in a house with steam heat radiators, I used to place my bread dough to rise on a towel on top of a radiator. It worked quite well as long as the heat didn’t get too hot while they were on there!

Pumpkin Chai Snickerdoodles

Get the feeling I’m really into pumpkin right now! I think it may be because I haven’t been feeling very well and knowing pumpkin can aid in calming an upset stomach, I’m turning to it to help me deal with stomach issues.

I’ve never had a snickerdoodle! Now that I’m allergic to chocolate (actually the caffeine in chocolate), I’m expanding my cookie horizons. Found this recipe on-line and thought it easily adjustable however, the cookies are not the easiest to make, especially if you’re new to cookie baking or don’t have a stand mixer like me. Treat them much like you would a peanut butter cookie – roll in sugar and then use a fork to flatten the balls.

Make Chai Sugar by mixing together:

1/3 cup date sugar

2 teaspoons cinnamon

1/2 teaspoon ginger

1/2 teaspoon allspice

1/2 teaspoon ground cardamom

1/4 teaspoon ground cloves

Set aside. Preheat oven to 375 degrees. Line 2 cookie sheets with parchment paper. In a large bowl mix:

1/3 cup aquafaba (if you don’t have a can of garbanzo beans handy or powdered aquafaba, substitute water)

2 tablespoons ground flaxseed

Let sit for several minutes to form flax gel and then add:

1/2 cup vegan shortening or margarine (I use Spectrum shortening)

1 cup date sugar

With a hand or stand mixer, beat on low/medium until the mixture is combined and almost fluffy. Add:

1/2 cup pumpkin puree

1 teaspoon vanilla

Mix to combine and then add:

1 cup all purpose gluten free flour

1/2 teaspoon baking soda

1/2 teaspoon salt

1/4 teaspoon allspice or nutmeg

1 teaspoon xanthan gum

Mix to combine before adding:

1 cup all purpose gluten free flour.

At this point, unless you have a stand mixer, it’s best to continue mixing with a large spoon or even, if you’ve washed your hands or are wearing gloves, with your hands. Mixture will be quite crumbly until all the flour is worked into the dough. The consistency reminds me of gingerbread cookies or sugar cookies. I used my hands and found the mixture combined quite easily. Scoop out by tablespoonful and roll into a ball (so you have to use your hands anyway!). The mixture shouldn’t be at all sticky but if it is, add a little more flour, 1 tablespoon at a time, until the stickiness is gone.

Roll each ball as you make them into the chai sugar mixture and place 1-2″ apart on the cookie sheet. When the sheet is full, using a fork, press down each ball into a flat disk.* Bake 8 minutes then check. If the cookies have puffed up (domed), flatten more with the fork. Bake an additional 2-3 minutes until the outside of the cookies are firm while the inside is still slightly underdone. Cool on sheet for several minutes before moving to a cooling rack.

*If you prefer, bake the balls for 8 minutes and then flatten them with the fork. Their appearance differs and I found the ones I flattened before baking were chewier. The smoother ones were flattened before baking (on the right) while the ones flattened after baking were rougher looking (on the left).