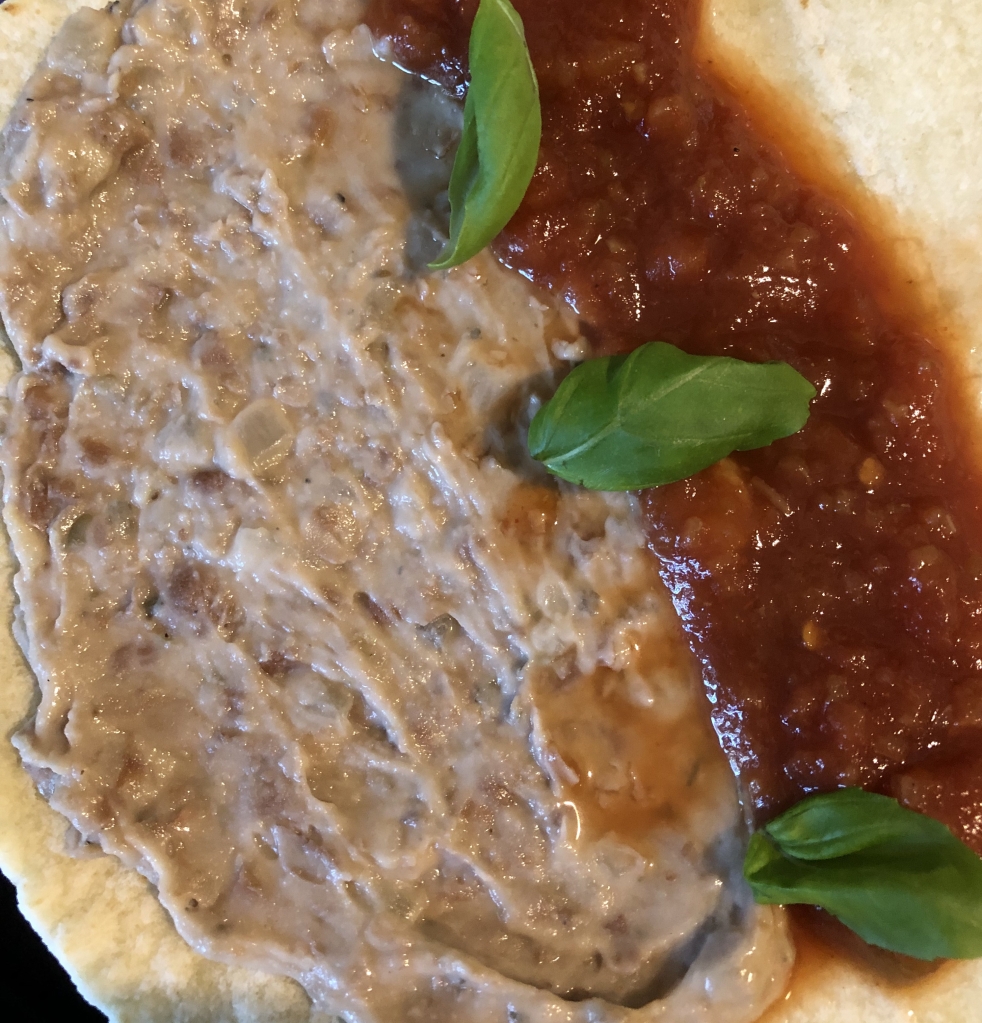
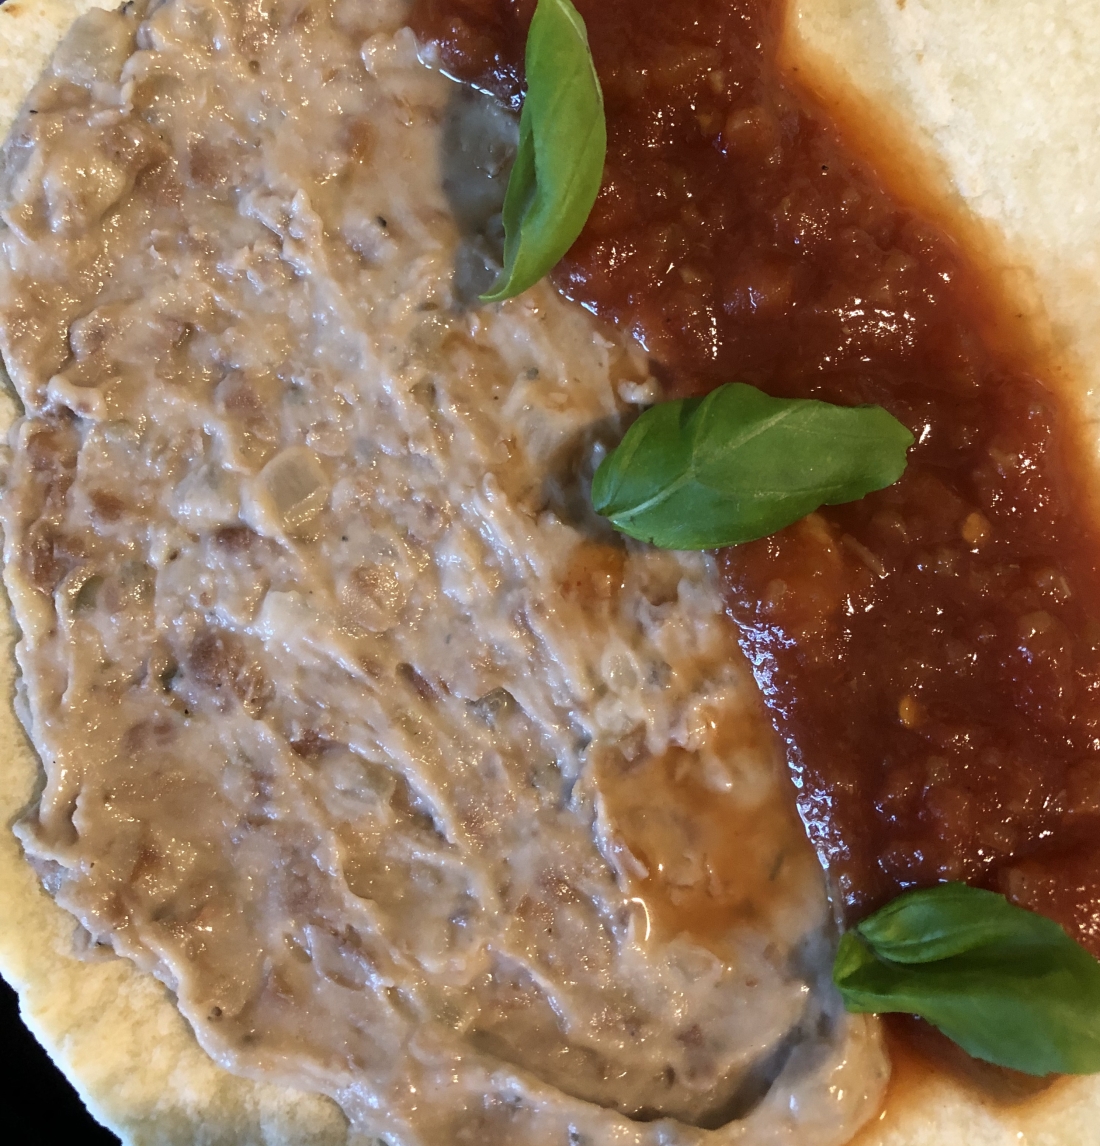
Mango Chicken Salad

Before I get to the recipe, I want to apologize to all my followers for the lack of posts the past several months. Mid-February was hectic with finishing packing up my apartment and then moving in with my son and his family. I finally unpacked the last of the boxes last week and feel at home once again. I’ve been collecting new recipes the past three months and will get them posted this coming week. But lets start with one of my favorite foods – chicken salad.

I eat a lot of chicken salads this time of year and I try to vary the flavors to make them more interesting. I alternate between vinaigrette and mayonnaise based salads. I’ve also changed them by doing a honey mustard vinaigrette, a creamy cole slaw dressing as well as an avocado one.

Several days ago while at my local market, I found some very ripe mangos and wondered how they might taste in my chicken salad. So I peeled and cut them up in my food processor, added the vinaigrette ingredients and tried mixing a small amount into a little chicken salad mix. Delicious!

If you haven’t tried mango, think of a peach on steroids. But be sure they are ripe or their sweetness doesn’t come through. Right now the yellow variety is in season so look for one that is completely yellow and getting soft to the touch. When ripe, the skin will pull right off once started with a knife.

Start either with the chicken or the mango dressing, either way works.

For the mango vinaigrette, in the bowl of a food processor or blender add:

2 peeled and sliced mango (not the seed of course)

1/4 cup olive or avocado oil

2 tablespoons mustard (whatever kind your family prefers)

2 tablespoons date syrup

1/4 cup rice vinegar (if using a different vinegar, probably use less since the rice is very mild)

1/2 teaspoon salt

1/4 teaspoon pepper

Blend until no lumps of mango remain. Makes about 1 1/2 cups of vinaigrette. That’s enough to make about five cups of chicken salad. I used a rotisserie chicken that was missing it’s wings and one thigh and leg.

About 4 cups chicken

3-4 stalks celery

1/2 cup pumpkin seeds (or another nut if you can have them)

1/2 cup shredded carrot

1/2 cup cooked peas

I like to grind the chicken, celery, pumpkin seeds and carrots in the food processor which makes a smoother salad. It’s a trick a friend who worked for a caterer taught me. Easy then to stuff it into a hollowed out tomato. It also makes a creamier sandwich.

Makes approximately 6 cups of salad.

Asian Style Lemon Chicken with Vegetables

One of my favorite Italian dishes is Lemon Chicken. I also love Asian chicken and looked on-line for a recipe but of course, with all my allergies, I didn’t find one that would work. So here’s my own recipe. I added a bunch of vegetables so that it’s a balanced meal. It can be served with either rice or noodles. Serves 4 generously.

Cut into chunks:

1 1/2 pounds boneless, skinless chicken breasts

Put the pieces into a large food storage bag and add:

1/4 cup arrowroot

Shake to cover the chicken completely with the arrowroot, adding a little more if necessary. You may need to separate the pieces during this process to be sure they are completely covered with the arrowroot. Let sit in the refrigerator for about a half hour. In a large skillet, heat over medium heat:

2 tablespoons olive oil

1 tablespoon sesame oil

When hot but not smoking, saute:

1 medium onion, diced

6-8 stalks celery, sliced on the diagonal (I use celery hearts so if using a whole celery, you might use less stalks)

8 ounces of sliced mushrooms

3/4 cup grated carrot (or 2 carrots thinly sliced on the diagonal)*

Reduce heat to low medium and continue to saute until the onion is translucent. While the vegetables cook, combine in a 3-4 cup bowl:

grated lemon rind from 2 lemons

1/2-2/3 cup fresh lemon juice (about 2 1/2 lemons)

1 cup chicken stock

1/4 cup date sugar (or agave or coconut nectar, honey)

1 tablespoon garlic puree (or 2 teaspoons minced garlic)

2 tablespoons arrowroot

Whisk until well combined and set aside. Heat in a deep skillet over medium high heat:

2-3 inches oil (I use a combination of olive and avocado oil)

Add to the vegetables:

1 cup bean sprouts (I used canned and drained the liquid before adding them)

1 can chopped or sliced water chestnuts

1 can sliced bamboo shoots

Stir to combine and add the sauce mixture, after whisking again. Stir as the sauce thickens, about 1 minute. Reduce heat to simmer or remove from heat. In 2 batches, fry the chicken pieces being sure to separate them into individual chunks before frying. Fry until browned on each side, about 4-5 minutes depending on the size of the pieces. You will probably need to reduce the heat to medium as the frying continues or the oil will get too hot to completely cook the chicken before it’s too brown on the outside. Drain each batch on paper towels and salt before adding to the vegetable mixture. After stirring in the second fried batch of chicken, the dish is ready to serve and should still be hot but if it’s cooled, reheat for 1-2 minutes over medium. Serve over rice or noodles. Garnish with sesame seeds and/or sliced scallions.

*Of course, other vegetables can be used such as bok choy, pea pods, string beans, etc.

Fish Casserole

I baked a beautiful halibut fillet yesterday but it was too much for just me. I’ve had a craving for tuna casserole for several weeks now so decided to mix the leftover halibut in with the tuna and wow, what a delicious, warm, comforting bite. I grew up on things like tuna casserole since my mother worked as a teacher and I began helping her cook meals when I was about ten. This was always a quick and easy meal to put together, but of course, we used canned soup and tuna along with frozen peas and regular pasta. Nothing I use today except the canned tuna and frozen peas. I find having grown up on it and not having fresh tuna until I was well into my 20s, that I prefer the canned stuff even though it’s not politically correct these days to use it. Feel free to use fresh if your family prefers it.

Preheat oven to 350 degrees. Spray a casserole dish (I found that my 12″ deep skillet made just enough to fill my 9x9x3″ baking dish). Put 3 quarts of water on to boil in a large pot. Chop either by hand or in a food processor:

1 small onion

4-5 stalks celery

8 ounces of baby bella mushrooms

2 medium carrots

Over medium heat, heat 1 tablespoon olive oil in a 12″ skillet with deep sides. Add the chopped vegetables along with:

1 cup frozen peas (or fresh if you have them)

2 cloves of garlic, minced

Salt and pepper to taste

1 teaspoon dry thyme

Cook, stirring occasionally until onion is translucent and carrot is softened, about 5 minutes. In the meantime, add one box (4 servings) to the boiling water of:

gluten-free pasta (I used a mixture of the heart of palm linguini which I love and some brown rice pasta)

Cook per package instructions. When the vegetables are ready, add:

2 cans tuna (I use the Safe Catch, low mercury brand that you don’t drain)

about 1/2 pound cooked white fish (such as halibut, haddock, cod), flaked

1 cup chicken stock (another 1 cup below for a total of 2 cups of chicken stock or fish stock if you have it)

In a small bowl, combine:

1 cup chicken stock

2 heaping tablespoons all-purpose gluten-free flour

Combine with a whisk until smooth before adding to the vegetables. Stir constantly until mixture is thickened. Add the strained pasta and place in the prepared baking dish. Top with a bread crumb mixture or French fried onions if desired. Bake for approximately 30 minutes. Serves 4.

Asian Pear Coleslaw

I love coleslaw, probably even more than potato or pasta salad. It’s often my go to vegetable if I have everything on-hand. But when my stomach started have a bad reaction to leafy green vegetables, I found it more difficult. At the store the other day, they had some small red cabbages. Red ones I can eat so I bought one, about 3-4 inches in diameter, just enough for a couple of servings of coleslaw. It’s also Asian pear season so I’ve been buying them as well and wondering what to do with them since I always seem to buy more than I can eat just as fruit, especially since the ones I find at the market are extra-large in size. So, of course, this recipe seemed ideal. Feel free to use any cabbage you like be it green, Chinese or red or any combination thereof. I’m rather lazy when it comes to chopping these days with my two rotator cuff tears so I chopped everything in the food processor. Feel free to do the chopping whatever way you like.

In the bowl of a food processor, add:

1 small cabbage, cut into chunks after removing the tough core

4-5 trimmed scallions

1 small or 1/2 of 1 large Asian pear (or slice into thin slices for more crunch)

2 stalks celery, cut into chunks

Pulse until chopped to your liking. Remove the chopped vegetables to a medium bowl. Set aside. In a blender combine:

1/4 cup extra virgin olive oil

2-3 teaspoons roasted pumpkin seeds (or sunflower seeds)

Juice of 1 lemon (about 1/4 cup)

1 tablespoon mustard (whatever type your family likes)

1/4 teaspoon salt

1/8 teaspoon ground black pepper (a dash or pinch)

2 teaspoons maple or date syrup

Blend until most of the seeds are ground and the olive oil is emulsified, about 1 1/2 to 2 minutes depending on your blender. Pour dressing over the cabbage mixture and combine. Makes 4 servings. To serve garnish with:

1/4 – 1/3 cup roasted seeds

Non-dairy cheese (optional)

Seafood Capellini with Lemon Sauce

Bought some beautiful scallops the other day and wondered what I could do with them. I also had a jar of crabmeat in the refrigerator and since I’ve been carving some seafood pasta, I decided to try something a little different. Generally, one can’t mix lemon juice with dairy since it curdles the milk. However, we don’t use dairy milk but plant-based milks so that doesn’t apply here. Basically, I made a white sauce with oat milk, grated in the rind of one lemon and stirred in the lemon juice, added the seafood and voila! Feel free to use whatever pasta and seafood your family enjoys.

First, put on a pot of water to boil for the pasta. Cook pasta according to box instructions. Also in a small pot, boil (or steam):

1 cup frozen green peas

Next, in a medium saute pan, heat over medium high:

1/4 cup olive oil

When the oil is very hot add:

8-10 sea scallops (dried thoroughly)

Reduce heat to medium and saute on each side for approximately 1-2 minutes depending on the thickness of the scallops. Remove from the heat, reduce heat to medium low and stir in:

1/4 to 1/3 cup gluten-free all-purpose flour

Stir to combine the two, the flour should absorb all the oil. Stir while it cooks for 1-2 minutes. Add:

Grated rind of one lemon

Juice of 1 lemon

1 1/2 cups non-dairy milk (NOT soy)

Salt and pepper to taste

Whisk to combine and continue whisking over low medium heat until the mixture thickens. Stir in the seared scallops and whatever other seafood your family likes. Add cooked pasta and strained peas. Serve immediately.

Air Frier Turkey Tenderloins

With all my food allergies, protein is difficult sometimes. And since I live alone, most meats except for individual things like pork chops or chicken pieces are always too much for one meal. So when I find turkey tenderloins, I always buy several packages and freeze the tenderloins individually. And then look for new and different ways to cook them. If you have an air fryer, this is so easy and quick. Otherwise, it could be cooked in the oven but it’ll just take a little longer. Of course, the essential thing about tenderloins, whatever type of animal they come from is not overcooking them and drying them out. This air fryer method worked very well for that. And, of course, this rub works on any protein, not just animal. And try mixing it up with different herbs and spices.

Preheat air fryer at 400 degrees for about 5 minutes.

Spray the air fryer basket with non-stick spray.

In a small bowl, combine:

1 teaspoon paprika

1 teaspoon garlic granules (or powder)

1/2 teaspoon dried thyme

1/2 teaspoon sea salt

1/4 teaspoon ground black pepper

1 teaspoon dried sage

1/2 teaspoon onion powder

Using paper towels, dry:

2 turkey tenderloins

Once dry, rub with:

1-2 tablespoons olive oil

Then sprinkle the rub mixture over the tenderloins being sure to coat both sides. Using dry hands, rub the herb mixture into the tenderloins. Place in the air fryer basket and cook for 12-15 minutes. Turn and repeat. Check turkey temperature (should be at 165 degrees) before removing. Let rest about 5 minutes before slicing.

Herbed Baked Chicken Breasts

This is a tasty, easy and quick recipe. Feel free to change up the herbs you use so that you get the flavors your family prefers. I like thyme and marjoram so those are the two I used but the paprika and garlic powder are staples for this recipe. It only takes a couple of minutes to get the herb rub together and cut the breasts in half (lengthwise) so total, this recipe takes less than a half hour before ready to eat.

First, preheat oven to 425 degrees. Line a baking sheet with parchment paper. Dry off:

2 chicken breasts, about 6-8 ounces each

Using a long knife, hold a breast upright against the palm of your hand and cut in half to produce two approximately equal portions of chicken breast. Repeat with the second breast. Next place the breasts on the prepared baking sheet and sprinkle with:

1-2 tablespoons olive oil.

Rub to coat the breast pieces evenly. Wash your hands. Next, in a small bowl combine:

1 teaspoon paprika

1 teaspoon dried thyme

1/2 teaspoon dried marjoram

1/2 teaspoon garlic powder

1 tablespoon date sugar (or coconut sugar)

3/4 teaspoon sea salt

1/2 teaspoon ground black pepper

Sprinkle the herb mix on one breast at a time and rub to coat. Repeat until all pieces are covered on both sides. I sprinkled all the breasts at once so by the time I got to the third one, the herb rub was a paste instead of dry. That’s why I suggest you sprinkle the rub on one piece at a time! Bake for 15-20 minutes, or until internal temperature reaches 165 degrees. The time needed will depend on the thickness of the breast pieces. My pieces were about a 1/2″ thick and took around 16 minutes. Don’t overcook or the breasts will be dry. Be sure to let the meat rest for about 5 minutes before cutting. Serves two generously.

Asian Glazed Sea Bass with Bok Choy

My favorite fish is Chilian sea bass. I don’t have it often obviously because it’s also about the most expensive fish. But it was on sale this week so I had to buy some and of course, then I had to find a new way to cook it. I’d also bought some Bok choy so this recipe popped out at me when I did a search. Hope you enjoy it as much as I did. It’s pretty quick and easy, just be careful making the glaze since it should be brushable, not gloppy.

First, preheat oven to 400 degrees. Line a baking sheet with parchment paper. Next, clean:

4-6 baby Bok choy (remove ends, wash thoroughly and dry)

Place the Bok choy on the baking sheet. Heat over medium high heat in a 10″ oven-safe skillet:

1 tablespoon olive oil

When the oil is shimmering add:

2 sea bass fillets, about 6 ounces each (be sure to scale the fish, wash and dry the fillets, remove the bones if desired)

Sear in the oil for about 6-8 minutes until skin easily separates from the pan. Flip over to flesh side and place in the oven for approximately 12-15 minutes until almost cooked (flesh flakes easily when cooked). Sprinkle the Bok choy pieces with:

2 tablespoons olive oil

1/2 teaspoon sea salt

1/4 teaspoon ground black pepper

Add to the oven and roast for about 15-18 minutes. While the bass and Bok choy cook, make the glaze. In a small saucepan add:

1/2 cup soy sauce substitute

1 tablespoon rice vinegar

2 tablespoons honey (or maple, agave or date syrup)

1/2 teaspoon sea salt

1 tablespoon sesame seeds

1/2 tablespoon arrowroot mixed with 1 tablespoon water (a slurry)

Cook until just thickened. Don’t overcook! Set aside until the fish is just about cooked. Remove the fish and Bok choy from the oven. Brush each with a generous amount of the glaze and return to the oven for another 3-4 minutes. Serve immediately. Garnish with the greens from the scallions.

TIP: I had some glaze left over and the next day cooked some green beans (saute in a little olive oil until tender). When thy were cooked, I poured over the 1/4 cup of remaining gaze. Oh succulent and full of umami!

Asparagus with Prosciutto

I love asparagus but don’t eat it often because my doctor forbids it. But this is such an easy and delicious recipe that I just had to have some. If you like salty, you’ll love this dish. And it’s so simple to make! Takes about 10 minutes. Serves 2-4.

First, clean your asparagus, wash the spears and break off the tough ends. If the cladodes* are large, remove them by plucking them off or peeling the spears. In a 12″ skillet heat over medium heat:

1 tablespoon oil

When it shimmers, add:

1 pound prepared asparagus

Sprinkle the asparagus with:

1/4 teaspoon sea salt**

1/8 teaspoon ground black pepper

1/8 – 1/4 teaspoon garlic granules (or add 1 teaspoon minced fresh garlic)

Stir the asparagus to distribute the seasonings and let cook for 1-2 minutes until tender but still firm and doesn’t fall down when you pick it up with the tongs. Remove from the pan onto a plate and place in a warm oven while you cook the prosciutto. Into the same skillet, add:

5 slices prosciutto, cut into pieces (or cook whole and cut afterwards)

If cooking the prosciutto whole, be sure to separate the pieces. Most pre-packaged prosciutto contains about 5 pieces. Cook until browned and most of the fat is rendered. Remove from the pan. If you didn’t cut it before cooking, chop now. BE CAREFUL – IT CAN BURN VERY QUICKLY AS I CAN ATTEST! Top the asparagus with the prosciutto and serve.

*These are the triangular, tough things on the asparagus spears. They are especially tough when the asparagus is larger than the pencil size.

** If you haven’t heard about the danger of using sea salt, read the article: Himalayan Salt vs. Sea Salt on YouTube.

Quick and Easy Low Carb English Muffin

I posted quite a while ago a recipe for English muffins made with yeast that are truly great and taste just like the original. But they take several hours of prep and quite a bit of work to make. Here, however, is one that is cooked in the microwave and takes about five minutes to put together (only because it takes a few minutes for the flax gel to thicken, if you can use an egg, it won’t take more than 2 minutes to put together. And I was quite surprised at how tasty they were. The recipe makes 2. Do what I say and not what I did – be sure they are cool before toasting them.

In a small bowl combine:

1 tablespoon ground flaxseed

3 tablespoons warm water

Whisk together and set aside. Grease (I used 1 teaspoon olive oil in each ramekin) 2, 3″ ramekins and set aside. In a small bowl (about 2 cups) combine:

1 tablespoon oil, vegan butter or margarine

2 tablespoons seed or nut butter

Microwave for 30 seconds to 2 minutes (depending on the kind of butter you use; my homemade pumpkin seed butter took a little over 1 minute). Whisk to combine and add:

2 tablespoons all purpose, gluten-free flour

1/2 teaspoon baking powder

1/8 teaspoon sea salt

1 tablespoon non-dairy milk

the flax gel (or 1 egg)

Whisk to combine before dividing equally between the two ramekins. Microwave for 1 to 1 1/2 minutes, remove and flip the muffins over in the ramekin (use an offset spatula). The bottom that is now the top looks wet. Microwave for another 30 seconds to 1 minute (smaller ramekins will take longer than larger ones). A toothpick inserted in the middle should come out clean and the top should look dry. COOL COMPLETELY! before toasting. And enjoy.