Grilled Duck Breast with cherry plum sauce

What a wonderful thing a duck breast is — however unforgiving!  Just a few seconds and you’ve overcooked it.  Your duck breast should be cooked to medium (although my brother likes his medium rare).  Remember when you’re grilling it that it will continue to cook a little while you let it rest after removing it from the heat.  One breast per person is a serving.

For 2 people:

  • 2 duck breasts, removed from package and dry on a paper towel.  If they are bloody, I usually rinse them under cold water before drying on a paper towel.  Score the fat cap (I do one cut lengthwise and then several cuts across each breast).  Salt and pepper to taste — remember that the salt will help render the fat so salt that side a little more liberally.

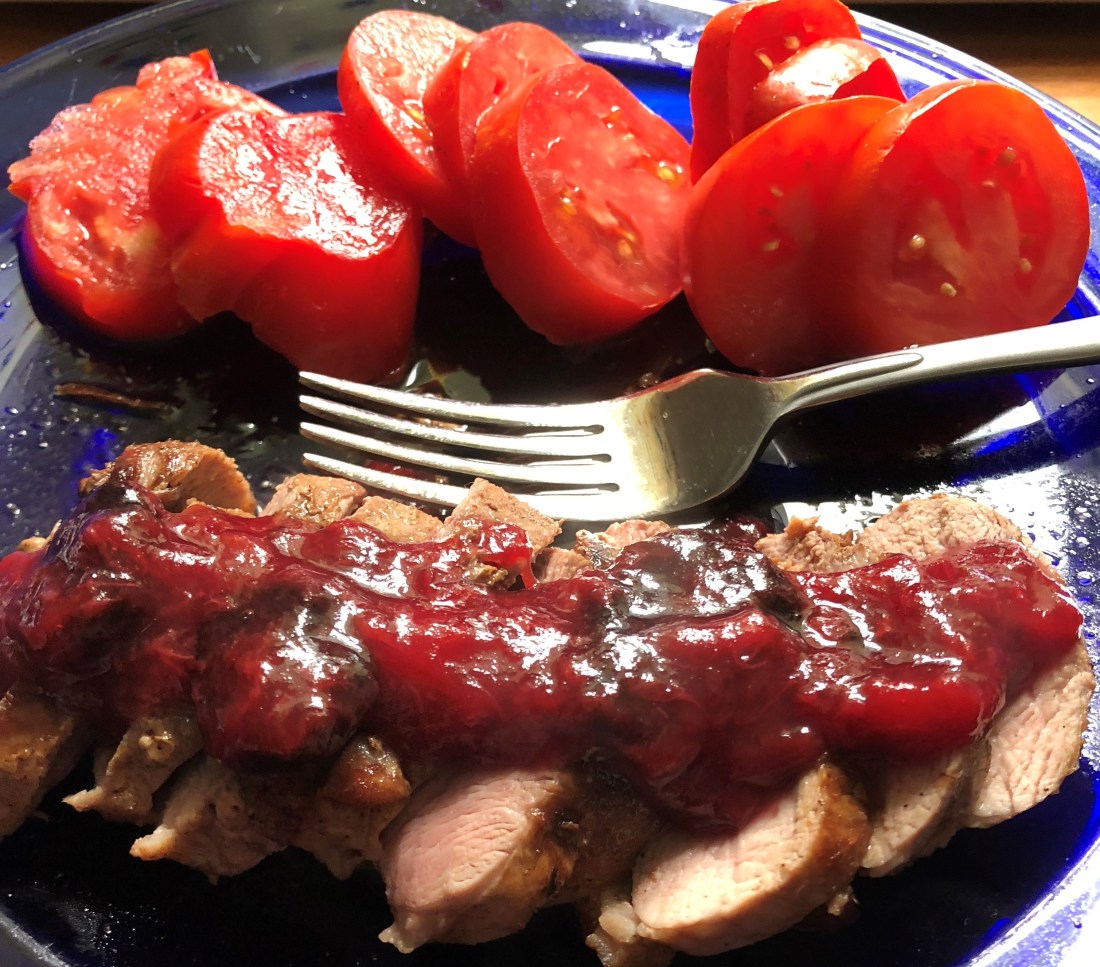
Heat a grill pan, or your outside barbecue grill, over a high heat.  Once it is very hot, add your duck breast(s) fat side down and reduce heat to medium.  Cook for 5 minutes on the fat side and then turn over for a minute to sear the meat side.  Turn it again to the fat side, cover and cook for another 4-5 minutes.  Remove cover and let cook another 2-5 minutes depending on doneness.  The breast should give slightly when cooked to medium.  The more give, the rarer the meat.  Remove from pan and let rest 3-5 minutes before slicing.

While the duck is cooking, dice one red or purple plum and put in a small saucepan with a 1/4 cup of water.  Add 6-8 pitted cherries (I actually had some dried bing cherries in the cupboard that I used).  Cover and cook on medium low heat for 8-12 minutes until the plums are soft enough to mash.  The skin will melt into the sauce.  If you prefer, blackberries would also go very well with the plums and the duck.

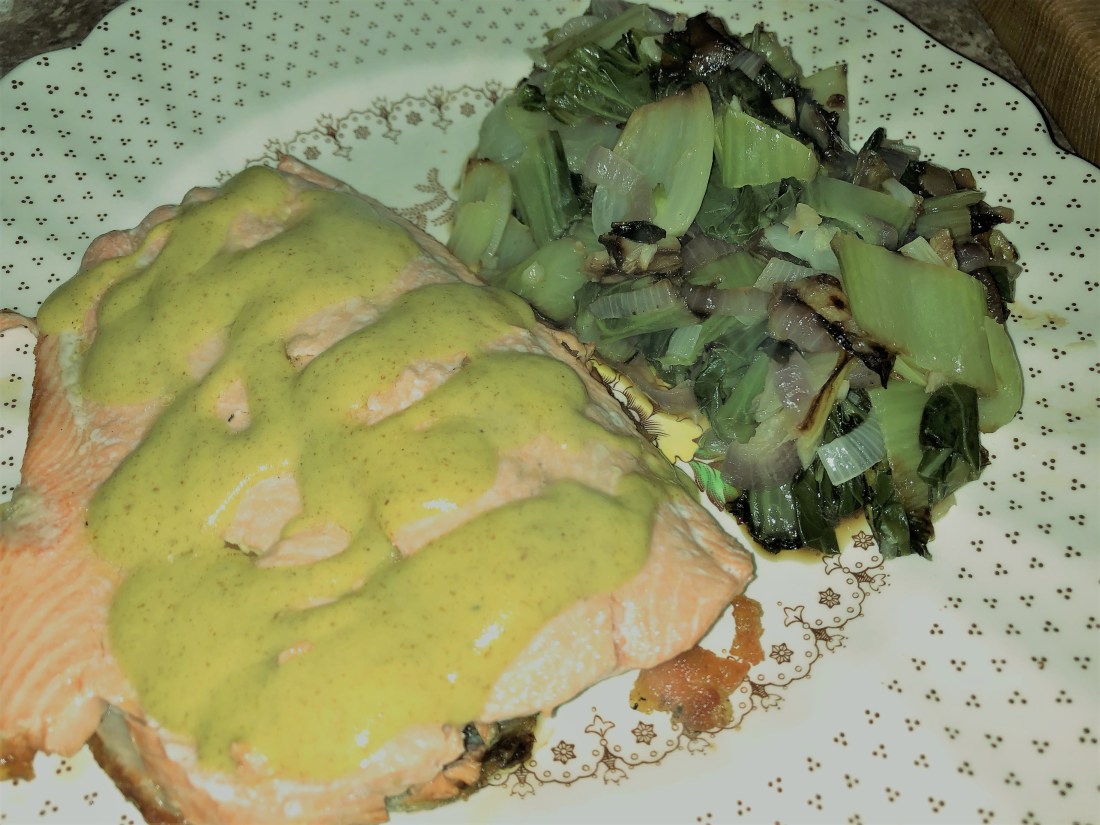
Duck goes really well with lots of sides.  I usually serve mine with the celery root and parsnip mash along with some sautéed bok choy, green beans with garlic sauce, maybe even some of our fresh tomato slices or a small tossed salad.

Gluten-Free Fried Chicken (dairy-free, gluten-free, egg-free, soy-free)

Who doesn’t like fried chicken (except perhaps vegans).  Its one of those comfort foods that I don’t make for my family very often but every once in a while we have a craving for it and of course, being allergic to gluten, dairy, and eggs, we can’t just go buy some fried chicken, never mind not knowing what its been fried in.  But its really easy to make at home,  and takes a half hour to 45 minutes depending on the size of your chicken pieces, plus some prep time.  I like to serve it with some sliced tomatoes from our garden along with sautéed squash (see recipe under side dishes).

You’ll need, for 4 servings:

  • 3-4 pounds of chicken pieces depending on how much your family eats; I used thighs and legs since that’s what my husband prefers but breasts work as well, trim off the excess fat and skin — for my husband and I, I used 3 legs and 2 thighs and we had 1 leg left over
  • Non-dairy milk to cover
  • 1 tablespoon of vinegar
  • 2 food storage bags
  • Flour mixture (see below)
  • at least 1 deep fry pan and maybe two if you have more then will loosely fit into one pan, electric if you have one OR a fry thermometer
  • Oil for approximately 2 inches in each pan (I used my olive oil)
  • Meat thermometer

About 2-4 hours before you plan to cook the chicken, place it in a gallon food storage bag covered with your choice of milk plus a tablespoon of vinegar.  Let marinate in the refrigerator.

In a deep fry pan, or if you have one, an electric skillet, heat sufficient oil to go about 1/3 to 1/2 way up the chicken pieces.  Heat to 375 degrees.  While the oil is heating, remove the chicken pieces from the milk marinate and wash (I don’t particularly like the taste of vinegar in my fried chicken so I wash off the milk mixture but you don’t have to).

In another gallon food storage bag, put:

  • 1/2 cup Bob’s Red Mill 1for1 GF flour (or your favorite GF flour blend)
  • 1/4 cup brown rice flour
  • 2 tablespoons of tapioca flour
  • 2 tablespoons of sorghum flour
  • Salt, pepper, and herb mixture to taste

Drop the chicken pieces into the flour mixture and shake well.  You’ll probably want to do just 3-4 pieces at a time.  When the oil is up to temperature, add the chicken and fry for 10 minutes, turning once at 5 minutes.  Turn again at 10 minutes and cover the fry pan for 15-20 minutes to cook the chicken through.  Remove the cover and cook another 5 minutes or so to crisp up.  Chicken is cooked when a thermometer registers 165 degrees internally so have a meat thermometer handy.  Remove to paper towels to drain the excess fat (if your fat has consistently been at 375 degrees, the chicken shouldn’t have a lot of excess fat).  Be sure to season your chicken pieces as soon as they come out of the pan.  Do not leave on the paper towels but remove to a serving platter.

Baked Haddock with Tomatoes and Basil

This is my preferred way to eat haddock.  Its so tasty and gives me the acidity that I really like to have with fish.  Takes only about a half hour in the oven to cook.

Add 1 tablespoon olive oil to a 9×12″ oven dish to cover bottom (you can also use an olive oil spay to coat the bottom of the dish; Trader Joe’s has one that contains nothing but olive oil).

Add 1 pound haddock cut into serving size pieces.

Add:

  • 1/4 cup sliced onion
  • 1 teaspoon diced garlic (1 medium sized garlic clove)
  • 12-15 basil leaves, torn into pieces
  • Salt and pepper to taste along with any other herbs you like (I use Mrs. Dash’s original because I like the flavor it gives this fish).

If you’re like me and have an over-abundance of fresh tomatoes at the moment, you can peel and chop 6-8 fresh, medium-sized tomatoes and sprinkle them over the fish.  If not, an 16 ounce can of diced tomatoes works just fine.

Bake at 400 degree for roughly 30 minutes depending on thickness of your fish (if your haddock is very thin, 20 minutes would probably be enough).  This works for any fish, not just haddock, cod and halibut also work great in this recipe.

Serve over red quinoa or brown rice with your favorite veggies.  Sauteed bok choy goes great with this recipe.

Battered Fish (gluten-free, egg-free, dairy-free)

I like baked fish, sautéed fish, and even fried fish although how many of us who are gluten-free often get to eat fried fish!  This makes a very crunchy on the outside, flakey and moist on the inside.  I find that spending a little more and buying the fresh fish produces a much tastier meal than using frozen fish which, I think, gets soggy when thawed out and cooked.

My husband, however, is convinced that the only way to eat fish is fried so I developed this recipe primarily for him.  And he’ll eat more of this than probably anything else I make for him, other than desserts.  For a normal family, this will serve 4; for my husband, this is 2 servings!

In a gallon freezer bag, mix:

  • 1/2 cup gluten-free flour (Bob’s Red Mill 1 for 1 or your favorite all purpose works fine)
  • Salt, pepper, garlic powder, paprika, or other herbs to your taste (this always makes me remember Emeril telling his audience, “I don’t know where you buy your flour, but mine comes unseasoned”).  I generally use about a teaspoon of each except less of the ground pepper.

Cut into serving sized pieces, trying to keep thicker and thinner pieces separated (TIP: so if you have a “normal” piece of haddock, one end is probably thinner than the other and one side is probably thicker than the other so you want to make sure the thicker pieces are cut together so that the fish will cook evenly).

  • 1 pound of fresh haddock, sole, or other white fish, cut into serving size pieces

Add fish pieces to the freezer bag, close, and shake fish until covered in flour.

Mix in a shallow bowl:

  • 1/2 cup gluten- free flour
  • 1/4 cup cassava flour (this adds a lot of crunch to the batter)
  • 1 teaspoon baking powder
  • Salt, pepper, garlic powder, etc., to your taste
  • 1/2 cup club soda, you may need more to get the batter to the proper consistency.

Whisk until blended.  The batter should be the consistency of pancake batter, thin but not too runny.

Add  oil to a 10-12 inch fry pan (or you can use an electric skillet where you can more easily control the temperature); oil should be 1 inch deep in the pan at a minimum.  I always use a combination of avocado and olive oil.

Remove each piece of fish from the flour mixture and dip into the batter.  When the oil is hot (350-375 degrees), add the thicker  pieces first being sure to place them in the oil closest to you first and then ending with the piece of fish away from you.  Cook on each side until golden brown (thicker pieces will take 3-5 minutes per side while the thinner pieces will only take 2-3 minutes per side).  Remove to a paper towel to drain excess oil; salt and serve.

Easy Curried Chicken with Sweet Potatoes (dairy free)

I’m a real lover of curry.  My mother grew up in Jamaica and introduced us to English curry very early on (Jamaica was still a British territory when she lived there).  That’s made quite differently from the Indian and Asian curries I’ve now come to love.  Here’s a quick, easy recipe that serves two but can easily be doubled, etc.

You’ll need:

  • 1/2 to 1 pound diced chicken, depending on your appetite
  • 1 medium or 2 small sweet potatoes, peeled and diced
  • 1 small to medium onion (I used red but it doesn’t matter), diced
  • 2 garlic cloves diced
  • 1 cup diced celery
  • 1-3 teaspoons Madras curry powder [if you want a mild curry flavor, use 1 teaspoon; for a full flavored, slightly hot curry, add 3 teaspoons]; if you use the pre-bottled stuff from the grocery store, you’ll need to add more because those are very bland. Some Whole Foods stores, and probably now some grocery stores, have it in bins where you can purchase the amounts you want.
  • 1-2 tablespoons olive oil
  • 1 cup chicken stock or, if you can use it coconut milk

Heat a medium to large skillet over high heat and add the oil when hot.  When the oil gets hot, turn the heat down to medium, add the curry powder and toast until very fragrant but be careful not to burn it, this should take less than a minute.  Add the diced chicken, onion, garlic and celery.  Cover and cook until veggies are soft and chicken is cooked, approximately 5 minutes.  Add the sweet potato and chicken stock, cover and simmer until potatoes are soft, about 7-10 , minutes.  At this point, you have several choices.  You can remove the cover and let the liquid boil off OR you can add 1/2 tablespoon of corn starch or gluten free flour (all purpose works fine) that you’ve dissolved in 1/4 cup of stock or milk.  That will thicken the sauce.

Plate and garnish with chopped scallions, dried cranberries or raisins along with a quarter of lime.  Curry loves citrus and sweet things so feel free to add cranberries, raisins or coconut, along with nuts (the oilier nuts work best here rather than almonds or macadamias; my mother always added walnuts) for a crunch or put them on the side so they can be added to taste.

Salmon with Bok Choy (dairy-free)

Want a quick meal that is very tasty?  This one can be prepared and cooked in less than a half hour.  Bok choy is one of my favorite vegetables and it pairs very well with a salmon filet.  Here I’ve sautéed the bok choy with some red onion and garlic in a little olive oil and topped the salmon with an easy mustard sauce.  The recipe serves two, or if you’re like me and love bok choy, this serves just me!

You’ll need:

  • 4 small to medium bok choy, washed and chopped
  • 1 small red onion, diced
  • 1 clove garlic
  • 2 tablespoon olive oil
  • 2 salmon filets
  • 1 tablespoon of your favorite mustard
  • 1 tablespoon of your favorite vinegar
  • 1/8 teaspoon stevia (or 2 tablespoons agave or honey, 1/8 teaspoon monk fruit powder,  etc.)

Prepare 4 small to medium baby bok choy by cutting of the lower portion and rinsing thoroughly under cold water.  The bok choy may still have some spots and that’s okay.  Be sure to rinse the green portion as well as the white.  Then slice from bottom to the leaves, you can use all of this vegetable.

Chop one small red onion (I like to half it, then slice it into medium slices, and finally cut each slice in half).  Chop one clove of garlic.

Add 1 tablespoon olive oil to a hot 10-12 inch skillet.  Add the prepared vegetables (bok choy, onion and garlic).  Stir to mix thoroughly and then cover and cook over medium heat for approximately 7-10 minutes depending on how al dente you like them.

Meanwhile, heat a large grill pan or skillet; add a small amount of olive oil.  Wash your salmon filets and dry them with a paper towel.  You will notice that I prefer the thinner slices of the salmon, they cook faster and I find I don’t dry the fish out as much.  Make some slices across the skin side and add, skin side down, to the hot pan.  Reduce heat to medium.  I like to cover the fish and cook for 5 minutes.  I then remove the cover and turn over the fish to cook for another 2-3 minutes until pink inside.

While your salmon and bok choy are cooking, in a small container with a lid put 1 tablespoon of your favorite mustard and 1 tablespoon of your favorite vinegar.  Add a very small amount of stevia (I used about 1/8 of a teaspoon).  Put on the lid and shake until mixed.  Sauce is ready.

Seafood Pasta Salad (gluten-free, dairy-free, egg-free)

This is a recipe passed down from my mother and grandmother.  They traditionally made it for our July 4th celebration along with blueberry muffins since usually by early  in July, we’d have fresh peas as well blueberries in central New Hampshire.  They made it with canned salmon, crab and shrimp but these days fresh or frozen seafood is also widely available.  My mother also always made it with the pasta shells for esthetic reasons but you can use whatever type of pasta your family likes.

You can also make it two ways, like the potato salad and the cole slaw, with either a vinaigrette or mayonnaise.  I prefer the vinaigrette since it has a lighter taste, especially in the July heat.

Mix in a medium sized bowl:

  • 6-8 ounces of cooked salmon
  • 4 ounces of cooked tiny shrimp
  • 6-8 ounces of cooked lump crabmeat
  • 6-8 ounces of cooked peas
  • 3 stalks of celery diced, don’t forget to add the leaves as well — they have a wonderful celery taste
  • 1/4 cup chopped red onion, chives, or scallions
  • 2 cups cooked gluten-free pasta [here I’ve found that the quinoa pasta works the best because it doesn’t get all mushy if it sits for a day; I’ve also gotten into the chickpea pasta to add more protein]
  • 1/2 cup of your favorite vinaigrette [I make mine with 1/2 olive oil, 1 tablespoon spicy mustard, 1/4 cup rice vinegar, 2 tablespoons agave nectar (or 1 teaspoon stevia), and 1/4 cup of water.]; if you need to, you can add more vinaigrette especially if you let the salad sit awhile in the refrigerator since the pasta will absorb the moisture.
  • OR 1/2 cup of your favorite mayonnaise mixed with several tablespoons of cold water [the water will loosen up the mayo and make for a lighter dressing without affecting the taste].
  • Salt and pepper to taste along with some fresh parsley to taste

I like to serve it on a bed of lettuce with some cherry or grape tomatoes as a garnish.  This recipe serves 4.  Delicious!

“Healthy” Chicken Tenders (gluten-free, egg-free, dairy-free)

My husband has always been a big fan of the deep-fried, breaded chicken tenders while I didn’t find them that appetizing.  They always seemed so tough and stringy to me.  These chicken tenders are as far away from that as you can get; delicious and healthy!

Place 1 1/2 pounds of chicken tenders in a bowl and cover with your favorite milk.  Let sit while you make the breading. Preheat oven to 400 degrees if using a conventional oven.  My Cuisinart convection/air fry oven does a beautiful job making these crispy while keeping them fat free.  And they came out so tender, juicy, while remaining crunchy on the outside.

Mix

  • 1/3 cup ground golden flax
  • 1/4 cup gluten-free bread crumbs (make sure they don’t have any sugar in them)
  • 2 tablespoons of chia seeds
  • Salt, pepper and garlic powder to taste (I used approximately a 1/4 teaspoon of each)

Prepare an 8×10″ or 9×11″ baking dish by spraying with a non-stick spray.

Dip each chicken tender into the coating mix and place in the prepared pan.  Bake for 15-18 minutes until chicken feels firm when pressed and coating is a golden brown.  In my Cuisinart, I air fried them for 6-7 minutes and then turned them over for another 6 or 7 minutes.

Serve with your favorite dipping sauce; honey mustard or marinara.

Honey mustard dipping sauce:  whisk together 1/4 cup of your favorite mustard with 3 tablespoons of honey (or agave or coconut nectar).

Turkey Veggie Meatloaf (gluten-free, egg-free)


I’ve always loved meatloaf.  After growing up on a dairy farm, it was a shock in my early forties to become allergic to everything from a cow.  No more meatloaf!  I was devastated.  So I’ve developed a recipe for a beef-free meatloaf that will please any meatloaf lover, and even those who don’t like meatloaf.

Pre-heat over to 400 degrees.  In your food processor, grind up:

  • 8 oz portabello mushrooms (I like to use either  the baby or sliced)
  • 3/4 cup shredded carrots
  • and 1 medium onion cut in wedges.

Once ground, place in a large mixing bowl. Add

  • 1 lb ground turkey breast
  • 1 lb ground pork (or if you don’t want to use pork, use 2 lbs ground turkey, not breast)
  • 1/2 cup Organicville Ketchup made with agave or 1/2 cup tomato paste
  • 1/4 teaspoon salt
  • 1/2 teaspoon ground pepper
  • 1 tablespoon of your favorite herb mixture (i.e., Mrs. Dash or McCormicks)
  • 1/4 cup oat flour
  • 1 tablespoon ground flax

Mix (using your hands is the easiest way) until blended.  Don’t overblend.  Spray an 8×10 or 9×12 pan with non-stick cooking spray.  Place mixture in pan and shape into a loaf.  You can either spread the top with more ketchup or cover with bacon strips.  Add a 1/2 cup water to the pan so that the bottom of your meatloaf doesn’t burn.  Bake for approximately 1 hour until internal temperature reaches 170 degrees.  Let stand 10-15 minutes before slicing.