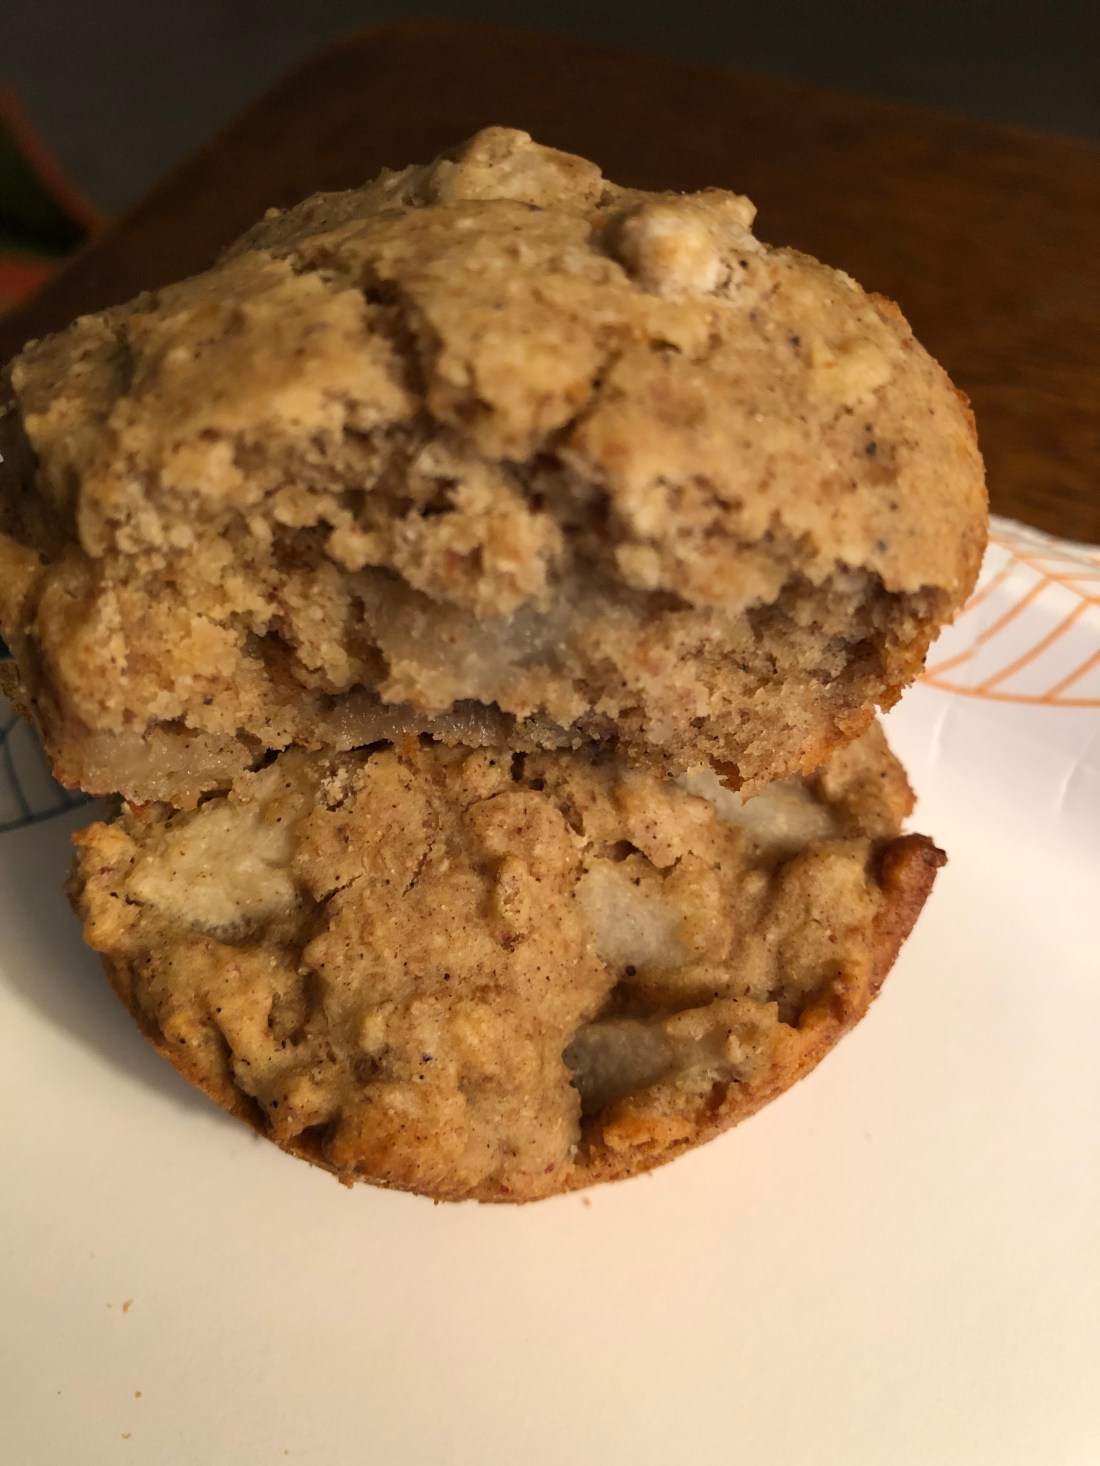
Most gluten-free muffins (and breads) are very gummy, overly moist. These are not! They have a very soft crumb but are not crumbly or overly dry. By finely dicing an Asian pear, these have a great crunch along with the spices. Just delicious! And fairly quick and easy to put together and bake (about 30 minutes altogether). Of course, apple can be used instead of pear.
Preheat oven to 350 degrees. Spray or grease a 12-muffin pan and set aside. In a medium bowl, combine:
1/4 cup avocado oil (or other mild oil)
1/2 cup gluten-free oat milk (or other non-dairy milk)
4 tablespoons pear sauce (1/4 cup + 1 tablespoon)
1 teaspoon vanilla extract
4 tablespoons date sugar (1/4 cup + 1 tablespoon)
3/4 cup finely diced Asian pear (1 small)
Stir to combine before adding:
1 1/2 cup gluten-free flour blend (one with guar or xanthan gum already in it)
2 teaspoons baking powder
1/8 teaspoon salt
1 teaspoon cinnamon
1/2 teaspoon allspice
1/2 teaspoon coriander
1/2 teaspoon ginger
1/4 teaspoon ground cloves
Mix thoroughly until combined. Spoon into muffin cups (about 2/3 full), sprinkle with date sugar if desired and bake for 15-18 minutes until skewer comes out clean.
I’ve been looking at all kinds of recipes for baked “oats”. But none of them have actual oatmeal in them, they all use oat flour. So here’s my alternative. I’ve added some quinoa flour and oat protein powder to the mix to increase the protein content of the pudding as well as increasing the sweetener a little because the flour, at least in my opinion, overrides the taste of the pumpkin and spices. I didn’t think of it until after they were in the oven but adding some roasted pepitas would some crunch.
As a reminder for those of you new to my blog, there are a number of allergen-free recipes here to make your Thanksgiving dinner allergen free such as gluten-free gravy (and fat free), string-bean casserole, vegan pumpkin pie, and a delicious mushroom and Italian sausage stuffing (which I made this year with a loaf of that quick and easy oat bread on the blog).
Lightly grease 6, 6-ounce ramekins and pre-heat oven to 350 degrees. In a medium bowl whisk together:
1 can pumpkin puree
1 cup quinoa flour
3/4 cup oat flour
1/4 cup pumpkin protein powder (or any protein powder you use, vanilla or even chocolate would work)
1/3 to 1/2 cup maple syrup (or honey, coconut nectar, date syrup, etc.)
2 teaspoons pumpkin pie spice
2 teaspoons baking powder
1 cup dairy-free milk (any will do but I would advise against using soy)
1/4 cup roasted pepita seeds
1/4 teaspoon of salt
Whisk until smooth then scoop into the ramekins to about 1/2″ from the top. Dust top with more pumpkin pie spice. Place on a baking sheet and bake for 15-17 minutes or until set.
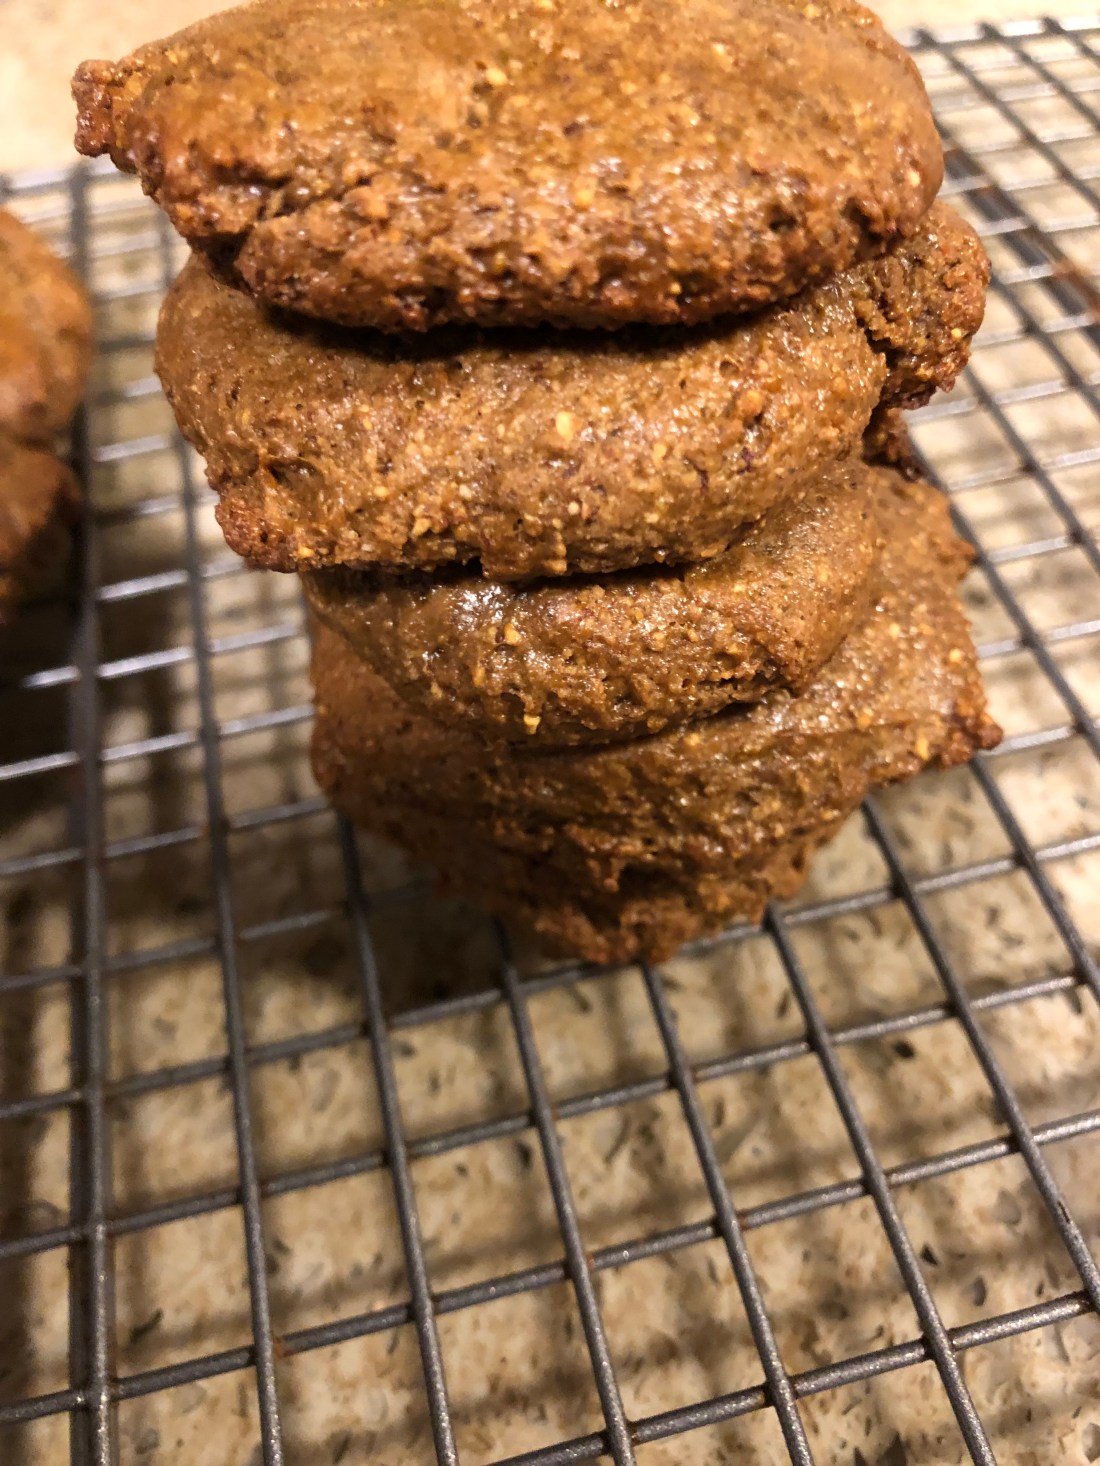
It’s that time of year again! Time to pull out the gingerbread recipes along with all the pumpkin and spices. Here’s a very easy ginger cookie recipe that takes very little time to throw together and only 10 minutes to bake so in a mere 20 minutes you’ve got cookies – just as quickly as any tube of cookie dough you buy in the grocery store. And oh so delicious!
Preheat oven to 350 degrees. Prepare a large baking sheet by covering with parchment paper. In a medium mixing bowl combine:
1 tablespoon ground flax
3 tablespoons warm water
Stir to combine and let sit for a minute or two until a gel forms. Add:
1/2 cup pepita butter (or sunflower butter, tahini, etc.)
1/3 cup date sugar
2 tablespoons molasses
1 teaspoon vanilla extract
Using a hand mixer, mix until fully combined. Add:
3 tablespoons all-purpose gluten-free flour
1/4 teaspoon baking soda
1/4 teaspoon sea salt
1 1/2 teaspoons ground ginger
1/4 teaspoon allspice
Using a spoon, mix in the dry ingredients. This is too thick for the hand mixer. When combined, using a small cookie scoop, place scoops on the prepared baking sheet and flatten. Makes about 15 cookies. Bake for 10-12 minutes. Cool on cooling rack.
When I worked at Arizona State University, the chair of the department and I shared the same birthday so we’d go out for lunch annually on our birthday. There was a little Chinese restaurant near campus where we’d devour several orders of pot stickers and a soup bowl of hot and sour soup. I’ve been checking every grocery store I go to and I couldn’t find gluten-free wonton wrappers but a check on-line found a recipe. So, although this process is somewhat lengthy, the dumplings are well worth the effort.
First, make the wonton wrappers by combining:
1/2 cup all purpose gluten-free flour
1/2 cup tapioca flour
1/2 white rice flour
1/2 teaspoon sea salt
1 teaspoon guar gum
Whisk together the dry ingredients then stir in:
1/2 cup boiling water
Dough will start to come together. Add:
2 tablespoons cold water
1 1/2 teaspoons olive oil
Stir to combine, kneading with hands if necessary. Form into a ball, cut in half. Place one half under plastic wrap to stay moist while working with the other half. Roll the dough into a log then cut into 12 pieces, about 1 tablespoon each. Roll the pieces into balls and place in a sandwich bag until ready to fill. Repeat with the other half of the dough.
Next, make the filling. In the bowl of a food processor, pulse:
8-10 scallion whites
6 ounces shitake mushrooms
1/2 cup shredded carrots
Pulse until well ground. Put into a medium bowl with:
3/4 pound ground turkey (or pork)
3 teaspoons date sugar
3 tablespoons soy sauce substitute (see recipe under sauces)
1/2 teaspoon ginger juice (or freshly grated ginger)
1/2 teaspoon toasted sesame oil
Combine, cover and store in the refrigerator until ready to fill the wontons. Using a bamboo steamer (or a steamer basket or pot but you won’t be able to cook as many at once), place over water on the stove. Take one dough ball, place between two pieces of plastic wrap, and using a small rolling pin (or any can), roll out to about a 3″ circle. Place about 1 tablespoon filling in the middle. Using the plastic wrap, bring the sides of the wonton wrapper together in the middle. Pick up the ball and gently press the edges together to seal the dumpling (these can be either round or rectangular). If the dough is dry, wipe the edges with a small amount of water to moisten and seal. Place in the steamer and repeat until the steamer is filled, without the dumplings touching the edges or each other because they will stick as they cook. Bring the steamer water to a boil and cook the dumplings 10-12 minutes. Serve with a sesame garlic sauce and garnish with the scallion greens.
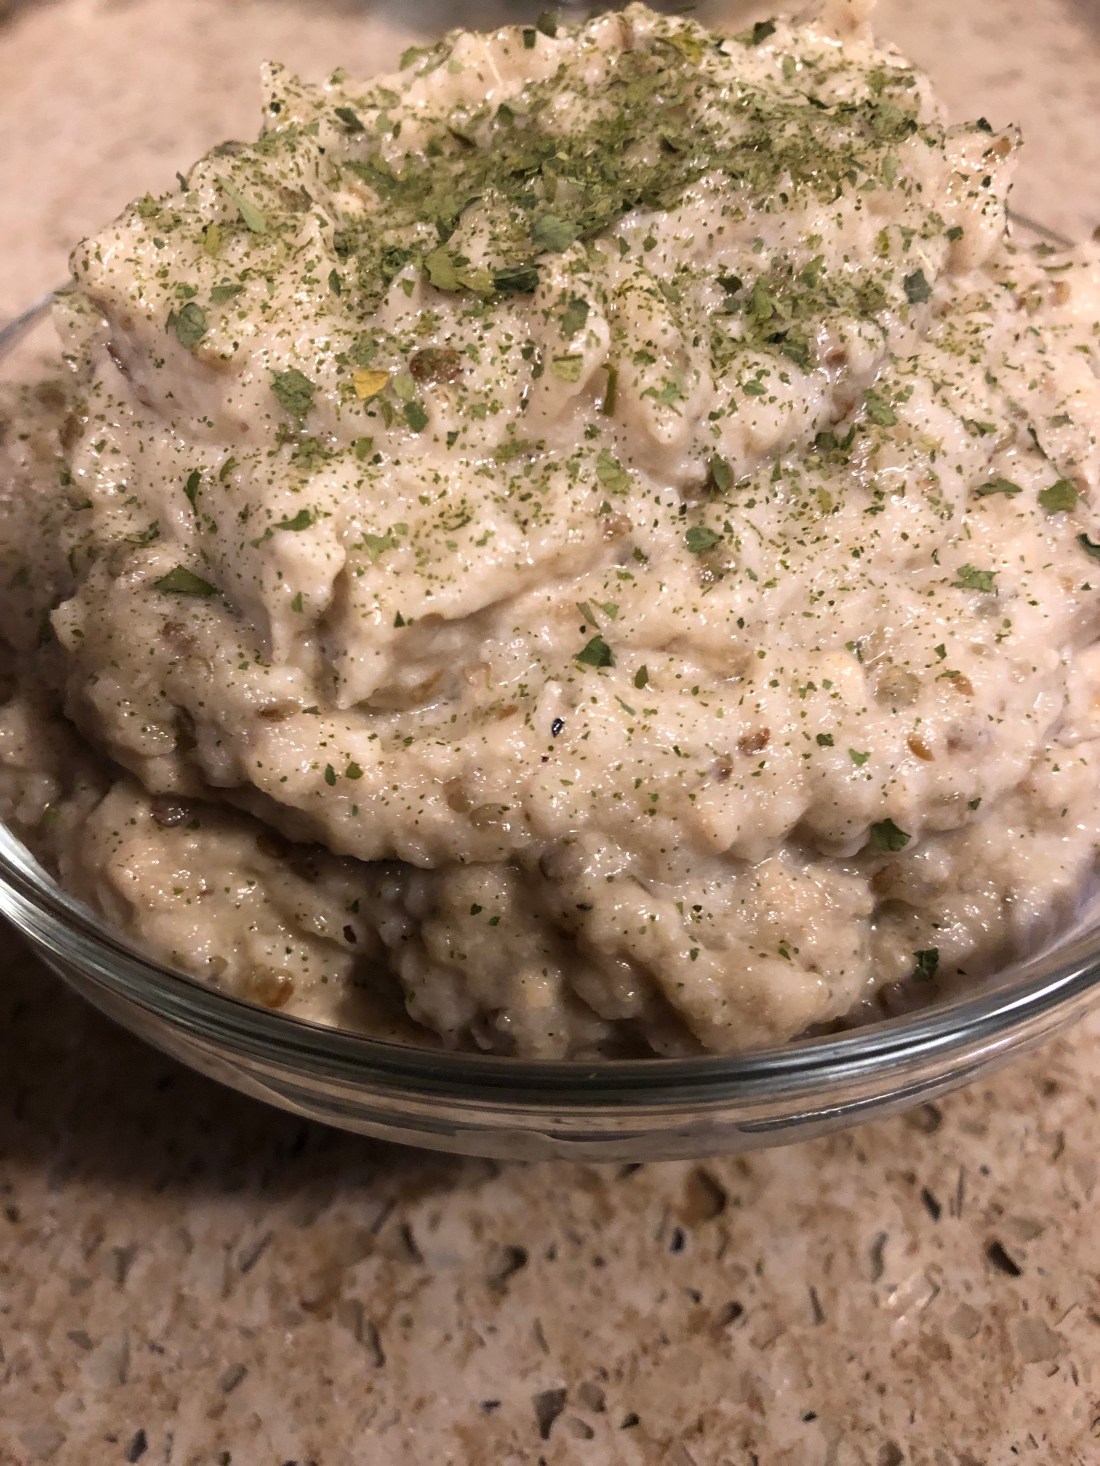
Yes, another eggplant recipe! And a very simple dip to prepare; the hardest part is roasting the eggplant and that’s not especially difficult, just time consuming. I can’t tell you exactly what size eggplant to buy – you’ll want about 2 cups of eggplant pulp. The 3 oriental eggplant I used only gave me about 1 cup of pulp so I would recommend a medium to large Italian eggplant for this recipe or else adjust the other ingredients to the amount of eggplant pulp you roasted.
First, roast the eggplant by slicing it into 1″ slices. Place on a baking sheet lined with parchment paper. Spray or brush the eggplant slices with olive oil then turn them over and repeat. Roast in a preheated 425 degree oven for 20-25 minutes.
While the eggplant is roasting, in a small skillet heat:
2 tablespoons avocado oil
1 teaspoon cumin
Heat only until you can smell the cumin, about 1 minute. Remove from heat and set aside to cool.
Remove the eggplant and let cool slightly before peeling the skin from around the outside of each slice. Place in a food processor and add:
2 tablespoons tahini
1 teaspoon minced garlic
salt and pepper (about 1/8 teaspoon salt and a dash of pepper)
1 tablespoon lemon juice
the cumin and avocado oil mixture
Pulse until smooth, spoon into a serving bowl and sprinkle with dried or fresh parsley. If desired, sprinkle with olive or avocado oil as well. Serve with gluten-free pita or quinoa buns (see recipe below).
Quinoa Buns
I thought these sounded interesting – avocado and quinoa with lime juice? Who puts lime juice in a bread? But I thought it sounded like it might be a good vehicle for the baba ghanoush. And it sounded very easy to make so I gave it a try and it actually is delicious but just be miserly with the lime zest or it overpowers the other flavors in the buns.
In a medium to large bowl combine:
1 1/2 cup quinoa flour (if you don’t have any but you have quinoa, simply pulse in a food processor to make flour from the raw quinoa)
1/4 cup gluten-free oat flour
2 tablespoons ground flaxseed
2 tablespoons sesame seeds
1 teaspoon baking powder
1/8 teaspoon sea salt
In a smaller bowl mash:
1 whole large ripe avocado being sure to take out any brown bruise spots which won’t mix into the batter
Add to the avocado:
1-2 tablespoons lime juice (juice from 1 lime)
1/2 teaspoon lime zest
1 tablespoon honey
3/4 cup water
Using a whisk or hand mixer, combine the wet ingredients until fairly smooth. Add to the dry ingredients and stir to combine. It’s a sticky dough so using wet hands shape into 6-7 balls. Place on a baking sheet lined with parchment paper and flatten to about 1/4 inch thickness. Sprinkle with more sesame seeds and let sit while the oven heats to 425 degrees. Bake about 25 minutes total, turning the buns over at 15 minutes to brown both sides. Test with a toothpick for doneness. REMEMEBER GLUTEN FREE BREADS CAN BE GUMMY SO EVEN IF THE TOOTHPICK COMES OUT CLEAN, THEY STILL MAY NOT BE COOKED THROUGH. Cool completely before cutting.
My father’s favorite dessert! Growing up we had a blackberry patch in the back yard and every August, we’d go pick the blackberries, always getting our arms scratched from the thorns. Most went the freezer (and our mouths) except for a few cups that immediately went into the house and put into a buttered casserole dish. Some flour and cinnamon went over them and then a cottage pudding spread on top for a crust, hot water and sugar and into the oven. My father always ate it with vanilla ice cream, obviously not something I can do. This is a dessert best served warm. The recipe serves 6.
Grease an 8″ casserole dish. Preheat oven to 425 degrees. In a medium bowl combine:
2 tablespoon tapioca flour (don’t have any? use 2 tablespoon all purpose gluten-free flour)
2 teaspoons cinnamon
Pour into the casserole dish. Into the bowl you used for the blackberries, combine:
1 cup all purpose gluten-free flour
1/2 teaspoon xanthan gum
2 teaspoons baking powder
1 tablespoon date sugar
1/4 teaspoon salt
Stir to combine then add:
2 tablespoons vegan margarine
Using a fork, work the margarine into the flour mixture. Add:
1/2 cup non-dairy milk
Combine until mixed but don’t over mix. Spoon on top of the berries and spread to cover most of them. Pour over the top of the cobbler:
1/4 cup date sugar
1 teaspoon cinnamon
1 cup hot water
Most of the date sugar should wash down into the berries. The little sugar on the top will form a sweet crust when baked. Bake the cobbler for 30-40 minutes until a toothpick inserted in the cobbler crust comes out clean. Serve warm with vanilla frozen dessert or whipped topping, or I like it just the way it is although sometimes I top it with a vanilla mousseline sauce.
Pastry Sauce:
Put into a saucepan and stir to combine:
2 tablespoons cornstarch (or arrowroot)
1/3 cup date sugar
1/4 teaspoon salt
Stir into the mixture:
1/4 cup non dairy milk (any will do EXCEPT NOT soy)
Whisk to make sure it’s lump free before adding:
2 cups non-dairy milk
Heat over medium heat whisking constantly once it starts to get hot until the mixture coats the back of a spoon. Remove from the heat and add:
1 teaspoon vanilla
2 tablespoons vegan margarine
Whisk to combine. Serve hot or chill for a vanilla pudding.
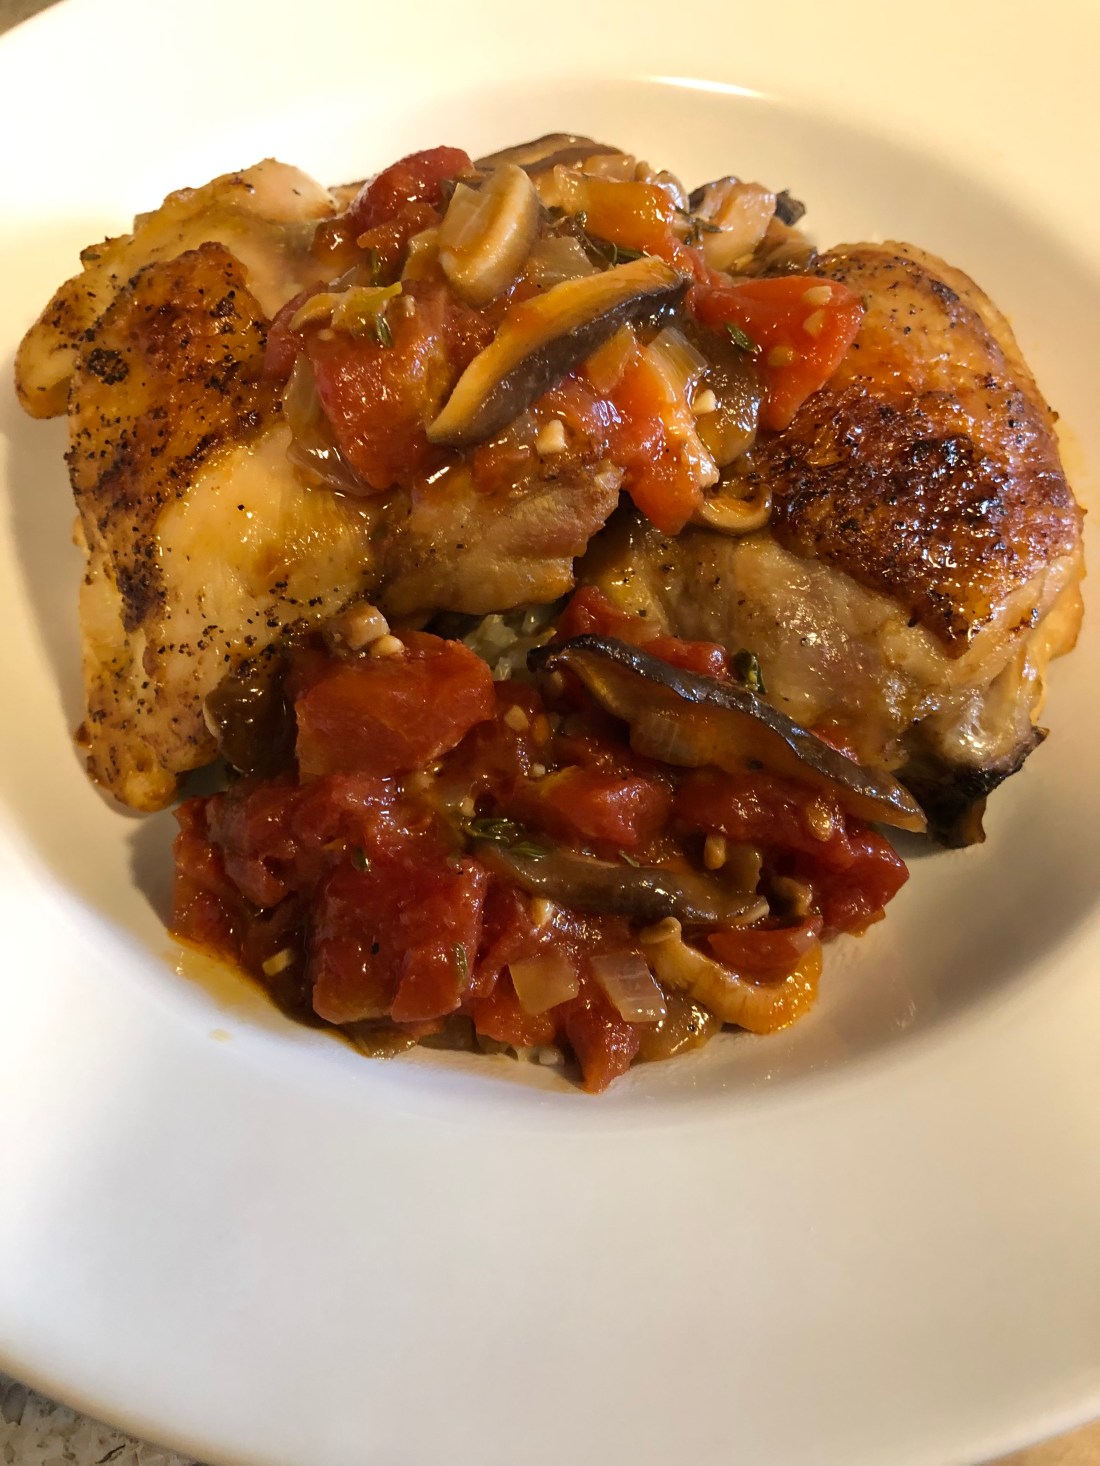
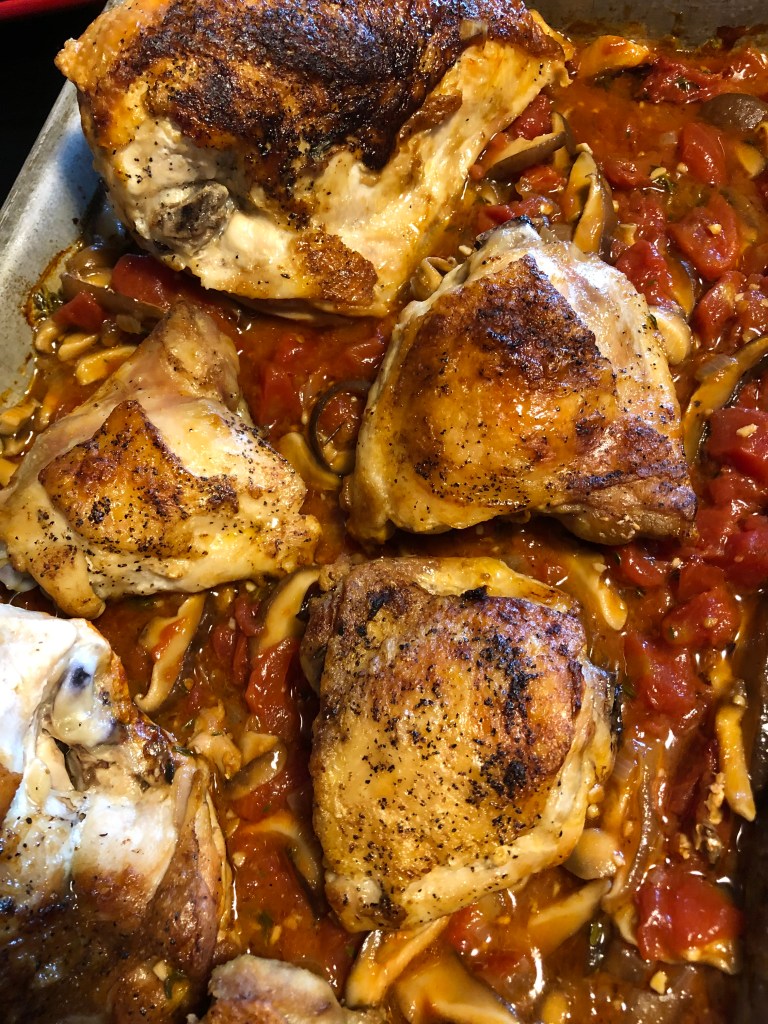
Here’s another great recipe adapted from the Chicken Bible. Because of salt restrictions, I left out the chopped olives and brandy also isn’t allowed in my diet so that’s gone as well but I’ll list them as optional if you want to add them to your dish. It was quite tasty and fairly easy to make. Be sure to use an oven safe pan or after making the sauce, transfer the sauce and then the chicken to an oven proof dish.
Preheat oven to 400 degrees. Peel and chop:
1 medium onion, diced fairly small
Using paper towels, dry:
4 medium size bone-in chicken breasts or 2 breasts and 4 thighs
After drying sprinkle with:
1/2 teaspoon salt (I used herbamare)
1/4 teaspoon ground black pepper
Heat over medium high, in a skillet large enough to cook the chicken without cramping:
1 tablespoon oil
Add the seasoned chicken pieces, skin side down and leave them alone for at least 5 minutes to brown the skin and get it crispy. Then turn and cooked for 2-3 minutes on the other side. Remove from the pan, drain all but 1 tablespoon oil from the skillet and add:
the diced onion
Cook over medium heat for 2-3 minutes until softened before adding:
2 teaspoons minced garlic
10 ounces sliced shitake mushrooms
Cook over medium heat until the mushrooms start to soften and give off their liquid before stirring in:
2 teaspoon hot sauce (or more if your family likes it spicier OR 1/4 teaspoon crushed red pepper flakes)
6 Kalamata olives, chopped fine (Optional)
Stir to incorporate before placing the chicken pieces on top of the sauce mixture. Bake for 35-40 minutes or until the breasts reach 160 degrees and the thighs register 170 degrees. Remove from oven and move the chicken to a serving platter. Add to the sauce:
2 tablespoons avocado oil
Whisk to combine and then spoon the sauce around the chicken and serve. Serves 4.
If you’re like me, the only bad thing about making pancakes is standing at the stove cooking 3 or 4 at a time when there’s at least a dozen to cook. Well, this recipe takes that away! These are the lightest, fluffiest pancakes I’ve had since I went gluten-free and oh so mouth-wateringly delicious. Of course, pumpkin or butternut squash can be substituted for the sweet potato puree, just make sure that they aren’t too wet so a drier squash would work best. I used Trader Joe’s frozen sweet potato mash in this recipe thinking canned sweet potato puree might be too wet. And it worked just fine. Also be sure to let the mixture sit in the baking pan for 10-15 minutes after you spread it. Gluten free flours take longer to absorb moisture than regular flour and letting it sit on the counter before cooking gives the flours time to absorb some of the liquid and the end product won’t be gummy.
In a large mixing bowl whisk together:
2 tablespoons ground flax
1/3 cup aquafaba (or 1/3 cup water with 1/2 teaspoon aquafaba powder)
While the flax gel is working, about 5 minutes, prepare an 15×9″ baking sheet by covering with parchment paper and spraying generously with a non-stick spray (I use Chosen Foods Avocado spray because it’s 100% avocado oil).
When the flax gel is set, add:
1/2 cup sweet potato puree
1/4 cup avocado oil
1/4 cup date syrup (or coconut or agave nectar, honey, or maple syrup)
1 1/2 cup non-dairy milk
1 teaspoon pumpkin pie spice
3/4 cup protein powder (I used Probase organic pumpkin seed protein, unflavored)
Whisk to combine before adding:
1 1/2 cups all purpose gluten-free flour
1/2 cup chickpea flour
1 teaspoon xanthan gum
2 1/2 teaspoons baking powder
1 teaspoon baking soda
1/4 teaspoon sea salt
1/3 cup dried cranberries (optional)
1/4 cup carob (or chocolate) chips (optional)
Stir to combine making sure to moisten all the flour but not overmix, batter will be thick. Spread in the prepared baking sheet and let sit 10-15 minutes while the oven heats to 400 degrees. Bake 18-20 minutes until spongy in the middle and golden brown. Cut into 12 pieces and serve with a drizzle of maple syrup. I found 2 pieces were enough for me so 4-6 servings depending on your appetite.
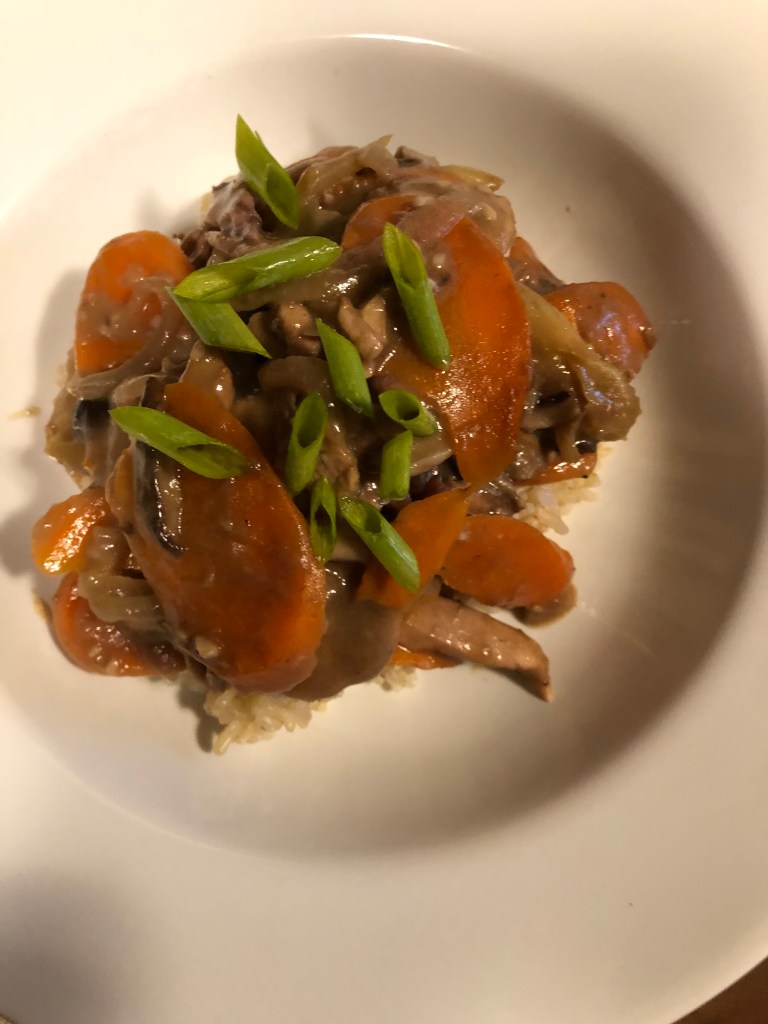
Had a little of the soy substitute sauce left over from the recipe a couple of days ago so thought I’d make some choy mein. But there wasn’t quite enough sauce for that and I’d gotten a jar of plum jam out of the freezer and added some of that and oh my goodness, how mouth-watering is this! Like adding a little pear or apple to a pork or chicken gravy, adding a little plum to this Chinese sauce turned out luscious. Don’t have any plum jam around the house? Stew up 2 plums (skin too if organic) along with about 2 tablespoons of date syrup and then puree it and you’ve got plum jam!
Just like with most Chinese recipes, the first step is always to cut everything up!
Peel:
1 small to medium onion, slice in half thin slices
1 large o 2 smaller carrots, slice on the diagonal
2 garlic cloves, minced
Trim:
2 whole stalks or 4 stalks from the celery heart (about a cup altogether), slice diagonally
6 ounces of shitake mushrooms, sliced
Put the vegetables in a bowl and set aside until ready to cook. Trim the fat and slice:
2 skinless, boneless chicken breasts*
Place the slices in a food storage bag and add:
2 tablespoons soy sauce substitute (see recipe under sauces)
2 tablespoons rice vinegar
1 tablespoon cornstarch or arrowroot
1/4 to 1/3 cup plum jam
Seal and refrigerate 15-30 minutes until ready to cook. When ready to cook, heat over medium heat in a 12″ skillet:
1 tablespoon olive oil
Add the vegetables and cook, stirring frequently, for 1-2 minutes. Cover and lower heat to medium low and cook for 5-7 minutes, stirring often, until carrots are tender. Remove the vegetables to their bowl, turn the heat back to medium and add to the skillet:
the marinated chicken and marinade
Cook stirring constantly until the chicken is cooked through, about 2-3 minutes. Reduce heat to low and add the vegetables back to the skillet along with:
1 cup chicken or vegetable stock
Stir to combine and continue stirring until sauce thickens, about 1 minute. Serve with brown rice or rice noodles.
*Want a vegan entrée? Substitute firm tofu or your favorite plant-based protein.
Here’s another recipe adapted from the Chicken Bible. It’s somewhat spicy due to the abundance of freshly grated ginger as well as just a 1/4 teaspoon Vietnamese chili sauce.* The original recipe called for 1/4 teaspoon of red pepper flakes so use those if you can’t find a chili sauce that works for your family. I also cut back slightly on the amount of freshly grated ginger – the original recipe called for 1 tablespoon but I used only about 1 teaspoon and it was sufficient for my tastes. This is a recipe that may sound difficult and complex but if you follow the steps, it’s really quite easy to make and oh so worth the effort – just as good as any dish in your favorite Chinese restaurant.
First, cut up everything:
1 pound bok choy (I used three medium sized baby), cut off the stems and cut into bitesize pieces and then separately chop the greens and put them in a separate bowl
2 small sweet red peppers, cut in thin slices
1 pound boneless skinless chicken breasts, sliced as thinly as possible (if the breasts are partially frozen, they will slice much easier although the hand holding the meat will get quite chilly!)
1 garlic clove minced
about 1″ of fresh ginger peeled and grated to produce roughly 1-2 teaspoons
2-3 scallions, slice at an angle, add the white parts to the bok choy stems and peppers and set the greens aside in a medium bowl
Next, mix together in a medium bowl:
1 tablespoon soy sauce substitute
2 teaspoons rice vinegar
1 teaspoon date syrup
1 teaspoon fish sauce
1 tablespoon sesame oil
1 teaspoon cornstarch (or arrowroot)
Whisk together and add the sliced chicken. Mix to ensure all the chicken is coated with the marinade. Refrigerate until needed.
Third, put on a pot of water to boil:
6 quarts water in a large pot
When the water comes to a bowl, add:
1 teaspoon sea salt
9 ounces of noodles (I used brown rice pad Thai noodles)
Cook for only 3 minutes until el dente (or the amount of time on the package of your noodles). Drain and add to the bowl with the green scallion slices. Mix to combine. In a 12″ non-stick skillet, heat over medium high heat:
2 tablespoons olive oil
Add the noodle/scallion mixture and spread out in the pan. Use a strong spatula (or I used a bacon flattener) to flatten the noodle mixture in the pan (see photo below). Cook 5-7 minutes until browned and then using a large spatula, flip and brown again on the second side 5-7 minutes. Remove to an oven proof plate and stick in a 200 degree oven to keep warm.
Now, in a small bowl mix together:
2 tablespoons olive oil
the minced garlic
the grated ginger
In another small bowl make the sauce by combining:
1/3 cup chicken or vegetable stock
2 tablespoons soy sauce substitute
1 tablespoon rice vinegar
1/2 tablespoon date syrup
1/4 teaspoon chili sauce or red pepper flakes (or hot sauce!)
1 teaspoon cornstarch (or arrowroot)
Stir to combine. Set aside until needed. Pour into the empty skillet and heat:
2 teaspoons olive oil
Add:
sliced chicken (and marinade)
Cook over medium high heat, stirring constantly and turning frequently until the meat is cooked, about 2 minutes. Remove to a dish and set aside. Into the same skillet heat over medium heat:
the olive oil mixture with the garlic and ginger
When hot, add:
the bok choy stems
red pepper slices
scallion whites
Cook over medium high heat stirring frequently until they just begin to soften, about 3 minutes. Add:
the bok choy greens
Cook just until the greens begin to wilt, add the cooked chicken along with any juice in the dish. Whisk the sauce mixture to be sure it’s still combined and pour over the chicken in the skillet. Stir continuously until the sauce thickens about 30 seconds and the chicken is reheated. Remove the noodle cake from the oven and cut into wedges. Serves 2.
*I had a lot of difficulty finding a chili sauce that didn’t contain either sugar or soy. I finally located one (at the 4th store I checked!) – Tuong Ot Toi Viet-Nam Chili Garlic Sauce. It’s VERY hot so the amount used should be to the level of your taste buds. I don’t mind spicy but super hot is not to my liking therefore the recipe calls for just 1/4 teaspoon.