Korean Style Ground Turkey with Cabbage

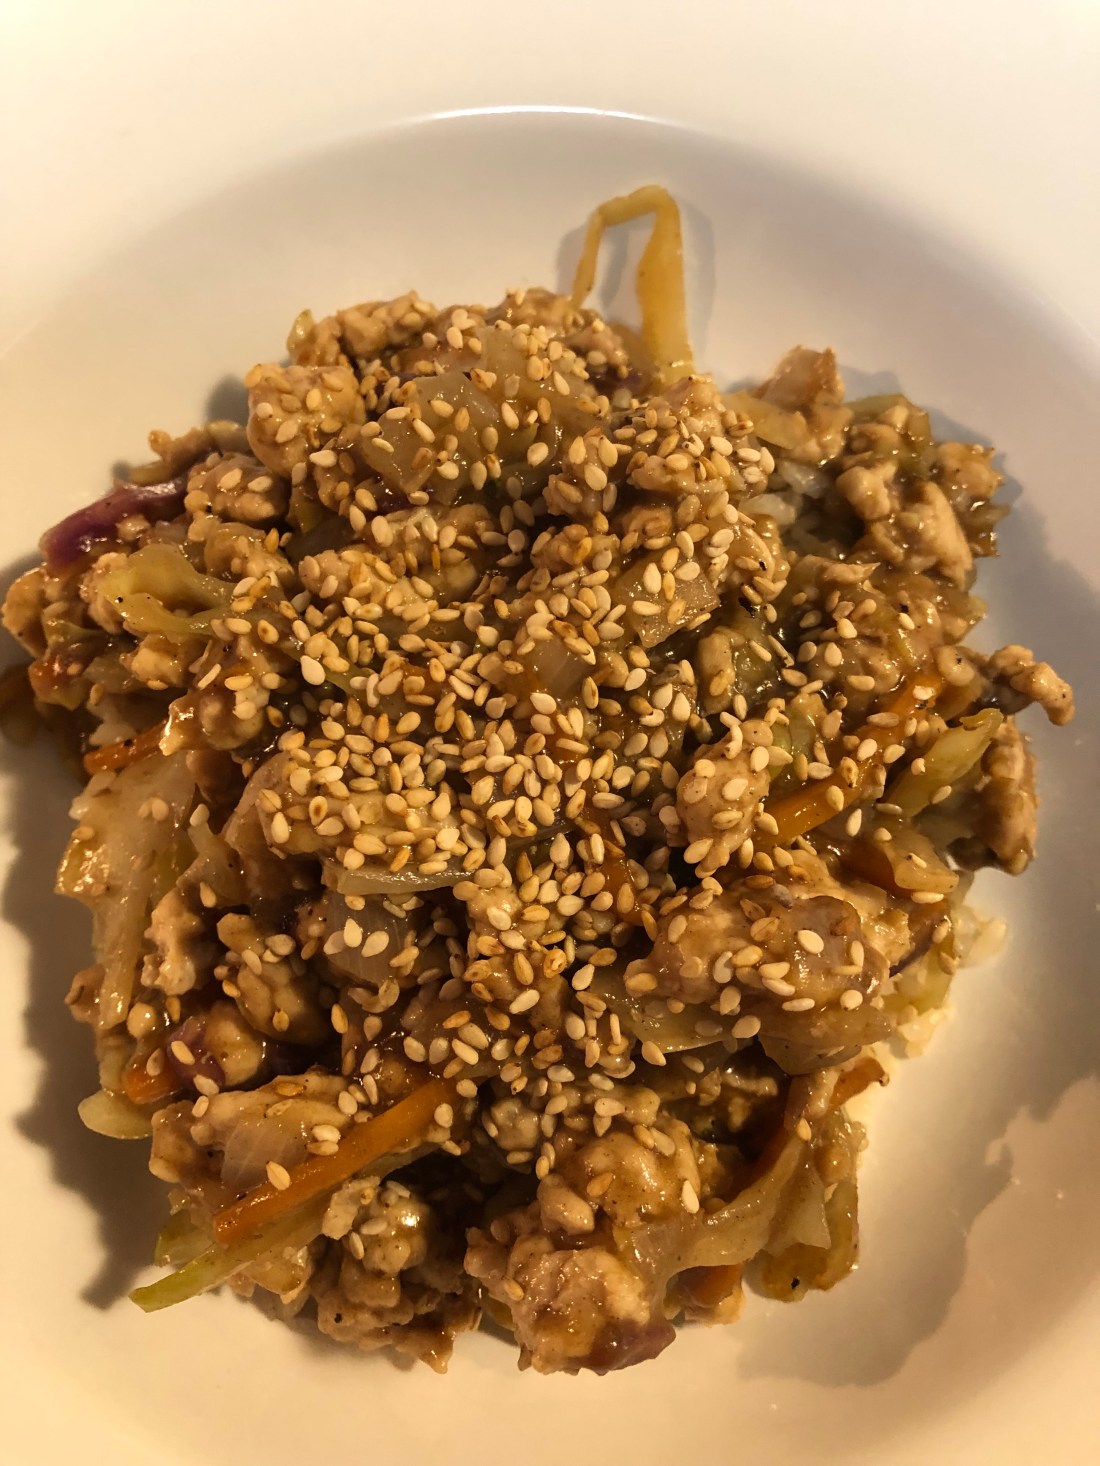
Super quick and easy, especially if you buy the pre-shredded cole slaw mix at the supermarket. The only other thing that needs dicing is the small onion and that doesn’t take long. This dish is a little sweet, spicy and tangy and the ground turkey, unless you really overcook it of course!, stays moist and succulent in the sauce. I apologize for not sprinkling the finished dish with scallion as it should be but I didn’t have any in the house and wasn’t up to going to the store today. Excellent even without them! As usual, feel free to mellow or increase the spices to fit your family’s tastes.

First, in a deep skillet (3″ or so), heat over medium high heat:

1/2 tablespoon olive oil

1/2 tablespoon sesame oil

When hot reduce heat to medium and add:

1 pound ground turkey breast

Break up the turkey and sauté for about 2 minutes before adding:

1 small onion, diced

1 cup shredded cabbage*

1/4 cup shredded carrots (in the cole slaw mix if you use that or most supermarkets now sell pre-shredded carrots)

2 teaspoons minced garlic (or 2 minced garlic cloves)

Stir to combine and cover, reduce heat to low and simmer for about 4-6 minutes until the cabbage and onion are softened.

While the dish simmers make the sauce by combining in a small bowl:

1/2 cup soy sauce substitute** (of course if your family can have soy, use regular soy sauce but reduce to 1/4 cup)

2 teaspoons tapioca starch (or flour)

1/4 teaspoon ground ginger (or 1/2 teaspoon freshly grated ginger)

1/4 teaspoon ground black pepper

1-2 tablespoons date sugar depending on how sweet you like it

1/4 teaspoon garlic chili sauce (or 1/4 teaspoon red pepper flakes, or 1 teaspoon siracha)

Whisk to combine. Remove cover from the turkey mixture and add in sauce, stirring constantly until it thickens which should be about 5-10 seconds. Remove from heat to a serving dish, top with toasted sesame seeds and/or sliced scallions. Serve over rice. Makes 4 servings.

*If cabbage isn’t a favorite in your family, add a small can of sliced bamboo shoots and a can of sliced water chestnuts. Or some thinly sliced bok choy would also work.

**See recipe under sauces. I generally have several 1 cup jars of it in the freezer.

Spicy Curried Carrot Soup

Quick, easy, and delicious, this soup with warm your stomach. It has that comfort food vibe with great flavor. Using pre-shredded carrots is what makes it so easy. Either regular orange carrots or rainbow carrot shreds will work. Add some lemon zest on top and a lemon wedge on the plate to add some freshness and lighten the spiciness of the soup. Serves 2 but easily doubled.

Put a 4-quart pot on over medium heat and add:

1 tablespoon olive oil

Heat until shimmering before adding:

1 small onion, finely diced

Cook the onion until translucent and then add:

1/2 to 1 teaspoon curry powder (depending on how spicy you want the soup)

Stir the curry powder into the onion and heat until just fragrant, about 30 seconds. Add:

2 cups shredded carrot

Stir to coat the carrots in the onion and curry mixture before adding to the pot:

1 to 1 1/2 cups stock (I used chicken bone broth but a mild vegetable broth would also work and keep this soup vegan; want to cover the carrots completely but not drown them)

1/2 teaspoon sea salt and 1/4 teaspoon ground black pepper (to taste)

Cook over medium low heat until carrot is softened, about 20-25 minutes, covered. Put the carrot mixture into a blender and add:

1/2 to 1 cup oat milk

Start with the 1/2 cup and add more if the mixture needs to be thinned to your taste. If the carrot mixture is really hot, cover the top of the blender with a kitchen towel and don’t fill it more than 1/2 full or you’ll have an explosion of hot soup all over your counter! Start blending on the lowest speed and as it purees, increase slightly. Should only take 30-45 seconds to blend. Serve with lemon zest and a wedge of lemon on the side. Serving it on the side allows the person eating that bowl to add as little or much of the lemon as they like. [I learned this trick from a Vietnamese chef and it really does mellow out the curry.]

Pork and Tomato Stew

This is a very easy recipe to make, cutting up the vegetables and pork are the most time consuming parts of the recipe. Be smart and use pork chops rather than pork roast so you don’t have to deal with as much fat and silver skin. I also used pre-cut carrots. Makes 4 servings.

In a 6-quart or larger Dutch oven, heat over medium high heat:

1 tablespoon olive oil

When shimmering, add:

3-4 cups diced pork (4-6 boneless pork chops depending on size and thickness)

1 teaspoon sea salt

1/2 teaspoon ground black pepper

Cook until the meat is browned on all sides. Lower heat to medium and add:

2 medium onions, diced

2 teaspoons minced garlic

Cook until the onions are translucent before adding:

2 tablespoons gluten-free, all-purpose flour

Mix the flour into the pan so that it absorbs the fat before adding to the pan:

1-1 1/2 cups sliced carrots

2 cups button or baby bella mushrooms, cleaned and cut into quarters (or 6ths if they are larger)

1 cup chicken stock (or bone broth)

Stir to combine these ingredients and mix the chicken stock into the meat mixture. In a small bowl combine:

2 tablespoons tomato paste

1-2 teaspoons siracha (optional)

1 tablespoon date syrup

Add to the pot along with:

5 large RIPE tomatoes, peeled and cut into quarters or eighths

2 teaspoons dried basil (or, if preferred add 2 tablespoons fresh chopped basil right before serving)

Stir to combine, reduce heat to low and let simmer for 45-50 minutes until meat is tender and carrots are cooked. Be sure to taste before serving and adjust salt and pepper as needed. Serve it over any starch your family likes – it will go great with rice, mashed potatoes or pasta, or any other grain such as quinoa.

Hearty Pork Stew

I cooked a pork roast the other day and we only ate half of it so today I cut it up intending to make a hash with some sweet potato, onions and carrots. After I cooked the roast, I left the roasting pan out and it was cold when I decided to make some gravy to go with the rest of the roast when I reheated it. Threw in some cold chicken stock and all the fat congealed and I was able to spoon it out of the pan before I put it on the heat to get all the sticky parts off the bottom of the pan – made such a delicious gravy! So my hash turned into a stew, rich, succulent and soul warming on this single digit day in Minnesota! Let it be 9 degrees outside, I’m toasty warm in here with this stew in me.

In a high sided skillet, heat over medium heat:

1 tablespoon olive oil

When shimmering add:

1 small onion diced

1/2 cup shredded or chopped carrots

1 cup frozen peas

Stir to combine and cover. Cook over medium low heat until onions are sweated and carrots are softened, about 4-5 minutes. Add:

2 cups sweet potato (or white if preferred), diced and cooked

2 cups diced cooked pork

1 medium pear, cored and diced

Again, stir to combine, cover and heat until the pear is softened and pork and potatoes are reheated, about 3-4 minutes. Add:

2 cups gravy (see recipe for gluten-free gravy under sauces)

Salt and pepper to taste.

Serves 4-6. Some crusty bread would be great with it to mop up the gravy!

Asian Pork and Cabbage

I took a small pork roast out of the freezer yesterday morning and noticed that I have two bags of carrots in the frig. What to do with them, I asked myself. So on Taste of Home, I found a recipe that I thought would work once I modified it to remove the allergens. It’s really quite quick and easy if you buy already chunked pork and pre-shredded cabbage and carrots. One of the bags of carrots was shredded so I went and picked up a large container of cole slaw mix this morning. It took me about a half hour to cut up the roast and then only about 10 minutes to make the dish! Very tasty over some rice. Makes 4 servings.

In a large nonstick skillet over medium, heat up:

2 teaspoons olive oil

When hot, add:

4-6 cups chopped cabbage

Cook for about 2 minutes until cabbage starts to get tender but is still crisp. Add:

2 cups shredded carrots

Stir to combine and cook for about another 2 minutes until carrots start to get tender. Remove to a bowl. Add to the now empty skillet:

2 teaspoons olive oil

When hot, add:

2 cups diced pork

Cook over medium high heat until the pork is browned on all sides, about 2 minutes depending on how large your chunks of pork are, try to cut them into approximately the same size (I know, easier said than done!). Add to the skillet:

2 tablespoons finely minced ginger root*

Stir to combine and cook for about 2 more minutes until the pork is about cooked and the juices run clear. Combine in a separate bowl before adding to the skillet:

1 cup chicken stock

1/4 cup soy sauce substitute

2 tablespoons arrowroot

1/2 teaspoon sesame oil

Whisk to combine and add to the skillet. Stir constantly until it thickens. Add the cabbage mixture back into the skillet and heat through, about 1 minutes. Add salt and pepper to taste. Serve over rice.

*The easiest way to mince ginger root is to cut off the peel producing a rectangle of ginger root. Slice into thin slices and then, using a French knife, cut back and forth until finely minced. (A French knife is a long-bladed knife that is angled so that you can rock the blade back and forth to finely chop things.)

Chicken Shepherd’s Pie

I know, you don’t have to say it! Another chicken recipe. This one can be fairly quick and easy. It’s a chicken stew with mashed potatoes (or in my case, mashed celery root and parsnips) on top with a few French-fried onions on top, baked for an hour (less if the stew is already hot). Again, like many of my recipes, feel free to use whatever vegetables you have on hand that your family prefers.

Grease or spray a casserole dish large enough to hold the stew and toppings. This will depend on the amount you need for your family, for me, I made a 4-serving size so used a 2-quart casserole dish. Preheat the oven to 375 degrees. In a skillet over medium heat, add:

2 tablespoons olive oil

When shimmering hot add:

12 ounces of chicken breast, cut into bite-size chunks

Salt and pepper to taste

Brown the chicken turning after about 2 minutes to brown on the other side(s). When chicken is fully browned, but not necessarily fully cooked, remove from the skillet and add to the skillet:

1/2 medium onion, diced

2 stalks celery, diced

1/2 cup carrot slices

1/2 cup green beans

1/2 cup peas

1 teaspoon dried thyme (or parsley, or herb of choice [I really like sage in my chicken dishes]).

Sauté, stirring frequently, until onions are transparent, reduce the heat and cover for 5 minutes or until the green beans and carrots are tender. Remove the vegetables from the pan. Whisk into the remaining fat:

2 tablespoons gluten-free all-purpose flour or enough to absorb all the fat in the pan

Cook the flour for several minutes and then add:

3/4 cup chicken stock

3/4 cup non-dairy milk (anything EXCEPT soy)

Whisk to combine with the flour and get out the lumps and then stir frequently until gravy comes to a bowl and thickens. If it’s too thick, add a little more stock or milk. If it’s too thin, make a slurry of another tablespoon of flour and a little milk and add to the gravy.

Mix in the chicken and vegetables. Top the casserole with:

2 cups mashed potato (or 2 cups celery root puree (see recipe under side dishes)

Sprinkle the top with French-fried onions or paprika. Bake in a pre-heated 375 degree oven for 30-60 minutes depending on if you bake it immediately or put it together to bake later as I did.

Easy Farmhouse Chicken Casserole

I know, again with the chicken! But there are just so many delicious ways to cook chicken and here’s another one. Easy and quick to make with pre-cooked chicken, this casserole covers all the bases with protein, starch and vegetables all in one mouth-watering package. So if you have some chicken (thighs, drums, breasts whatever) or leftover rotisserie chicken, this is a great way to use it up that your family will enjoy.

Make sure your oven rack is in the upper half of the oven. Preheat oven to 425 degrees. Grease a 9×13 casserole (or spray with non-stick spray). Over medium high heat, heat a medium sized Dutch oven and add:

1 tablespoon olive oil

4 slices of bacon, diced

Cook bacon until it’s crisp. If you don’t want to eat the bacon fat, drain it before adding:

1 tablespoon olive oil (3 tablespoons if you drained the bacon fat off)

1 medium onion, diced

3-4 celery stalks, diced

1 cup thinly sliced carrots (or shredded)

1 cup frozen peas

Reduce heat to medium and cook until vegetables are softened. Stir into the vegetables:

1/4 cup gluten-free, all-purpose flour (I had to use 1/3 cup to absorb all the oil)

3 cups chicken stock

1 cup non-dairy milk (anything EXCEPT soy)*

1/4 teaspoon dried thyme

1 teaspoon dried sage

1/4 teaspoon ground black pepper

1/2 teaspoon sea salt

Stir, being sure to scrape the bottom of the pot to get all those wonderful drippings from the bacon. Cook, stirring frequently until sauce is thickened, about 3-5 minutes. Add:

3 cups diced or shredded chicken

3 cups diced and cooked potatoes (I used a mix of sweet and Russet potatoes)

Turn off heat. Pour (or ladle like I had to) the chicken mixture into the prepared casserole dish. In a medium bowl combine:

1 cup gluten-free bread crumbs

2 tablespoons avocado oil

Using a fork, mix thoroughly so that the bread crumbs are combined with the oil. Add:

1 cup gluten-free French-fried onions (or forget the bread crumbs and just use onions, oh so tasty!)

Spread the bread crumb mixture evenly over the casserole and bake for 15-20 minutes. Cool slightly before serving. Serves 6-8 generously.

*The original recipe called for cream. Silk now makes a non-dairy cream which you could use in place of the non-dairy milk for a richer sauce. The Silk cream is coconut based.

Lemon Chicken Soup with Vegetables

Chicken is one of my staple proteins. I had some chicken breasts in my fridge that needed to be used but I didn’t have time today to do a lot with it. Chicken soup I thought! Quick, easy, not too much work. Then I thought about the lemon beurre blanc sauce I made a few nights ago to go with some fish and thought I love chicken and lemon. It won’t be too hard to put them together. This soup is the outcome of that thought process. Hope you enjoy it as much as I did!

First, heat a small Dutch oven over medium high heat. When it gets hot, add:

1 tablespoon olive oil

When the oil is shimmering add:

1 small onion, diced

2 stalks celery, diced

1/2 cup shredded carrots

3-4 ounces sliced mushrooms (any kind you like)

Stir to combine and let cook reducing heat to medium until the vegetables begin to soften. Add:

6-8 ounces white meat chicken, cut into bite size pieces

1/2 teaspoon sea salt

1/4 teaspoon ground black pepper

1/2 teaspoon garlic powder

Stir so the chicken goes to the bottom of the pot, or as much as possible. When chicken is browned, add:

2 teaspoons minced garlic

approximately 1 tablespoon lemon zest (zest of one large lemon)

3 cups chicken stock

8 ounces of small pasta like elbows (I used green lentil safari)

8 ounces whole chickpeas

Stir to combine, cover, reduce heat to medium low so that the stock is on a low boil to cook the chicken and pasta, about 12-15 minutes. While it’s cooking combine in a small bowl (2 cups):

1/4 cup lemon juice (juice from one large lemon)

1/2 cup oat milk

2-3 tablespoons gluten-free all-purpose flour

Whisk to combine the flour. When the pasta and chicken are cooked, add:

1/2 to 1 cup frozen peas

Cook for 3-5 minutes longer to cook the peas before adding the milk mixture. If necessary pour the milk mixture through a small sieve to keep any flour lumps out of the soup. Stir the soup to mix in the flour and continue stirring for 2-3 minutes while the stock thickens and the flour cooks. Stir in:

2 tablespoons honey

Salt and pepper to taste

Serves 4.

Of course you can add any vegetables your family likes. Asparagus would work very well in this soup as it goes great with lemon. And rice would work as well as pasta depending on taste.

Chicken Cacciatore

There are probably as many recipes for chicken cacciatore on the internet as there are recipe sites. But here’s another one that’s easy to prepare and tastes oh so good! The chicken stays fairly moist (because it’s browned before stewing), the portobellos add some depth to the dish and the sauce is rich and succulent. Using boneless, skinless chicken thighs cuts down on the cooking time so this can be ready in about 40 minutes for a fairly quick midweek supper.

Trim fat and dry with paper towels:

6-8 boneless, skinless chicken thighs

Salt and pepper lightly. Over medium heat begin heating a Dutch oven and add:

1 tablespoon olive oil

Add the chicken thighs and cook, about 4-5 minutes before turning and browning on the other side. If the chicken sticks to the bottom of the pan when trying to turn it, it’s not ready to turn so brown a little longer. Once browned on both sides, remove to a plate and add to the pan:

1 medium onion, diced

5-6 stalks celery, chopped

3 large or 5 medium portobello mushroom caps, cleaned and chopped

3/4 cup diced carrots

Lightly salt and saute until the onion is translucent and the celery and mushrooms are softened. Add:

2 teaspoons minced garlic

1 1/2 tablespoons gluten-free all-purpose flour

Mix to combine and cook out the flour over medium low heat for a minute before adding:

2 cups chicken stock (or 1 cup white wine and 1 cup chicken stock, or 1 cup chicken stock and 1 cup mushroom stock)

1/2 teaspoon dried thyme

1/2 teaspoon dried sage

14-15 ounce can diced tomatoes, drained

Stir to combine and then place the chicken thighs into the stock, pushing down to cover. Be sure to add any juices that have accumulated on the plate as well. Cover the pot and reduce heat to low simmer and cook for 20-25 minutes until chicken reaches 175 degrees internally. It will start falling apart when completely stewed so don’t worry if you don’t have a meat thermometer to measure the internal temperature. Add:

2 tablespoons tomato paste

Stir to combine. Serve over rice, pasta, or potatoes. I’ve discovered at my local Whole Foods Market, a heart of palm pasta (365 brand) that is very low in carbs and very tasty so I added a bag of it (drained and rinsed) about 10 minutes before the cacciatore was done. Serve with parmesan cheese if desired. Serves 4.

Chinese Dumplings

When I worked at Arizona State University, the chair of the department and I shared the same birthday so we’d go out for lunch annually on our birthday. There was a little Chinese restaurant near campus where we’d devour several orders of pot stickers and a soup bowl of hot and sour soup. I’ve been checking every grocery store I go to and I couldn’t find gluten-free wonton wrappers but a check on-line found a recipe. So, although this process is somewhat lengthy, the dumplings are well worth the effort.

First, make the wonton wrappers by combining:

1/2 cup all purpose gluten-free flour

1/2 cup tapioca flour

1/2 white rice flour

1/2 teaspoon sea salt

1 teaspoon guar gum

Whisk together the dry ingredients then stir in:

1/2 cup boiling water

Dough will start to come together. Add:

2 tablespoons cold water

1 1/2 teaspoons olive oil

Stir to combine, kneading with hands if necessary. Form into a ball, cut in half. Place one half under plastic wrap to stay moist while working with the other half. Roll the dough into a log then cut into 12 pieces, about 1 tablespoon each. Roll the pieces into balls and place in a sandwich bag until ready to fill. Repeat with the other half of the dough.

Next, make the filling. In the bowl of a food processor, pulse:

8-10 scallion whites

6 ounces shitake mushrooms

1/2 cup shredded carrots

Pulse until well ground. Put into a medium bowl with:

3/4 pound ground turkey (or pork)

3 teaspoons date sugar

3 tablespoons soy sauce substitute (see recipe under sauces)

1/2 teaspoon ginger juice (or freshly grated ginger)

1/2 teaspoon toasted sesame oil

Combine, cover and store in the refrigerator until ready to fill the wontons. Using a bamboo steamer (or a steamer basket or pot but you won’t be able to cook as many at once), place over water on the stove. Take one dough ball, place between two pieces of plastic wrap, and using a small rolling pin (or any can), roll out to about a 3″ circle. Place about 1 tablespoon filling in the middle. Using the plastic wrap, bring the sides of the wonton wrapper together in the middle. Pick up the ball and gently press the edges together to seal the dumpling (these can be either round or rectangular). If the dough is dry, wipe the edges with a small amount of water to moisten and seal. Place in the steamer and repeat until the steamer is filled, without the dumplings touching the edges or each other because they will stick as they cook. Bring the steamer water to a boil and cook the dumplings 10-12 minutes. Serve with a sesame garlic sauce and garnish with the scallion greens.

Sesame Garlic Sauce:

1/4 cup soy sauce substitute

1 tablespoon toasted sesame oil

1 tablespoon fish sauce

1 teaspoon minced garlic

1 tablespoon date syrup or honey

1/4 teaspoon chili sauce or red pepper flakes