Chicken Canzanese

When I first saw the listing for Chicken Canzanese in the chicken bible, I thought it was a Chinese dish but turns out it’s a very old Italian recipe. I’ve resized and revamped it for those of us with allergies. It originally made eight servings so I’ve reduced it to 4. I’ve also changed the white wine in the original to chicken stock plus a touch of rice vinegar and honey. Since I’m used to using dried herbs rather than fresh, I’ve also reflected that change in this recipe. I hope you enjoy it as much as I did!

Preheat oven to 325 degrees. In an ovenproof skillet (about 10-12 inches), heat over medium high heat:

1 teaspoon olive oil

Add:

1 ounce prosciutto cut into 1/4 inch cubes*

Cook, stirring frequently, until just starting to brown. Add:

3 teaspoons chopped garlic

Cook, stirring often, until garlic just starts to brown. Transfer the prosciutto and garlic to a small bowl. Dry with paper towels:

4-5 chicken thighs, skin on

Dust them with pepper to taste (no salt is necessary in this recipe because of the salt in the prosciutto. Replace the skillet on the heat and add:

1 teaspoon olive oil

the 4-5 chicken thighs, skin side down

Cook until well browned on the first side (about 5 minutes) then turn over and brown on the meat side, reducing heat to medium (about 5 more minutes). Transfer the chicken to a plate. Drain all but 2 tablespoon of the oil from the skillet (the chicken will release quite a bit of fat). Add to the skillet over medium heat:

2 tablespoon all purpose gluten-free flour

Whisk to combine and let the flour cook for about 30 seconds while whisking before adding:

2 cups of chicken stock

drizzle of rice vinegar (about 1/4 teaspoon)

drizzle of honey (about 1/2 teaspoon)

1/4 to 1/2 teaspoon dried rosemary (depending on your taste)

1/2 teaspoon dried sage

dash (1/8 teaspoon) ground cloves (or add 2 whole cloves – just remember to remove them before serving)

2 bay leaves

1/4 teaspoon red pepper flakes (optional depending on your taste)

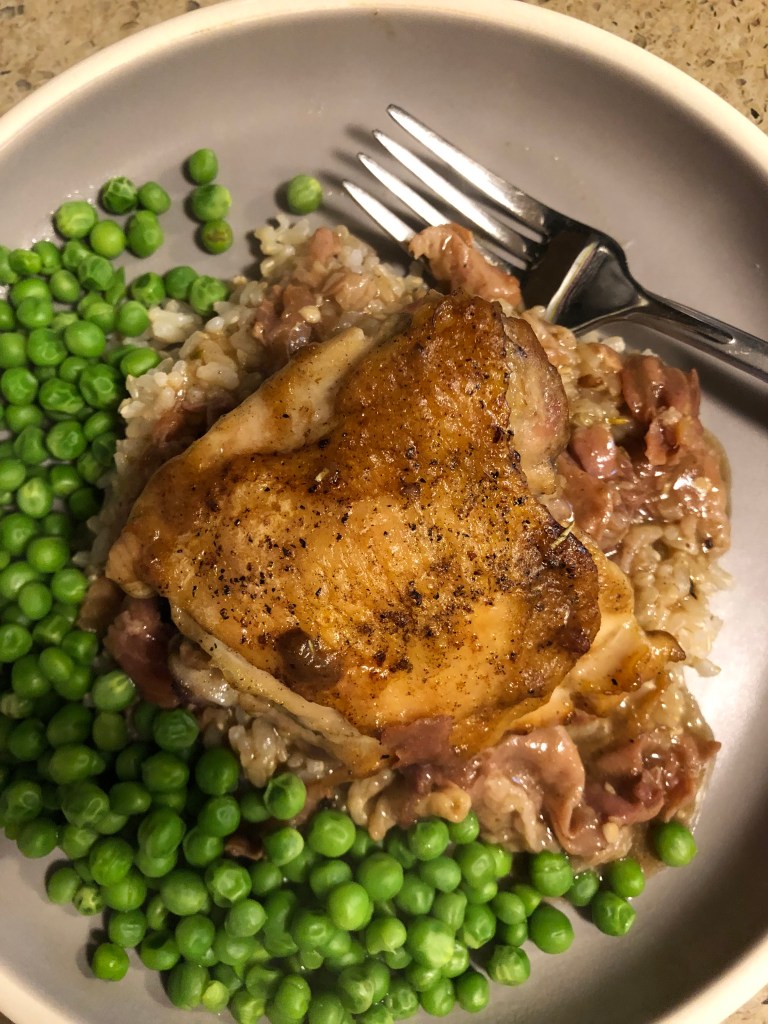
Whisk to combine and cook until slightly thickened. Add the prosciutto, garlic, and chicken (skin side up) to the skillet, nestling the chicken into the sauce. Bake in preheated oven for about 1 to 1 1/2 hours. After about 15 minutes check and see if the sauce is bubbling; if it is reduce oven temperature to 300 and cook until chicken is tender. Sauce should have thickened but if it’s still thin, remove the chicken from the sauce (move to a plate and cover) and cook the sauce on the stovetop for a few minutes until reduced to approximately 1 1/2 cups. Remove from the heat and whisk in:

1 tablespoon vegan margarine

1 tablespoon lemon juice and 1/4 teaspoon lemon zest

Stir to combine and then pour the sauce around the chicken. Remove the bay leaves (and whole cloves if used) before serving. Serve over rice, mashed potatoes, or polenta.

*Prosciutto can become tough if fried when very thinly sliced so it’s recommended that a 1/4″ piece be used to cut “chunks” for this recipe. However, my deli wasn’t able to provide a “slab” of prosciutto because of shortages now due to the pandemic so I used the thinly sliced prepackaged prosciutto instead. Seemed to work alright but I simply chopped it into larger pieces than 1/4″.

Gluten-Free Pizza Crust

It’s very difficult to find a gluten-free pizza crust recipe that doesn’t include at least one egg. This one is yeasted so if you have trouble with getting yeast to work, not an uncommon problem, just make sure your yeast is: 1) still viable – there should be a date on the package; 2) that your water isn’t too hot or too cold – like with a baby’s bottle, the water should be just slightly warmer than a neutral feel on your inside wrist or about 105 degrees; 3) never put the salt in with the yeast, always add it to the flour; and 4) yeast needs food to grow so add the sweetener to the yeast to help it develop.

Those types in place, here’s the recipe. Takes awhile because of letting the yeast do it’s thing but it’s a very easy recipe to make.

First, in a 8-10 cup bowl combine:

1 1/2 cups gluten-free flour (I used the 1to1 but any will work fine)

1 tablespoon date sugar

1 teaspoon guar gum (or xanthan gum)

1 teaspoon baking powder

1/2 teaspoon salt

Mix to combine. In a 2-3 cup bowl mix together:

1 1/2 teaspoons yeast (this is one packet)

1 cup warm water (see above)

1 teaspoon date sugar

1/2 cup of the flour mixture above

Use a whisk to combine until there are no lumps or very small lumps left. Set aside and let the yeast work for 15-30 minutes, it should double in size. If it doesn’t start bubbling within the first few minutes, either the yeast isn’t any good or the water was too cold or too hot. Start again in this case.

After the yeast has doubled in size add:

1 tablespoon olive oil

Then pour the wet yeast mixture into the flour mixture and stir (wooden spoon best) until all the flour is absorbed. Try not to mix too much once the mixture is combined and smooth or the dough may become tough. Form the dough into a ball, or as close to a ball as possible – if the mixture is too wet and sticky, wet or oil a spatula to form into a ball. Cover with a clean kitchen towel or plastic wrap and let sit for about 1 hour or until the ball is about double in size.

Preheat oven to 450 degrees. Grease a 10-12″ pizza pan (or a rectangular baking sheet) with:

2 tablespoons olive oil

Depending on the size and shape of the pizza desired, either scrape the entire ball of dough into the pan or cut into sections to make smaller pizzas. Personally, since I live alone, I quarter the dough and shape it into 4 personal size pizzas on a large baking sheet. Spread it on the pizza pan or shape it using wet or greased hands. I spread the olive oil on the baking pan with my hand and then have a greased hand to spread the dough out and shape it as I like.

Bake the dough for 10-12 minutes or until it just starts to brown. Remove from oven and either cover with toppings and bake for an additional 20-25 minutes at 425 degrees (baking time depends a lot on the thickness of the crust), or cool and freeze the prepared pizza crusts for later use. I made 4 small personal sized pizza but I added the toppings to all of them, baked them and then froze the extra 3 fully made to heat up at a later date.

TIP: Gluten-free baked goods take longer to bake than “normal” baked goods so don’t be afraid to let the pizza dough cook for longer if it isn’t browned on the bottom. My crusts were quite thin so the 20 minutes was sufficient.

Pumpkin Gingerbread Cake

I do love gingerbread but I also love pumpkin. This cake doesn’t have a pronounced pumpkin taste – the ginger overwhelms it so if you want more pumpkin taste, reduce the amount of ginger you add. It’s wonderfully moist and delicious served with a vanilla frozen dessert or a non-dairy whipped cream.

Preheat oven to 350 degrees and grease an 8×8 square or round pan (to take the entire cake out of the pan to serve, cover the baking pan with parchment paper and then grease). In a small bowl combine:

1 tablespoon ground flax

3 tablespoons aquafaba*

*Add 1 teaspoon aquafaba powder to 3 tablespoons hot water. Don’t have aquafaba powder or a can of chickpeas handy? Substitute 1 tablespoon vinegar and 2 tablespoons hot water. Let the mixture sit for 5 minutes or until a flax gel forms. In a medium sized bowl (at least 3 cups) combine:

1/3 cup honey

1/3 cup unsulfured molasses

3/4 cup pumpkin puree

1/2 cup hot (the hotter the better) water

Mix until the molasses and honey are fairly thin. In another medium size bowl (at least 6 cups) sift together:

1 cup sorghum flour

3/4 cup tapioca flour or arrowroot

1 teaspoon xanthan gum

2 teaspoons ginger

1 teaspoon cinnamon

1 teaspoon allspice (or nutmeg)

1 1/2 teaspoons baking soda

Pour the wet ingredients into the dry and mix thoroughly. Pour into the prepared pan and bake for 30-35 minutes or until a toothpick inserted in the center comes out clean. Cool slightly before cutting.

Pumpkin Cheesecake Bites

This is a very simple recipe although it’s not quick because of the need to chill the dough before forming the balls. I can’t tell you how delicious these are since I couldn’t eat them – all the non-dairy cream cheeses on the market contain either soy, coconut or are made from a nut milk, none of which I can eat. However, my daughter-in-law tells me they are scrumptious.

In the bowl of a food processor:

22-24 gluten-free pseudo graham crackers (see recipe under Appetizers and Snacks)

Pulse until the crackers are nothing but crumbs. Remove and measure them. The crumbs should measure about 2 cups. Add to the food processor:

8 ounces non-dairy cream cheese (I used the Kite brand and it’s quite soft so I needed to add the full 2 cups of graham cracker crumbs)

1/2 cup pumpkin puree

1/3 cup fine date sugar

1 teaspoon pumpkin pie spice (or 1/2 teaspoon cinnamon, 1/4 teaspoon nutmeg, and 1/4 teaspoon ground ginger)

1 1/2-2 cups pseudo graham cracker crumbs (depending on the softness of the non-dairy cream cheese you use)

Pulse until well blended. The mixture should come together into a cookie dough like consistency. It may be slightly sticky. If so, add a little more cracker crumbs. Remove from the food processor into a medium bowl, cover and chill in the refrigerator for several hours. Line a medium baking tray with parchment or waxed paper and drop dough by tablespoons onto the paper. If the dough is firm enough, just chill again until set. If the dough is still very soft, freeze for 1/2 to 1 hour. At this point, these can be just rolled in ground nuts or seeds or covered with carob or chocolate.

In a double boiler, over not in hot water, melt 16 ounces carob chips (or if chocolate is possible, use whatever brand of chocolate chips you like). I know that many people now use the microwave to melt chocolate but I find it makes it grainy so I don’t recommend it. When the balls are firm and the chips melted, spoon the melted carob over each ball to cover and then sprinkle with ground nuts or seeds (pumpkin seeds would work very well here). Chill again until the carob sets. Place in an airtight tin and keep in the refrigerator (it is after all cheesecake!). Makes 30-36 balls.

FYI: Since my daughter-in-law loves milk chocolate, I used milk chocolate chips when I made these for her. I also tried dipping the balls into the chocolate but found that they began melting into the hot chocolate so I suggested pouring the carob or chocolate over the balls instead of dipping them.

Pseudo Graham Crackers (or Vegan Graham Crackers)

Never one of my favorite foods, graham crackers are generally made with lots of brown sugar, whole wheat flour, and an egg or two. Here’s a recipe for graham crackers that I actually really like. In fact, I made them this afternoon for a recipe I’m going to make tomorrow which calls for graham crackers (Pumpkin Cheesecake Bites). That is, I’ll make it tomorrow if there are any left! These are so tasty, you might want to make a double batch if you need some for another recipe like I do. Maybe I’ll also make some marshmallow and post up a recipe for smores, that is if there are any leftovers.

Preheat over to 350 degrees.

In a food processor, combine:

1 1/4 cup brown rice flour

2 tablespoons corn starch (or tapioca or potato starch, or arrowroot)

1/3 cup date sugar

1 teaspoon baking powder

1/2 teaspoon salt

Pulse to combine and break up any clumps in the date sugar. Add:

5 tablespoons vegan margarine (that’s 1/4 cup + 1 tablespoon), cold

Pulse to combine until the dough resembles little peas. Add:

1/3 cup non-dairy milk (I used oat but any will work)

3 tablespoons honey (put a little oil on the measure so the honey will slide right out)*

Again pulse until the dough comes away from the sides of the processor bowl. If the dough is too thin, add more flour(I used about 1/4 cup more brown rice flour) until the dough is no longer sticky and comes away from the bowl. Place a 14×16″ piece of parchment (more or less) on the counter and dump the dough onto the parchment. Form into a rectangle as much as possible. Top with a second piece of 14×16″ parchment and using a rolling pin, roll out the dough until it’s almost the size of the parchment and about 1/8″ thick. Slide the parchment onto a baking sheet (an extra large cookie sheet without sides works best) and refrigerate the dough for up to a half hour. Remove from refrigerator and remove the top piece of parchment. Using a knife, pizza cutter, or pastry wheel, cut the dough into pieces either rectangular or square (mine were about 3×3″). Pierce each piece with a fork like you would a pie crust. Bake for 9-11 minutes and then turn the pan and bake for an additional 9-11 minutes or until the edges of the crackers are brown and the center is a golden brown. Cool completely before eating. The crackers should separate easily (mine actually mostly separated during baking). Delicious! Store in an airtight container (if there are any left to store) or in the freezer for long-term storage (haha, not in this household!). Makes approximately 16 crackers depending on size cut.

*By a little, I mean put a drop on your finger and rub it in the measuring spoon. It doesn’t take much.

HINTS: 1 teaspoon of cinnamon or allspice could be added

1/4 cup carob or cocoa could be substituted for some of the flour

Maple syrup could be substituted for the honey

Sweet and Sour Chicken Salad

I often buy a rotisserie chicken, it’s a quick and easy meal. I’m careful of course, all rotisserie chickens are not equal. I read the ingredients until I found one that had no soy, canola, or corn oil. But since I live alone, this chicken always has lots of meat left over. I do so love chicken salad but even that can get boring when always made the same. I’ve added curry powder and made curried chicken salad which is delicious but I recently tried using a sweet and sour dressing, much like one used for coleslaw. Delicious, very easy and tasty at the end of summer when we’re getting tired of the same old salads.

I like to pulse my cooked chicken in my food processor to produce a slightly chunky chicken. Don’t take it to the extent of puree, just a fairly rough chop, almost like cooked ground chicken meat. For 4 servings, dice or pulse:

2 cooked chicken breasts, of medium size

Remove from food processor or cutting board into a bowl. Dice or pulse:

4-5 stalks celery, cleaned and quartered

4-5 scallions, cleaned and quartered

1/2 cup shredded carrots (or diced carrots)

Add to the chicken meat. I also add:

1/2 cup cooked baby peas

Mix these ingredients together. In a separate smaller bowl make the dressing using:

1 cup vegan mayonnaise

1 good dash hot sauce (optional)

2 tablespoons vinegar

2 tablespoons honey, agave nectar or date syrup

2 tablespoons dill pickle relish (or minced dill pickle)

Salt and pepper to taste

Whisk the dressing to combine and then add to the meat mixture. Mix well, chill and serve over a bed of mixed greens. Tomatoes and avocado on the side are a nice addition to this meal. I’ll often also garnish my chicken salad with pumpkin seeds or mix into the salad sesame or poppy seeds.

Pork Chops with Pear Sauce and Sautéed Endive

Mostly I eat chicken but occasionally I’ve have some pork and I find it difficult to find creative ways to cook it, a plain pork chop can be so boring. Here’s one I adjusted from one I found online. I added the endive which goes great with both the pork chop and the pear sauce.

First, make a batch of pear sauce (see recipe under sauces) except instead of adding the ginger, add 1/2 teaspoon of cinnamon and 1/4 teaspoon of allspice (per cup of pear sauce/about 1 pear). Additionally, add about 1 tablespoon of date syrup (or 2 teaspoons of honey or agave nectar).

In a 10″ skillet, heat over medium high:

1 tablespoon olive oil

Blot dry:

2 1″ thick pork chops (or a little thinner or thicker if preferred just adjust the cooking time)

Season with salt, pepper, and garlic powder (granulated works best). Add to the hot oil and sear on each side (about 1-2 minutes per side) then reduce heat to medium low and cook, uncovered, for about 5-6 minutes per side or until the pork is firm to the touch. Set aside and let sit off the heat for approximately 10 minutes to rest.

While the pork rests, heat in 12″ skillet over medium heat:

1 tablespoon olive oil

Add:

1/2 medium sweet onion, dice

6-8 medium to large endive (slice off the lower stem end and then quarter)

Season with salt, pepper, and garlic powder then cook stirring occasionally so that the onion doesn’t burn. After about 3-4 minutes, reduce heat to medium low and cover so that the lower cores of the endive soften and continue cooking for another 3-4 minutes or until the endive cores are softened.

If you’ve premade the pear sauce as I did, heat in a small pot until hot. Pour half the mixture (about 1/2 cup) over each pork chop. Serves 2.

Easy Moroccan Chicken

I’m reposting this recipe that I original developed in 2020 because I have some additional tips for you about it that I thought made it so much more scrumptious. Many of us can’t (and shouldn’t) eat corn. I know because I’m one. But I grew up eating corn and I do so love it. Especially when it’s corn season, like it is right now. I happened to get to the market this morning right after they’d put out a fresh batch of local corn.

If you don’t know when corn is fresh, here’s what to look for: check that the tassels are still moist or at least still have some green to them and are not turned completely brown and that the stem end is still green. If the stem end is brown, the corn is old and will have lost much of it’s flavor. Also don’t husk the corn until you’re ready to put it in the pot! A definite no no. And always steam corn, it should never be boiled.

My mother was a great admirer of Craig Claiborne, the food critic for the New York Times in the 1970s. When he published a cookbook, she had to have it. About a week later, she found a recipe in it for corn in which he said corn should be boiled. She slammed the book shut, said the man was an idiot and never read anything else he ever wrote.

Having grown up on a farm where my father wouldn’t eat corn unless he went out and picked it, husked it and brought it to my mother who had the steamer all set to cook it. And the bushels of corn that we’d blanch and cut off the cobs in September to freeze for the winter. My, it was a two-day affair.

So please, another tip, never reheat or cook corn in water. If you have frozen corn off the cob, it should be simmered in milk (such as oat milk) and some fat (of course my mother always used butter!). Corn has a milky base, not a watery one so cooking it in milk enhances the flavor.

So, today, even though I knew better, I added corn to this recipe. And of my goodness, it was so delicious and I suffered so desperately all afternoon after I ate it but the enjoyment and flavor was worth the few bad hours afterwards. Here’s the amended recipe, feel free to omit the corn if you can’t eat it.

You’ll need:

4 chicken thighs (I tried using a breast and it was tough)

1 cup salsa – use whatever salsa your family prefers, mild, medium, hot or spicy, doesn’t matter

Approximately 3/4 cup of freshly cooked corn cut from the cob (I used only 1 ear)

1 teaspoon honey

1 teaspoon garam masala or coriander

1/2 teaspoon hot sauce [optional]

1/2 teaspoon salt or herbamare

Spray a 9×9″ pan with cooking spray. Mix the salsa, honey and spices together (I use a small whisk) and put a thin layer on the bottom of the pan. Arrange the thighs on top and then spread the remaining salsa mix on each thigh. Bake at 350 degrees for approximately 30-45 minutes depending on the thickness of the chicken thighs.

It’s that easy! You can serve it with brown rice to sop up all the wonderful flavors of the salsa.

PS: I gave the rest of the corn to my grandson so I wouldn’t be tempted to eat it myself!

Watermelon Gazpacho

There are about as many recipes on the internet for watermelon gazpacho as there are for regular tomato based gazpacho. Naturally sweet from the watermelon, my recipe is very simple and easy to make with just a few ingredients. Again, the most difficult part is peeling the tomatoes so get the ripest ones you can find.

First, just as with tomato gazpacho, put a pot of water on to boil. When it’s boiling drop in:

4 small Roma (or plum) tomatoes with + cut in the blossom end (as opposed to the stem end)

Turn off the heat and let them sit for just a minute or so before dousing them in an ice bath. Peel and cut out the stem end (about 1/4 inch into the tomato). Set aside.

Cut into pieces:

1 mini personal watermelon (about 8″ diameter or a little smaller)

Cut the meat off the peel and place in a blender or food processor. Process until smooth. Add the tomatoes and blend until smooth. Add:

1 small English cucumber, peeled and cut into 3-4″ pieces

Add to the mixture and blend until smooth. At this point, there are options:

1/2 small jar of mild (or hot if heat is desired) chili peppers

1 tablespoon hot sauce

1/4 cup fresh basil, chiffonade

I prefer mine pure so I just add at this point:

1 teaspoon sea salt (or herbamare)

Ground pepper to taste

Juice of 1-2 lemons, strained*

Chill and serve. Makes 8 cups.

*OR Limes if preferred.

Gazpacho

This is the time of year for one of the best things to eat on the planet, fresh picked tomatoes! But for anyone who grows them, it soon becomes an overabundance and the issue becomes, “okay, what am I going to do with all these tomatoes?”. For many, this abundance becomes canned (or frozen) pasta sauce, tomato juice, or we even start picking them green and making fried green tomatoes (see recipe under side dishes). Here’s another tasty way to use up some of these extra tomatoes and, with the temperatures around here in the high 80s and low 90s right now, it’s also a very refreshing meal. And it will use up some of those extra cucumbers from the garden as well!

First, put on a good size pot of water to boil. Wash and cut slits (+) across the bottom (the one opposite the stem end) of:

8 medium to large plum tomatoes (use plum or Roma tomatoes because they aren’t as seedy or juicy as other tomatoes)*

While the water comes to a boil, prepare an ice bath in a large pot or bowl by filling the container about half full of cold water and then adding a tray of ice cubes. When the water boils, add the tomatoes, turn off the stove, and let the tomatoes sit for 1-2 minutes in the hot water. Remove with a slotted spoon and put into the ice bath. Let sit for a minute before peeling them. The riper the tomatoes, the less time they need in the hot water and the easier they are to peel. Peel them and cut out the stem end along with the tough part that extends into the tomato for about a quarter inch. Place them into a food processor or blender after peeling.

Pulse until coarsely chopped (or blend). I like my gazpacho fairly smooth so I used my Vitamix and made it fairly smooth. Put into a large bowl (at least 5 quarts). Pulse in a food processor or blender:

3-4 roasted red peppers (fresh can be used by I prefer the flavor of roasted peppers)

2-3 small red onions, peeled and quartered

1 large English cucumber (peeled if not organic otherwise just cut into chunks before pulsing)**

When chopped finely, add to the tomato mixture and stir to blend. Add:

1/4 cup extra virgin olive oil

1/4 cup rice vinegar

1 tablespoon garlic powder (if you like the taste of fresh garlic, pulse 6-8 garlic cloves along with the vegetables)

2 teaspoon sea salt or herbamare

1 teaspoon ground pepper

48 ounces strained organic tomatoes (or tomato juice)

Mix thoroughly and add:

1/4 cup chopped fresh basil (reserve 2 teaspoons for garnish)

Chill thoroughly before serving. WARNING: This makes 16 cups of gazpacho so unless you’re hosting a large dinner party (or want to freeze some), this recipe can be cut in half. Garnish with extra chopped basil, diced cucumber and tomatoes. You can also garnish it with a spoonful of Greek yogurt or sour cream as well as croutons.

*Regular cucumbers can be used instead, just be sure to seed them before pulsing.