Asian Coleslaw

I do love a good coleslaw. I’ve put several recipes for it on my blog over the years and here’s another one that I think is up there near the top. Quick and easy to make, it tastes delicious. Of course, if you can use real soy sauce, feel free but use only half as much as the soy sauce substitute. And I know, more brown food! Can’t seem to stop making brown things.

To make the sauce whisk together:

1/3 cup rice vinegar

1/3 cup avocado oil

5 tablespoons seed or nut butter (I used pumpkin seed butter but tahini would also work well)

1/3 cup soy sauce substitute (or 3 tablespoons soy sauce) (SEE recipe under SAUCES)

3 tablespoons date sugar (or honey, agave or coconut nectar, or date syrup)

1 teaspoon garlic puree

1 tablespoon freshly grated ginger (Optional)

1 teaspoon sesame oil (toasted preferably)

1/4 cup toasted sesame seeds

Whisk until thoroughly blended and then pour over:

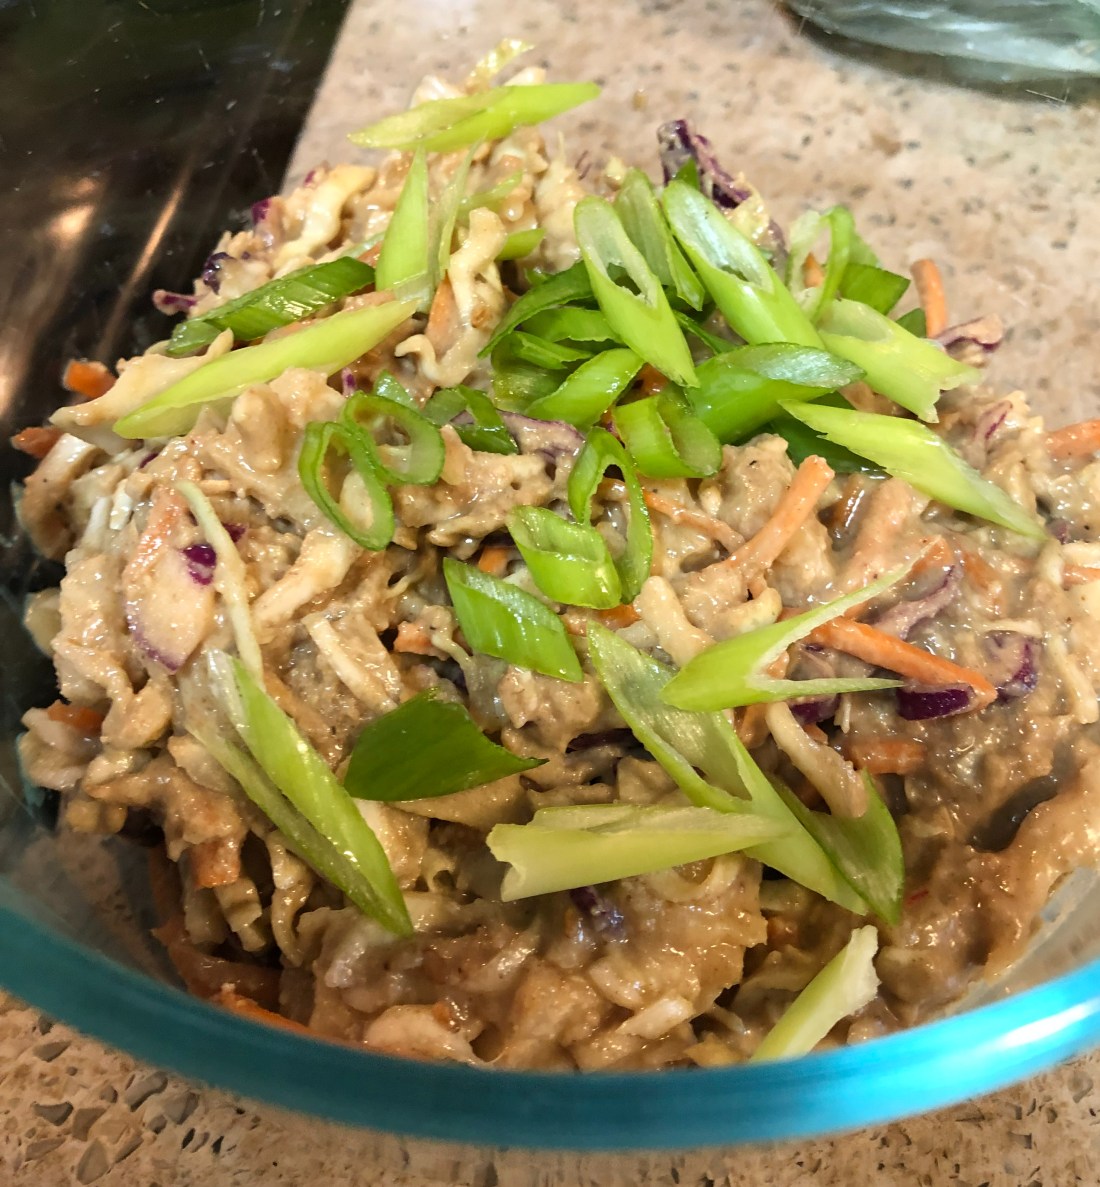
5 cups shaved green cabbage (or Napa cabbage, even some bok choy would work)

2 cups shaved red cabbage

1 cup shredded carrots

1 cup diced water chestnuts

1 cup diced Asian pear*

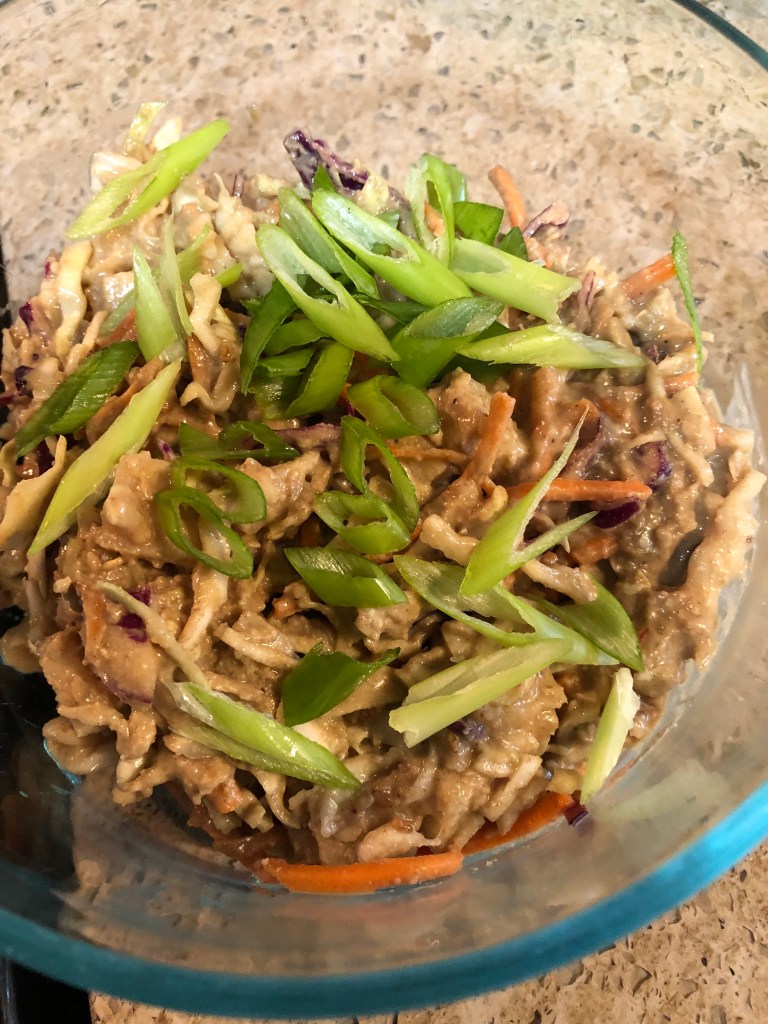
6 scallions, chopped (reserve a few of the chopped greens for garnish)

Mix thoroughly (I used a serving fork) to combine the sauce with all the ingredients. Makes 8-10 servings.

*Asian pears aren’t very sweet and are very firm. If you can’t find Asian pears, feel free to add another chopped fruit such as pineapple. Regular apple or pear won’t work very well here. Jicama would also work but not add any sweetness but you could substitute some apple juice for some of (or all of) the oil. You may want to omit the date sugar if you add pineapple or apple juice.

Zucchini and Turnip Fritters

I love finding easy side dishes to replace the starch of potatoes, rice, or pasta. Here’s one that’s healthy as well as delicious that your family will love because it’s fried! The golden brown goodness of these fritters will get even your children to eat them. Feel free to change up the vegetables – I used zucchini, purple top turnip and carrots but one made with yellow squash, kohlrabi, and butternut squash would also work, or maybe you’d prefer zucchini, celery root, and parsnips. The seasonings can also be switched up – instead of garlic powder and coriander, how about dill, marjoram, basil, thyme, cumin or even some curry. Have fun with this one.

In the bowl of a food processor, place:

1 medium zucchini, cut into sections lengthwise and then quartered

1 medium purple top turnip, ends removed, peeled, and quartered*

8-10 baby carrots, rainbows make a pretty patty

Pulse until well grated. While the vegetables are grating heat over medium heat in a 12″ high-sided skillet:

about 1/4 inch of oil (I used a mixture of olive and avocado oil)

Pour the grated vegetables into a medium-sized bowl and add:

1/4 cup gluten-free all-purpose flour

1 teaspoon baking powder (aluminum free)

1 teaspoon salt

1/4 teaspoon ground black pepper

1/2 teaspoon garlic powder (not salt)

1/4 teaspoon coriander

2-4 green onions, chopped, both green and white sections

Stir to combine thoroughly. Scoop out portions using a 1/4 cup measure. Form into patties. Place in the hot oil and fry until golden brown, about 3-4 minutes, flip and do the same on the other side. Remove and drain on a paper towel to remove excess oil, season with a little more salt. Serve immediately. Makes 2-4 servings depending on what else you’re serving with them and your family’s appetites!

*The purple top turnip has a very mild flavor while the yellow turnip (or rutabaga) is much stronger.

Thai Chicken Tenders

My husband loved chicken tenders. I think more because they’re usually deep fried than for their texture which I find generally to be stringy because they’re often overcooked. I found an adaptable recipe online so I decided to give them a try. It’s quite an easy recipe to make but I’d suggest you make the sauce first so the tenders don’t sit around after frying waiting for the sauce. Like most things that are fried, once dipped in the sauce, they will quickly lose their crunch so serve immediately after you finish preparation. Makes 2 servings.

First, put the oil on to heat. In a deep 12″ skillet heat over medium high heat:

approximately 3/4″ of oil (I used a mix of olive and avocado oil)

Next prepare the sauce. In a small saucepan, whisk together:

1/3 cup soy sauce substitute

1 tablespoon date sugar

1/2 tablespoon sriracha sauce

1 teaspoon pumpkin seed butter (or any butter you like – sunflower, peanut, tahini, etc.)

1 teaspoon grated ginger (optional)

2 tablespoons water (more may be added if the sauce gets too thick)

1-2 teaspoons arrowroot (I used 2 and the sauce got much too thick)

1 teaspoon minced garlic or garlic puree

Cook over medium heat until thickened. I had to add about 1/4 cup of water to thin mine out and I think now that I probably should have made it even thinner so that the sauce wasn’t as thick on the tenders but I didn’t mind it since the sauce is so delicious!

Next coat ONE POUND of chicken tenders. Mix together in a shallow dish:

1 cup gluten-free panko bread crumbs

1/4 teaspoon sea salt

1/8 teaspoon ground black pepper

1/4 teaspoon paprika (or if you want them really spicy, use red pepper flakes instead)

In a separate shallow dish add:

1/2 cup non-dairy milk

1 teaspoon rice vinegar

Dip each tender into the milk to coat and then into the crumb mixture. Gently place in the oil that should now be at 350 degrees (after you add the tenders if the oil is still at temperature, reduce heat from medium high to medium). Cook on the first side for approximately 3-4 minutes before turning and browning on the other side for another 2-3 minutes or until firm. Remove from fat. Be sure not to crowd the tenders in the skillet. Drain on paper towels. When all the tenders are fried, dip each one into the sauce making sure to coat evenly. Serve immediately. Garnish with fresh cilantro or green scallions.

I know, I know, more brown food. But as Anne Burrell says “Brown foot GOOD!”

Easy Oatmeal Granola

I don’t usually post anything about the recipes that I try that don’t turn out well but here’s one I made last night which failed in what it was supposed to be but became an inspiration for something else. I’ve always loved granola but there’s always something, often times raisins or nuts in it, that I can’t have (never mind all the sugar!). The oatcakes recipe I tried to make last night failed miserably – all it wanted to do was crumble. I thought and thought today, what can I do with this? Don’t want to throw it out, it tastes good, maybe use it as a topping for a pear brown betty. Then it hit me – it’ll make really tasty granola. So I added some pumpkin seeds, freeze dried raspberries and some small pieces of chopped dates and guess what – I was right! Oh so delicious! Here’s the basic recipe for the “oatcakes” which you can then add any number of dried fruits and nuts/seeds to for a delicious granola. Just watch out cuz it’s addictive!

Line a medium sized sheet pan with parchment paper. In a medium size bowl combine:

2 cups uncooked gluten-free oatmeal

1 cup gluten-free all-purpose flour

1/2 teaspoon sea salt

1/2 cup fine date sugar

In a small bowl (I used a 1 cup glass measure), combine:

1/4 teaspoon baking soda

1/4 cup hot water

Stir to dissolve the baking soda before adding:

1/2 cup avocado oil

Optional at this point maybe add one or two spices:

1 teaspoon cinnamon, nutmeg, allspice, cardamom

1/4 – 1/2 teaspoon ground cloves, mace, coriander, ginger

Stir into the dry ingredients, the mixture will be crumbly but try to bring it together as much as possible. Spread out on the sheet pan and cool in the refrigerator for 15-20 minutes before baking. Preheat oven to 400 degrees about 5 minutes before the mixture is ready to bake. Bake for approximately 20 minutes until the top is golden brown. Remove from oven and cool before breaking up and putting in a storage container (I used a gallon food storage bag). Add any number of ingredients such as:

1/4 cup pumpkin seeds, sunflower seeds, sesame seeds, hemp hulls

1/4 cup of any type of nuts (if you can eat nuts) like chopped cashews, almonds, walnuts or pecans (roasted of course)

1/4 cup small pieces of chopped dates

1/4 cup freeze-dried fruit such as raspberries, strawberries, etc.

1/4 cup dried fruit like cranberries, blueberries, cherries, etc. – even raisins for those who can eat them!

I must be quite slow on the uptake – it occurred to me while I was typing this that the original recipe writer probably wanted us to use cooked oatmeal rather than uncooked! I’ll have to try it that way.

Honey Barbeque Sauce

I gave you a recipe for barbeque sauce when I made the Barbeque Beans side dish a while ago (see recipe under side dishes). That one included some oil so here’s an oil free, spicy recipe that I just love and I hope you will too. I’m making some pork Ribbletts tomorrow and since my usual Organicville Barbeque Sauce isn’t available at my local store at the moment, I decided to try making my own. I’ll pass on the recipe for the ribbletts tomorrow.

In a small saucepan combine:

1 cup tomato sauce

1/4 cup honey (maple or date syrup, coconut or agave nectar)

1/4 cup white vinegar (or apple cider)

2 tablespoons molasses

1/2 teaspoon salt

1/4 teaspoon ground black pepper

1/4 teaspoon smoked paprika

1/4 teaspoon onion powder

1/4 teaspoon garlic powder

1/4 teaspoon chili sauce (in the Asian section of your market just be sure to purchase one without any sugar) (Optional)

1/2 teaspoon sriracha (Optional)

1/4 teaspoon cumin

Stir or whisk together and taste. Just remember that all these flavors will be accentuated as the sauce reduces. Heat over medium heat until it just starts to bubble then reduce to low and simmer for about 15-20 minutes until thickened. Add additional salt, etc., if needed per your taste. Makes about 1 1/2 – 1 3/4 cups of sauce.

Creamy Turkey Tenderloin with Garlic and Shallots

Here’s a one dish wonder that’s very easy to make and so delectable to eat. When we don’t want to heat up the oven on these hot summer nights, this is a great recipe to fall back on. It’s pretty simple to make and takes very little time, less than a half hour to prepare. The addition of the garlic and shallots adds some flavor as well as heat (we’re talking over a tablespoon of minced garlic here). This would also work well with skinless boneless chicken breasts or pork tenderloin.

First, dry off using paper towels, one:

1 pound (approximately) turkey tenderloin

Then slice it in half lengthwise to expose the tendon running down the middle (that tough white string). Remove the tendon, easier if you cut the tenderloin so that the tendon is on the outer part of one half. On a plate or pie plate (I used a paper plate) combine:

2 tablespoons gluten-free all purpose flour

1/4 teaspoon sea salt

1/4 teaspoon ground black pepper

1/4 teaspoon paprika

1/4 teaspoon garlic powder

Whisk to make sure the herbs are even throughout the flour mixture. Dredge each half of the turkey tenderloin in the flour mixture, on both sides. In a 12″ skillet, heat over medium high heat:

1 tablespoon olive oil

When the oil is shimmering, add the turkey pieces, lower the heat to medium and saute the turkey on each side for approximately 3-5 minutes or until firm, turning once.* Remove from the skillet and add:

3-4 small shallots, sliced and/or diced

1-2 tablespoons minced garlic

You may need to add a little more (about 1 teaspoon) olive oil. Sauté over medium low heat for about 1 minute until the shallots are softened and the garlic is just beginning to brown. Add to the skillet:

1/2 to 3/4 cups chicken (or turkey) stock (start with 1/2 cup and add more if the mixture needs thinning after the next step)

Scrap the bottom of the skillet to release the browned bits left from the turkey. Mix together:

1 cup dairy-free milk (I used oat but for a creamier texture, use a non-dairy creamer)

1 1/2 tablespoons gluten-free flour

Whisk to combine before adding to the skillet. Stir the ingredients to mix thoroughly and continue stirring until the sauce thickens before reducing the heat to low, about 2-3 minutes. Add the turkey pieces back into the sauce and simmer for several minutes to reheat the turkey. Serves 2-4. I served mine over brown rice but it would pair just as well with mashed potatoes, mashed sweet potatoes, quinoa, sorghum or millet, or even a puree of root vegetables.

*The amount of time needed to cook the turkey will depend on the thickness of the turkey slices.

String Beans with Garlic Sauce

I used to love vegetables with garlic sauce. I’d order them, especially eggplant or green beans, whenever I went to an Asian restaurant. A friend recently saw a TikTok video showing how to make them and forwarded it to me. Of course, I had to change a few things to make it suitable to those of us with allergies but it’s a very simple, easy, quick recipe. Enjoy!

First, wash and cut the ends (both) off:

1 pound string beans, green, yellow, purple, doesn’t matter

Next, cut them in half and set aside. In a 12″ high sided skillet, heat over medium high heat:

1 tablespoon olive oil

When the oil is shimmering, add:

1/2 large sweet onion, thinly sliced

1 tablespoon minced garlic OR 6 garlic cloves, thinly sliced

Reduce heat to medium and saute until just starting to brown. Add the string beans along with:

1/4 cup soy sauce substitute (see recipe under Sauces)

1/4 cup stock (vegetable, chicken, doesn’t matter unless you want to keep it vegan)

1 teaspoon sriracha (optional)

1 teaspoon sesame oil (optional)

Salt and pepper to taste

Cover and simmer over medium low heat for about 5 minutes until the string beans begin to get tender. If you like your string beans a little crunchy, cook them a little less and if you like them soft, cook them a little more. Remove the cover and put the heat back up to medium high, stirring the beans constantly until most of the liquid is absorbed and reduced by at least half. It will thicken considerable as it reduces. Serves 4.

6-Minute Sweet Potato Crumpets

What is a crumpet you ask? Well, I’ve seen it described as a spongier English muffin that is made on the griddle rather than in the oven. But English muffins are also made on the griddle. Another description says that crumpets are spongy whereas English muffins are bready. I think that’s probably the best description. So I decided to refer to these as crumpets even though they are not cooked on the stovetop but are cooked in the microwave, therefore making them very quick and easy to make. They could also be baked in a 350 degree oven for about 10-12 minutes. The recipe makes 1 crumpet although while one was cooking, I began another thereby using the entire can of pureed sweet potato to make a total of 8. For a sweeter crumpet, see variations below.

In a small bowl, about 3-4 cups, mix together:

1 tablespoon ground flax

3 tablespoons warm water

Whisk together and let sit for about 3 minutes until it becomes flax gel (egg substitute). At that point, add:

2 tablespoons pureed sweet potato

Whisk to combine before adding:

2 tablespoons sorghum flour

1/2 teaspoon baking powder

about 1/16 teaspoon sea salt (a generous pinch)

1 tablespoon oat milk

Whisk again to combine before pouring the batter into a 2-cup glass bowl (I used Pyrex storage bowls) sprayed with a non-stick cooking spray. Microwave on high for 2-3 minutes (the 2-cup Pyrex storage bowl took 3 minutes; 1 tried 2 1/2 minutes but the bottom wasn’t cooked). Remove from microwave and flip onto a cooling rack. Let cool for 5-10 minutes before dusting the bottom with a little sorghum flour. Let sit for several hours before toasting or place in small baggies. Can be frozen for several weeks, that is if you have any leftover.

With a little of the sugar-free blackberry jelly I made last week. Delicious!

VARIATIONS:

Use pumpkin puree instead of sweet potato

Use tahini instead of sweet potato (or other seed or nut butter); more milk may be needed if using a thicker butter

Add a pinch of cinnamon or allspice

Add 1 teaspoon of date syrup, maple syrup, agave or coconut nectar for a little sweeter crumpet

Use 2 tablespoons of jelly or jam in place of the sweet potato – you may need to adjust the milk and/or flour depending on the consistency of your jelly or jam

Asian-Style Sorghum Salad

There are so many great grains out there for those of us who can’t digest gluten or potatoes. Here’s one that takes a little longer to make, only because sorghum takes such a long time to cook but is really delicious and quite different from any other grain. As usual, feel free to use variations listed below if a non-Asian type of salad is desired. Enjoy something other than pasta or potatoes!

Cook in 2 quarts of boiling water:

1 cup washed sorghum*

1 teaspoon sea salt

Once water boils, reduce heat to medium high and boil uncovered for 50-60 minutes or until sorghum is soft. Rinse under cold water.

While the sorghum is boiling, prepare:

1/2 to 3/4 cup shredded carrots

2 cups shredded Chinese cabbage

1 cup diced jicama (or diced water chestnuts)

1 cup stringed and sliced pea pods

Combine in a large bowl. Then make the dressing. Pour into a 2-cup jar:

1/4 cup soy sauce substitute (see recipe under sauces/condiments/dressings)

1/2 cup olive oil

1/4 cup sesame seeds

2 teaspoons toasted sesame oil

2 tablespoons rice vinegar

1 teaspoon fish sauce (Optional)

2 tablespoon date syrup

1/2 teaspoon chili paste (or wasabi paste)

1 teaspoon finely minced garlic or ginger (Optional)

Shake vigorously to emulsify although the oil will separate if not used immediately so it will need to be repeated prior to use. Once the sorghum is cooked, rinsed and cooled, pour into the bowl of vegetables and add the dressing. Toss to combine and serve.

*Sorghum has a waxy outer shell that needs to be rinsed off before cooking.

VARIATIONS:

Italian Sorghum salad: Use diced tomatoes, cucumbers, parsley or basil, carrots, peas, etc., with an Italian style dressing.

Sorghum “Potato-style” salad: Add some diced onion, celery, hard-boiled eggs, and a mayonnaise dressing.

Indian Sorghum salad: Use chickpeas, broccoli, carrot, cucumber, spinach, or zucchini along with a curry or tahini-based dressing.

Kohlrabi Slaw

Most cole slaws are pretty easy to make especially if you buy a pre-sliced bag of cole slaw mix which usually includes green and red cabbage along with shredded carrots. I’m always looking for new types of cole slaw and a cooking show I watched recently added kohlrabi to it and I remembered the kohlrabi from my childhood. My sister, brothers, and I would be weeding the garden and see the kohlrabi bulbs, cut them off, and eat them like apples. So delicious! And my mother would be so angry with us because she’d planned on cooking them for supper.

This reminds me of that because they’re raw. If you don’t like kohlrabi or can’t find it in your supermarket, jicama would work just as well. Some thin slices of apple or pear would be great in this as well.

Combine in a large bowl:

1 1/2 cups thinly sliced kohlrabi

1 cup shredded carrots

1 1/2 cups thinly sliced red cabbage (I sliced it thin and then cut the slices in half)

1 1/2 cups thinly sliced white cabbage (I used Chinese but any white or green cabbage works)

In a glass jar combine:

1/2 cup olive oil

1/4 cup rice vinegar (white or apple cider would also work)

2 tablespoons honey

1 teaspoon celery seeds

1 tablespoon sriracha (optional)

Put the lid on the jar and shake vigorously for about a minute or until emulsified. Pour over the vegetables and stir to mix the vegetables and dressing (I used tongs for this). Serve chilled. Makes 6 servings.