Eggless Hollandaise Sauce

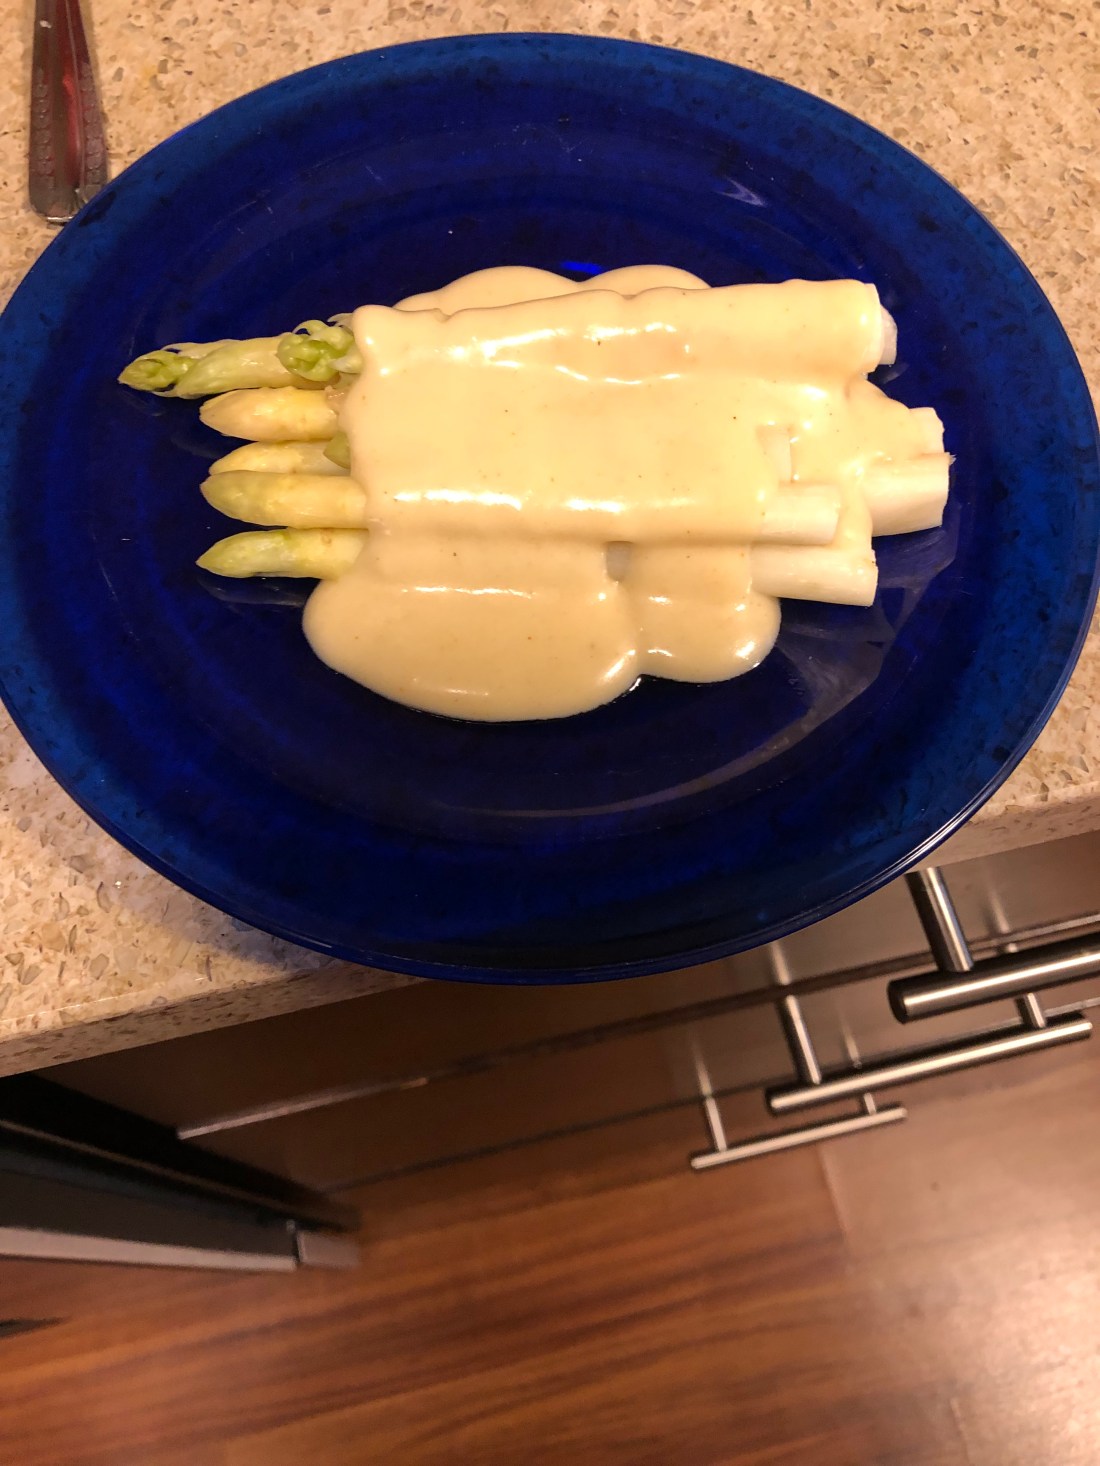
This is a very easy recipe to make, unlike egg yolk and butter based Hollandaise which can break very easily. But even without the egg yolks and butter, it has an unctuous mouth feel and an almost umami satisfaction. It’s a simple white sauce with some added vinegar and lemon zest. Great for topping asparagus (I used white, sorry the photo doesn’t have more color, I have to limit my intake of green vegetables), peas and onions, chicken or turkey breast instead of gravy, or almost any fish (although you might want a little more lemon with fish).

In a 4 cup or larger saucepan, whisk together:

2 tablespoons olive oil

1 1/2 teaspoons rice vinegar

1 teaspoon grated lemon zest (best to grate with a microplane rather than a box grater) [this comes to the zest of about half a lemon]

pinch paprika (wasn’t enough for me so I added about 1/4 teaspoon)

3 tablespoons of gluten-free all purpose flour

Dash of sea salt

This should whisk to a fairly smooth consistency except for the lemon zest. Slowly add while whisking:

3/4 cup cold non-dairy milk (any kind except soy which won’t thicken)

Put over a medium heat and whisk until the mixture begins to thicken. When it’s quite thick, whisk in:

1/2 cup non-dairy milk

Reduce heat to low and continue cooking for 8-10 minutes until the sauce is again somewhat thick (thinner than pudding), it should coat the back of a spoon. Serve hot, makes 1 1/2 cups.

TIPS:

*I added several dashes of herbamare to my sauce

*Gently brown some minced garlic in the oil before adding the remaining ingredients for a roasted garlic flavor (this won’t have a creamy smooth mouth feel)

*Some thyme, Italian herbs, or other herbs in small amounts would work well in this sauce and give it a slightly different flavor. Sage would be good if you want to serve it with chicken or turkey.

*For an eggless “Eggs” Benedict, pour over some Canadian bacon and tomato slice(s) on a gluten-free English muffin for a hearty breakfast.

Thai “Peanut” Sauce with Spaghetti Squash

My obsession with eggplant has been demolished and replaced with spaghetti squash. Such a versatile vegetable, low in carbs, and good either as a “spaghetti” type vegetable or as a mashed squash. In this instance, it’s used as a spaghetti. And of course, I’ve left out the peanuts and substituted tahini but really any seed or nut butter will work in this recipe. And feel free to adjust the last four ingredients in the sauce to meet your family’s tastes. I used a lot more of the red curry paste because I just didn’t taste it at the prescribed amount.

First, preheat oven to 375 degrees. Cut in half:

1 small to medium spaghetti squash (size depending on how many you want to feed)

Sprinkle with about 1 tablespoon of olive oil, salt and pepper and place face down on a baking tray. Bake in preheated oven for approximately 30 minutes or until a knife can be easily inserted into the skin side of the squash. Baking time will depend on the size of the squash. When tender, set aside to cool while you make the sauce.

In a medium size saucepan, combine:

1 1/2 cups non-dairy milk (if you can have coconut milk, it would work well here)

2/3 cup tahini, sunflower, pepita, or other seed or nut butter

1/4 cup date sugar

1/4 cup water

2 tablespoons fish sauce (or soy substitute for vegans)

2 tablespoons rice vinegar

2 teaspoons sesame oil

2 teaspoons red curry paste (I used about 2 tablespoons)

Whisk to combine thoroughly although some heat may be needed to break down the seed or nut butter. Cook over medium high heat until it reaches a boil and then reduce heat to medium low and cook, stirring frequently, until thickened, about 5 minutes. Remove from heat.

In a 12″ skillet, heat over medium heat:

1 tablespoon olive oil

Add:

1/2 cup peas

1/2 cup shredded carrots

1 teaspoon minced garlic

Cover and cook until the carrots and peas are tender, about 5 minutes. Reduce heat to low. Using a fork, scrap the flesh from the inside of the spaghetti squash from end to end. Add to the skillet with the other vegetables along with 1/2 to 1 cup of the sauce. At this point, add:

1/4 cup chopped parsley (OPTIONAL)

Toss and cook for 2-3 minutes until squash is heated through. Serve with chopped nuts or seeds (I used roasted pumpkin seeds, delicious!). With a small squash as a side dish, serves 4.

This recipe makes about 3 times as much sauce as is needed for the dish. I spooned the remainder into 1 cup canning jars and put them in the freezer.

Eggplant Boats

Here’s another recipe for stuffed eggplant which would also work great for zucchini. Those of you who’ve followed me for awhile know how much I love eggplant! This recipe doesn’t use any starchy foods – no rice, pasta, bread crumbs, etc. Instead, it adds some cooked spaghetti squash to the stuffing! Delicious, very rich tasting. I didn’t but a dash of allspice (or nutmeg) would add even more depth to these flavors.

First, preheat oven to 350 degrees. Cut in half:

1 small spaghetti squash

2 large eggplants (longer works better than rounder)

These will both take approximately the same amount of time to cook since the spaghetti squash doesn’t want to be overcooked or the strands turn to mush. Remove the seeds from the squash. Rub the halves of the squash and the eggplant with:

4-6 tablespoons olive oil total for all six pieces

Cut x’s in the eggplant and stab with a fork on the skin side (be sure to use Italian eggplant for these not Oriental ones). Place the squash skin side up and the eggplant skin side down on a large cookie sheet and bake for approximately 30-45 minutes until the squash is tender when stabbed with a knife and the eggplant is starting to turn translucent in the middle. If the eggplants are very round they will take longer to cook through.

Leave both squash and eggplant to cool a little while the filling is cooked. In an 10-12 inch skillet, heat over medium heat:

1 tablespoon oil

When its shimmering (hot), add:

2 sweet Italian sausage removed from the casing (or hot if your family prefers them) [OPTIONAL]

Stir and cook the sausage until it’s almost cooked through before adding:

1 medium onion peeled and diced

1 medium sweet pepper diced

1/2 cup shredded carrots

2 teaspoons minced garlic

6 ounces of sliced shitake mushrooms

Cover and simmer over medium low heat until the vegetables are softened. Remove cover and add:

1 to 1 1/2 cups marinara sauce [see recipe under sauces or use jarred]

Cover again and leave over low heat. Use a fork to remove the flesh from the spaghetti squash, going from stem to bud end lengthwise not across the squash. It should come off in strands that look like spaghetti unless it’s overcooked. It will still work just won’t look like spaghetti in the filling. Also use a sharp spoon to detach the center flesh of the eggplant, cut it into pieces. Be sure to leave about a 1/4 inch of eggplant in the skins. Add the removed eggplant to the filling along with:

2 cups of the spaghetti squash (should be about equal to both halves of the squash depending on size)

Mix the squash and eggplant into the filling in the skillet. Place the eggplant halves on a baking sheet and fill generously with the filling. Sprinkle with:

1/4 to 1/2 cup non-dairy cheese (I used Parmesan but any cheese your family likes will work)

Return to the oven and bake for 20-25 minutes. Serves 4 to 6 depending on the size of the eggplant.

Vegan Carob Soufflé

I would never have thought I could make a soufflé without eggs but here it is! And delicious although perhaps not quite as fluffy as an egg soufflé. Very easy to make, just be sure it’s coming out of the oven immediately before you want to serve it because it does fall quite quickly as it cools off. Impress your vegan friends with this one! And of course, you can use chocolate instead of carob.

First, preheat oven to 350 degrees. This makes only 3 soufflés but is easy enough to double. Prepare the ramekins but spraying with a non-stick spray and then dusting them with a mixture of:

1 teaspoon carob powder

2 teaspoons date sugar

This allows the soufflé mixture to rise without being gripped by the ramekins surface. Next, mix together:

1 tablespoon psyllium husk (I used flaked)

3 tablespoons cold water

Whisk together to mix and set aside. The next step is to melt together:

1/2 cup unsweetened carob chips (or chocolate chips)

1/4 cup vegan margarine or butter (I used 1/4 cup of avocado oil)

Melt in either a double boiler over (not in) water over low heat or place a metal bowl on top of a pot of simmering water. Keep over low heat so that there isn’t a lot of steam emerging which could break the carob or chocolate. While this melts, in a medium sized bowl beat:

1/2 cup cold water

2 teaspoons aquafaba powder*

3 tablespoons date sugar

1/4 teaspoon guar gum

1/4 teaspoon cream of tartar

If you don’t have any aquafaba powder, use a cup of liquid aquafaba that you’ve reduced over heat to 1/2 cup. This requires a stronger mix of aquafaba so the powder is the easiest way to go. [It’s readily available online.]

Start beating the mixture on the lowest speed of your hand or stand mixer. Beat on low for 2-3 minutes then increase the speed to medium, again beating 2-3 minutes before finally increasing the speed to the highest setting and again beating 2-3 minutes. Trust me, you’ll say after the second stage that the mixture looks like stiff peaks but don’t stop there! This needs the third stage of the beating to keep it’s fluffy texture when folded into the carob mixture.

Once the chips are melted, remove from the heat and whisk together the fat and carob before adding:

1 teaspoon vanilla extract

3 tablespoons date sugar (optional depending on your family’s sweet tooth!)

1 tablespoon all purpose gluten-free flour

2 tablespoons carob powder

1/4 teaspoon sea salt

the psyllium mixture you set aside earlier

Whisk together to combine and then spoon in the aquafaba mixture. Carefully fold in the whipped aquafaba (it’s okay if a few streaks remain). Spoon into the prepared ramekins. Mixture should reach almost to the top of the ramekin. Bake for 20 minutes – DO NOT OPEN THE OVEN WHILE COOKING – the mixture should reach the top of the ramekin. Serve immediately.

Chicken Canzanese

When I first saw the listing for Chicken Canzanese in the chicken bible, I thought it was a Chinese dish but turns out it’s a very old Italian recipe. I’ve resized and revamped it for those of us with allergies. It originally made eight servings so I’ve reduced it to 4. I’ve also changed the white wine in the original to chicken stock plus a touch of rice vinegar and honey. Since I’m used to using dried herbs rather than fresh, I’ve also reflected that change in this recipe. I hope you enjoy it as much as I did!

Preheat oven to 325 degrees. In an ovenproof skillet (about 10-12 inches), heat over medium high heat:

1 teaspoon olive oil

Add:

1 ounce prosciutto cut into 1/4 inch cubes*

Cook, stirring frequently, until just starting to brown. Add:

3 teaspoons chopped garlic

Cook, stirring often, until garlic just starts to brown. Transfer the prosciutto and garlic to a small bowl. Dry with paper towels:

4-5 chicken thighs, skin on

Dust them with pepper to taste (no salt is necessary in this recipe because of the salt in the prosciutto. Replace the skillet on the heat and add:

1 teaspoon olive oil

the 4-5 chicken thighs, skin side down

Cook until well browned on the first side (about 5 minutes) then turn over and brown on the meat side, reducing heat to medium (about 5 more minutes). Transfer the chicken to a plate. Drain all but 2 tablespoon of the oil from the skillet (the chicken will release quite a bit of fat). Add to the skillet over medium heat:

2 tablespoon all purpose gluten-free flour

Whisk to combine and let the flour cook for about 30 seconds while whisking before adding:

2 cups of chicken stock

drizzle of rice vinegar (about 1/4 teaspoon)

drizzle of honey (about 1/2 teaspoon)

1/4 to 1/2 teaspoon dried rosemary (depending on your taste)

1/2 teaspoon dried sage

dash (1/8 teaspoon) ground cloves (or add 2 whole cloves – just remember to remove them before serving)

2 bay leaves

1/4 teaspoon red pepper flakes (optional depending on your taste)

Whisk to combine and cook until slightly thickened. Add the prosciutto, garlic, and chicken (skin side up) to the skillet, nestling the chicken into the sauce. Bake in preheated oven for about 1 to 1 1/2 hours. After about 15 minutes check and see if the sauce is bubbling; if it is reduce oven temperature to 300 and cook until chicken is tender. Sauce should have thickened but if it’s still thin, remove the chicken from the sauce (move to a plate and cover) and cook the sauce on the stovetop for a few minutes until reduced to approximately 1 1/2 cups. Remove from the heat and whisk in:

1 tablespoon vegan margarine

1 tablespoon lemon juice and 1/4 teaspoon lemon zest

Stir to combine and then pour the sauce around the chicken. Remove the bay leaves (and whole cloves if used) before serving. Serve over rice, mashed potatoes, or polenta.

*Prosciutto can become tough if fried when very thinly sliced so it’s recommended that a 1/4″ piece be used to cut “chunks” for this recipe. However, my deli wasn’t able to provide a “slab” of prosciutto because of shortages now due to the pandemic so I used the thinly sliced prepackaged prosciutto instead. Seemed to work alright but I simply chopped it into larger pieces than 1/4″.

Gluten-Free Pizza Crust

It’s very difficult to find a gluten-free pizza crust recipe that doesn’t include at least one egg. This one is yeasted so if you have trouble with getting yeast to work, not an uncommon problem, just make sure your yeast is: 1) still viable – there should be a date on the package; 2) that your water isn’t too hot or too cold – like with a baby’s bottle, the water should be just slightly warmer than a neutral feel on your inside wrist or about 105 degrees; 3) never put the salt in with the yeast, always add it to the flour; and 4) yeast needs food to grow so add the sweetener to the yeast to help it develop.

Those types in place, here’s the recipe. Takes awhile because of letting the yeast do it’s thing but it’s a very easy recipe to make.

First, in a 8-10 cup bowl combine:

1 1/2 cups gluten-free flour (I used the 1to1 but any will work fine)

1 tablespoon date sugar

1 teaspoon guar gum (or xanthan gum)

1 teaspoon baking powder

1/2 teaspoon salt

Mix to combine. In a 2-3 cup bowl mix together:

1 1/2 teaspoons yeast (this is one packet)

1 cup warm water (see above)

1 teaspoon date sugar

1/2 cup of the flour mixture above

Use a whisk to combine until there are no lumps or very small lumps left. Set aside and let the yeast work for 15-30 minutes, it should double in size. If it doesn’t start bubbling within the first few minutes, either the yeast isn’t any good or the water was too cold or too hot. Start again in this case.

After the yeast has doubled in size add:

1 tablespoon olive oil

Then pour the wet yeast mixture into the flour mixture and stir (wooden spoon best) until all the flour is absorbed. Try not to mix too much once the mixture is combined and smooth or the dough may become tough. Form the dough into a ball, or as close to a ball as possible – if the mixture is too wet and sticky, wet or oil a spatula to form into a ball. Cover with a clean kitchen towel or plastic wrap and let sit for about 1 hour or until the ball is about double in size.

Preheat oven to 450 degrees. Grease a 10-12″ pizza pan (or a rectangular baking sheet) with:

2 tablespoons olive oil

Depending on the size and shape of the pizza desired, either scrape the entire ball of dough into the pan or cut into sections to make smaller pizzas. Personally, since I live alone, I quarter the dough and shape it into 4 personal size pizzas on a large baking sheet. Spread it on the pizza pan or shape it using wet or greased hands. I spread the olive oil on the baking pan with my hand and then have a greased hand to spread the dough out and shape it as I like.

Bake the dough for 10-12 minutes or until it just starts to brown. Remove from oven and either cover with toppings and bake for an additional 20-25 minutes at 425 degrees (baking time depends a lot on the thickness of the crust), or cool and freeze the prepared pizza crusts for later use. I made 4 small personal sized pizza but I added the toppings to all of them, baked them and then froze the extra 3 fully made to heat up at a later date.

TIP: Gluten-free baked goods take longer to bake than “normal” baked goods so don’t be afraid to let the pizza dough cook for longer if it isn’t browned on the bottom. My crusts were quite thin so the 20 minutes was sufficient.

Pumpkin Gingerbread Cake

I do love gingerbread but I also love pumpkin. This cake doesn’t have a pronounced pumpkin taste – the ginger overwhelms it so if you want more pumpkin taste, reduce the amount of ginger you add. It’s wonderfully moist and delicious served with a vanilla frozen dessert or a non-dairy whipped cream.

Preheat oven to 350 degrees and grease an 8×8 square or round pan (to take the entire cake out of the pan to serve, cover the baking pan with parchment paper and then grease). In a small bowl combine:

1 tablespoon ground flax

3 tablespoons aquafaba*

*Add 1 teaspoon aquafaba powder to 3 tablespoons hot water. Don’t have aquafaba powder or a can of chickpeas handy? Substitute 1 tablespoon vinegar and 2 tablespoons hot water. Let the mixture sit for 5 minutes or until a flax gel forms. In a medium sized bowl (at least 3 cups) combine:

1/3 cup honey

1/3 cup unsulfured molasses

3/4 cup pumpkin puree

1/2 cup hot (the hotter the better) water

Mix until the molasses and honey are fairly thin. In another medium size bowl (at least 6 cups) sift together:

1 cup sorghum flour

3/4 cup tapioca flour or arrowroot

1 teaspoon xanthan gum

2 teaspoons ginger

1 teaspoon cinnamon

1 teaspoon allspice (or nutmeg)

1 1/2 teaspoons baking soda

Pour the wet ingredients into the dry and mix thoroughly. Pour into the prepared pan and bake for 30-35 minutes or until a toothpick inserted in the center comes out clean. Cool slightly before cutting.

Pumpkin Cheesecake Bites

This is a very simple recipe although it’s not quick because of the need to chill the dough before forming the balls. I can’t tell you how delicious these are since I couldn’t eat them – all the non-dairy cream cheeses on the market contain either soy, coconut or are made from a nut milk, none of which I can eat. However, my daughter-in-law tells me they are scrumptious.

In the bowl of a food processor:

22-24 gluten-free pseudo graham crackers (see recipe under Appetizers and Snacks)

Pulse until the crackers are nothing but crumbs. Remove and measure them. The crumbs should measure about 2 cups. Add to the food processor:

8 ounces non-dairy cream cheese (I used the Kite brand and it’s quite soft so I needed to add the full 2 cups of graham cracker crumbs)

1/2 cup pumpkin puree

1/3 cup fine date sugar

1 teaspoon pumpkin pie spice (or 1/2 teaspoon cinnamon, 1/4 teaspoon nutmeg, and 1/4 teaspoon ground ginger)

1 1/2-2 cups pseudo graham cracker crumbs (depending on the softness of the non-dairy cream cheese you use)

Pulse until well blended. The mixture should come together into a cookie dough like consistency. It may be slightly sticky. If so, add a little more cracker crumbs. Remove from the food processor into a medium bowl, cover and chill in the refrigerator for several hours. Line a medium baking tray with parchment or waxed paper and drop dough by tablespoons onto the paper. If the dough is firm enough, just chill again until set. If the dough is still very soft, freeze for 1/2 to 1 hour. At this point, these can be just rolled in ground nuts or seeds or covered with carob or chocolate.

In a double boiler, over not in hot water, melt 16 ounces carob chips (or if chocolate is possible, use whatever brand of chocolate chips you like). I know that many people now use the microwave to melt chocolate but I find it makes it grainy so I don’t recommend it. When the balls are firm and the chips melted, spoon the melted carob over each ball to cover and then sprinkle with ground nuts or seeds (pumpkin seeds would work very well here). Chill again until the carob sets. Place in an airtight tin and keep in the refrigerator (it is after all cheesecake!). Makes 30-36 balls.

FYI: Since my daughter-in-law loves milk chocolate, I used milk chocolate chips when I made these for her. I also tried dipping the balls into the chocolate but found that they began melting into the hot chocolate so I suggested pouring the carob or chocolate over the balls instead of dipping them.

Pseudo Graham Crackers (or Vegan Graham Crackers)

Never one of my favorite foods, graham crackers are generally made with lots of brown sugar, whole wheat flour, and an egg or two. Here’s a recipe for graham crackers that I actually really like. In fact, I made them this afternoon for a recipe I’m going to make tomorrow which calls for graham crackers (Pumpkin Cheesecake Bites). That is, I’ll make it tomorrow if there are any left! These are so tasty, you might want to make a double batch if you need some for another recipe like I do. Maybe I’ll also make some marshmallow and post up a recipe for smores, that is if there are any leftovers.

Preheat over to 350 degrees.

In a food processor, combine:

1 1/4 cup brown rice flour

2 tablespoons corn starch (or tapioca or potato starch, or arrowroot)

1/3 cup date sugar

1 teaspoon baking powder

1/2 teaspoon salt

Pulse to combine and break up any clumps in the date sugar. Add:

5 tablespoons vegan margarine (that’s 1/4 cup + 1 tablespoon), cold

Pulse to combine until the dough resembles little peas. Add:

1/3 cup non-dairy milk (I used oat but any will work)

3 tablespoons honey (put a little oil on the measure so the honey will slide right out)*

Again pulse until the dough comes away from the sides of the processor bowl. If the dough is too thin, add more flour(I used about 1/4 cup more brown rice flour) until the dough is no longer sticky and comes away from the bowl. Place a 14×16″ piece of parchment (more or less) on the counter and dump the dough onto the parchment. Form into a rectangle as much as possible. Top with a second piece of 14×16″ parchment and using a rolling pin, roll out the dough until it’s almost the size of the parchment and about 1/8″ thick. Slide the parchment onto a baking sheet (an extra large cookie sheet without sides works best) and refrigerate the dough for up to a half hour. Remove from refrigerator and remove the top piece of parchment. Using a knife, pizza cutter, or pastry wheel, cut the dough into pieces either rectangular or square (mine were about 3×3″). Pierce each piece with a fork like you would a pie crust. Bake for 9-11 minutes and then turn the pan and bake for an additional 9-11 minutes or until the edges of the crackers are brown and the center is a golden brown. Cool completely before eating. The crackers should separate easily (mine actually mostly separated during baking). Delicious! Store in an airtight container (if there are any left to store) or in the freezer for long-term storage (haha, not in this household!). Makes approximately 16 crackers depending on size cut.

*By a little, I mean put a drop on your finger and rub it in the measuring spoon. It doesn’t take much.

HINTS: 1 teaspoon of cinnamon or allspice could be added

1/4 cup carob or cocoa could be substituted for some of the flour

Maple syrup could be substituted for the honey

Sweet and Sour Chicken Salad

I often buy a rotisserie chicken, it’s a quick and easy meal. I’m careful of course, all rotisserie chickens are not equal. I read the ingredients until I found one that had no soy, canola, or corn oil. But since I live alone, this chicken always has lots of meat left over. I do so love chicken salad but even that can get boring when always made the same. I’ve added curry powder and made curried chicken salad which is delicious but I recently tried using a sweet and sour dressing, much like one used for coleslaw. Delicious, very easy and tasty at the end of summer when we’re getting tired of the same old salads.

I like to pulse my cooked chicken in my food processor to produce a slightly chunky chicken. Don’t take it to the extent of puree, just a fairly rough chop, almost like cooked ground chicken meat. For 4 servings, dice or pulse:

2 cooked chicken breasts, of medium size

Remove from food processor or cutting board into a bowl. Dice or pulse:

4-5 stalks celery, cleaned and quartered

4-5 scallions, cleaned and quartered

1/2 cup shredded carrots (or diced carrots)

Add to the chicken meat. I also add:

1/2 cup cooked baby peas

Mix these ingredients together. In a separate smaller bowl make the dressing using:

1 cup vegan mayonnaise

1 good dash hot sauce (optional)

2 tablespoons vinegar

2 tablespoons honey, agave nectar or date syrup

2 tablespoons dill pickle relish (or minced dill pickle)

Salt and pepper to taste

Whisk the dressing to combine and then add to the meat mixture. Mix well, chill and serve over a bed of mixed greens. Tomatoes and avocado on the side are a nice addition to this meal. I’ll often also garnish my chicken salad with pumpkin seeds or mix into the salad sesame or poppy seeds.