Eggplant Boats

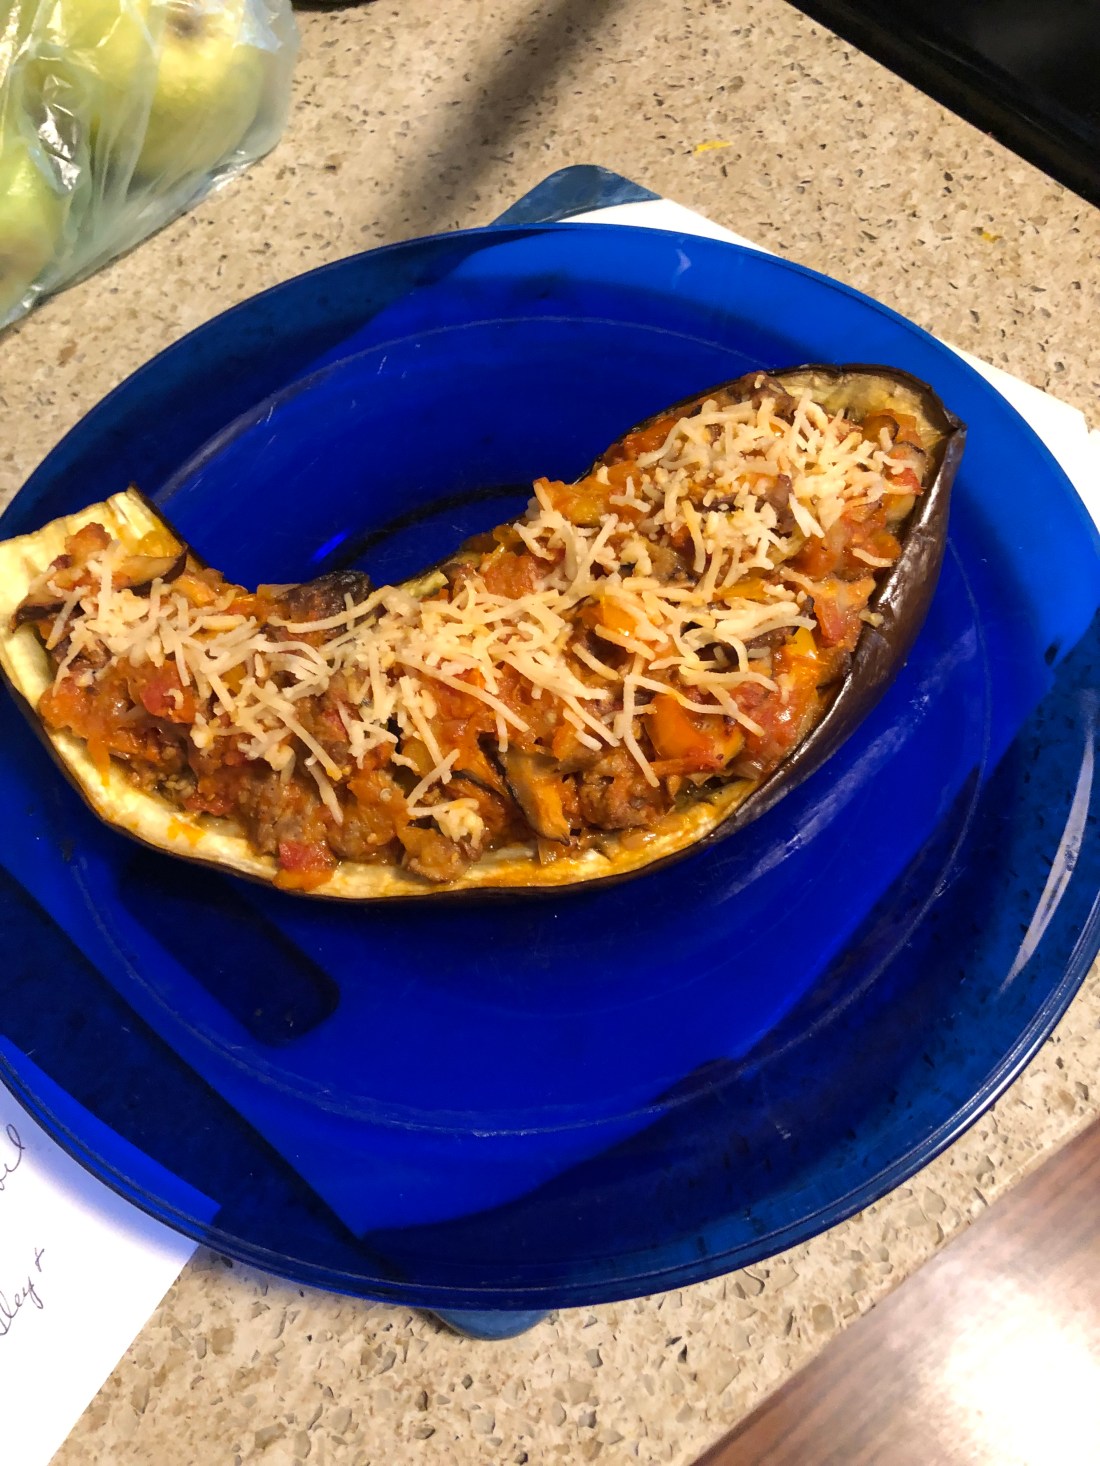
Here’s another recipe for stuffed eggplant which would also work great for zucchini. Those of you who’ve followed me for awhile know how much I love eggplant! This recipe doesn’t use any starchy foods – no rice, pasta, bread crumbs, etc. Instead, it adds some cooked spaghetti squash to the stuffing! Delicious, very rich tasting. I didn’t but a dash of allspice (or nutmeg) would add even more depth to these flavors.

First, preheat oven to 350 degrees. Cut in half:

1 small spaghetti squash

2 large eggplants (longer works better than rounder)

These will both take approximately the same amount of time to cook since the spaghetti squash doesn’t want to be overcooked or the strands turn to mush. Remove the seeds from the squash. Rub the halves of the squash and the eggplant with:

4-6 tablespoons olive oil total for all six pieces

Cut x’s in the eggplant and stab with a fork on the skin side (be sure to use Italian eggplant for these not Oriental ones). Place the squash skin side up and the eggplant skin side down on a large cookie sheet and bake for approximately 30-45 minutes until the squash is tender when stabbed with a knife and the eggplant is starting to turn translucent in the middle. If the eggplants are very round they will take longer to cook through.

Leave both squash and eggplant to cool a little while the filling is cooked. In an 10-12 inch skillet, heat over medium heat:

1 tablespoon oil

When its shimmering (hot), add:

2 sweet Italian sausage removed from the casing (or hot if your family prefers them) [OPTIONAL]

Stir and cook the sausage until it’s almost cooked through before adding:

1 medium onion peeled and diced

1 medium sweet pepper diced

1/2 cup shredded carrots

2 teaspoons minced garlic

6 ounces of sliced shitake mushrooms

Cover and simmer over medium low heat until the vegetables are softened. Remove cover and add:

1 to 1 1/2 cups marinara sauce [see recipe under sauces or use jarred]

Cover again and leave over low heat. Use a fork to remove the flesh from the spaghetti squash, going from stem to bud end lengthwise not across the squash. It should come off in strands that look like spaghetti unless it’s overcooked. It will still work just won’t look like spaghetti in the filling. Also use a sharp spoon to detach the center flesh of the eggplant, cut it into pieces. Be sure to leave about a 1/4 inch of eggplant in the skins. Add the removed eggplant to the filling along with:

2 cups of the spaghetti squash (should be about equal to both halves of the squash depending on size)

Mix the squash and eggplant into the filling in the skillet. Place the eggplant halves on a baking sheet and fill generously with the filling. Sprinkle with:

1/4 to 1/2 cup non-dairy cheese (I used Parmesan but any cheese your family likes will work)

Return to the oven and bake for 20-25 minutes. Serves 4 to 6 depending on the size of the eggplant.

Vegan Carob Soufflé

I would never have thought I could make a soufflé without eggs but here it is! And delicious although perhaps not quite as fluffy as an egg soufflé. Very easy to make, just be sure it’s coming out of the oven immediately before you want to serve it because it does fall quite quickly as it cools off. Impress your vegan friends with this one! And of course, you can use chocolate instead of carob.

First, preheat oven to 350 degrees. This makes only 3 soufflés but is easy enough to double. Prepare the ramekins but spraying with a non-stick spray and then dusting them with a mixture of:

1 teaspoon carob powder

2 teaspoons date sugar

This allows the soufflé mixture to rise without being gripped by the ramekins surface. Next, mix together:

1 tablespoon psyllium husk (I used flaked)

3 tablespoons cold water

Whisk together to mix and set aside. The next step is to melt together:

1/2 cup unsweetened carob chips (or chocolate chips)

1/4 cup vegan margarine or butter (I used 1/4 cup of avocado oil)

Melt in either a double boiler over (not in) water over low heat or place a metal bowl on top of a pot of simmering water. Keep over low heat so that there isn’t a lot of steam emerging which could break the carob or chocolate. While this melts, in a medium sized bowl beat:

1/2 cup cold water

2 teaspoons aquafaba powder*

3 tablespoons date sugar

1/4 teaspoon guar gum

1/4 teaspoon cream of tartar

If you don’t have any aquafaba powder, use a cup of liquid aquafaba that you’ve reduced over heat to 1/2 cup. This requires a stronger mix of aquafaba so the powder is the easiest way to go. [It’s readily available online.]

Start beating the mixture on the lowest speed of your hand or stand mixer. Beat on low for 2-3 minutes then increase the speed to medium, again beating 2-3 minutes before finally increasing the speed to the highest setting and again beating 2-3 minutes. Trust me, you’ll say after the second stage that the mixture looks like stiff peaks but don’t stop there! This needs the third stage of the beating to keep it’s fluffy texture when folded into the carob mixture.

Once the chips are melted, remove from the heat and whisk together the fat and carob before adding:

1 teaspoon vanilla extract

3 tablespoons date sugar (optional depending on your family’s sweet tooth!)

1 tablespoon all purpose gluten-free flour

2 tablespoons carob powder

1/4 teaspoon sea salt

the psyllium mixture you set aside earlier

Whisk together to combine and then spoon in the aquafaba mixture. Carefully fold in the whipped aquafaba (it’s okay if a few streaks remain). Spoon into the prepared ramekins. Mixture should reach almost to the top of the ramekin. Bake for 20 minutes – DO NOT OPEN THE OVEN WHILE COOKING – the mixture should reach the top of the ramekin. Serve immediately.

Chicken Canzanese

When I first saw the listing for Chicken Canzanese in the chicken bible, I thought it was a Chinese dish but turns out it’s a very old Italian recipe. I’ve resized and revamped it for those of us with allergies. It originally made eight servings so I’ve reduced it to 4. I’ve also changed the white wine in the original to chicken stock plus a touch of rice vinegar and honey. Since I’m used to using dried herbs rather than fresh, I’ve also reflected that change in this recipe. I hope you enjoy it as much as I did!

Preheat oven to 325 degrees. In an ovenproof skillet (about 10-12 inches), heat over medium high heat:

1 teaspoon olive oil

Add:

1 ounce prosciutto cut into 1/4 inch cubes*

Cook, stirring frequently, until just starting to brown. Add:

3 teaspoons chopped garlic

Cook, stirring often, until garlic just starts to brown. Transfer the prosciutto and garlic to a small bowl. Dry with paper towels:

4-5 chicken thighs, skin on

Dust them with pepper to taste (no salt is necessary in this recipe because of the salt in the prosciutto. Replace the skillet on the heat and add:

1 teaspoon olive oil

the 4-5 chicken thighs, skin side down

Cook until well browned on the first side (about 5 minutes) then turn over and brown on the meat side, reducing heat to medium (about 5 more minutes). Transfer the chicken to a plate. Drain all but 2 tablespoon of the oil from the skillet (the chicken will release quite a bit of fat). Add to the skillet over medium heat:

2 tablespoon all purpose gluten-free flour

Whisk to combine and let the flour cook for about 30 seconds while whisking before adding:

2 cups of chicken stock

drizzle of rice vinegar (about 1/4 teaspoon)

drizzle of honey (about 1/2 teaspoon)

1/4 to 1/2 teaspoon dried rosemary (depending on your taste)

1/2 teaspoon dried sage

dash (1/8 teaspoon) ground cloves (or add 2 whole cloves – just remember to remove them before serving)

2 bay leaves

1/4 teaspoon red pepper flakes (optional depending on your taste)

Whisk to combine and cook until slightly thickened. Add the prosciutto, garlic, and chicken (skin side up) to the skillet, nestling the chicken into the sauce. Bake in preheated oven for about 1 to 1 1/2 hours. After about 15 minutes check and see if the sauce is bubbling; if it is reduce oven temperature to 300 and cook until chicken is tender. Sauce should have thickened but if it’s still thin, remove the chicken from the sauce (move to a plate and cover) and cook the sauce on the stovetop for a few minutes until reduced to approximately 1 1/2 cups. Remove from the heat and whisk in:

1 tablespoon vegan margarine

1 tablespoon lemon juice and 1/4 teaspoon lemon zest

Stir to combine and then pour the sauce around the chicken. Remove the bay leaves (and whole cloves if used) before serving. Serve over rice, mashed potatoes, or polenta.

*Prosciutto can become tough if fried when very thinly sliced so it’s recommended that a 1/4″ piece be used to cut “chunks” for this recipe. However, my deli wasn’t able to provide a “slab” of prosciutto because of shortages now due to the pandemic so I used the thinly sliced prepackaged prosciutto instead. Seemed to work alright but I simply chopped it into larger pieces than 1/4″.

Gluten-Free Pizza Crust

It’s very difficult to find a gluten-free pizza crust recipe that doesn’t include at least one egg. This one is yeasted so if you have trouble with getting yeast to work, not an uncommon problem, just make sure your yeast is: 1) still viable – there should be a date on the package; 2) that your water isn’t too hot or too cold – like with a baby’s bottle, the water should be just slightly warmer than a neutral feel on your inside wrist or about 105 degrees; 3) never put the salt in with the yeast, always add it to the flour; and 4) yeast needs food to grow so add the sweetener to the yeast to help it develop.

Those types in place, here’s the recipe. Takes awhile because of letting the yeast do it’s thing but it’s a very easy recipe to make.

First, in a 8-10 cup bowl combine:

1 1/2 cups gluten-free flour (I used the 1to1 but any will work fine)

1 tablespoon date sugar

1 teaspoon guar gum (or xanthan gum)

1 teaspoon baking powder

1/2 teaspoon salt

Mix to combine. In a 2-3 cup bowl mix together:

1 1/2 teaspoons yeast (this is one packet)

1 cup warm water (see above)

1 teaspoon date sugar

1/2 cup of the flour mixture above

Use a whisk to combine until there are no lumps or very small lumps left. Set aside and let the yeast work for 15-30 minutes, it should double in size. If it doesn’t start bubbling within the first few minutes, either the yeast isn’t any good or the water was too cold or too hot. Start again in this case.

After the yeast has doubled in size add:

1 tablespoon olive oil

Then pour the wet yeast mixture into the flour mixture and stir (wooden spoon best) until all the flour is absorbed. Try not to mix too much once the mixture is combined and smooth or the dough may become tough. Form the dough into a ball, or as close to a ball as possible – if the mixture is too wet and sticky, wet or oil a spatula to form into a ball. Cover with a clean kitchen towel or plastic wrap and let sit for about 1 hour or until the ball is about double in size.

Preheat oven to 450 degrees. Grease a 10-12″ pizza pan (or a rectangular baking sheet) with:

2 tablespoons olive oil

Depending on the size and shape of the pizza desired, either scrape the entire ball of dough into the pan or cut into sections to make smaller pizzas. Personally, since I live alone, I quarter the dough and shape it into 4 personal size pizzas on a large baking sheet. Spread it on the pizza pan or shape it using wet or greased hands. I spread the olive oil on the baking pan with my hand and then have a greased hand to spread the dough out and shape it as I like.

Bake the dough for 10-12 minutes or until it just starts to brown. Remove from oven and either cover with toppings and bake for an additional 20-25 minutes at 425 degrees (baking time depends a lot on the thickness of the crust), or cool and freeze the prepared pizza crusts for later use. I made 4 small personal sized pizza but I added the toppings to all of them, baked them and then froze the extra 3 fully made to heat up at a later date.

TIP: Gluten-free baked goods take longer to bake than “normal” baked goods so don’t be afraid to let the pizza dough cook for longer if it isn’t browned on the bottom. My crusts were quite thin so the 20 minutes was sufficient.

Pumpkin Gingerbread Cake

I do love gingerbread but I also love pumpkin. This cake doesn’t have a pronounced pumpkin taste – the ginger overwhelms it so if you want more pumpkin taste, reduce the amount of ginger you add. It’s wonderfully moist and delicious served with a vanilla frozen dessert or a non-dairy whipped cream.

Preheat oven to 350 degrees and grease an 8×8 square or round pan (to take the entire cake out of the pan to serve, cover the baking pan with parchment paper and then grease). In a small bowl combine:

1 tablespoon ground flax

3 tablespoons aquafaba*

*Add 1 teaspoon aquafaba powder to 3 tablespoons hot water. Don’t have aquafaba powder or a can of chickpeas handy? Substitute 1 tablespoon vinegar and 2 tablespoons hot water. Let the mixture sit for 5 minutes or until a flax gel forms. In a medium sized bowl (at least 3 cups) combine:

1/3 cup honey

1/3 cup unsulfured molasses

3/4 cup pumpkin puree

1/2 cup hot (the hotter the better) water

Mix until the molasses and honey are fairly thin. In another medium size bowl (at least 6 cups) sift together:

1 cup sorghum flour

3/4 cup tapioca flour or arrowroot

1 teaspoon xanthan gum

2 teaspoons ginger

1 teaspoon cinnamon

1 teaspoon allspice (or nutmeg)

1 1/2 teaspoons baking soda

Pour the wet ingredients into the dry and mix thoroughly. Pour into the prepared pan and bake for 30-35 minutes or until a toothpick inserted in the center comes out clean. Cool slightly before cutting.

Sweet and Sour Chicken Salad

I often buy a rotisserie chicken, it’s a quick and easy meal. I’m careful of course, all rotisserie chickens are not equal. I read the ingredients until I found one that had no soy, canola, or corn oil. But since I live alone, this chicken always has lots of meat left over. I do so love chicken salad but even that can get boring when always made the same. I’ve added curry powder and made curried chicken salad which is delicious but I recently tried using a sweet and sour dressing, much like one used for coleslaw. Delicious, very easy and tasty at the end of summer when we’re getting tired of the same old salads.

I like to pulse my cooked chicken in my food processor to produce a slightly chunky chicken. Don’t take it to the extent of puree, just a fairly rough chop, almost like cooked ground chicken meat. For 4 servings, dice or pulse:

2 cooked chicken breasts, of medium size

Remove from food processor or cutting board into a bowl. Dice or pulse:

4-5 stalks celery, cleaned and quartered

4-5 scallions, cleaned and quartered

1/2 cup shredded carrots (or diced carrots)

Add to the chicken meat. I also add:

1/2 cup cooked baby peas

Mix these ingredients together. In a separate smaller bowl make the dressing using:

1 cup vegan mayonnaise

1 good dash hot sauce (optional)

2 tablespoons vinegar

2 tablespoons honey, agave nectar or date syrup

2 tablespoons dill pickle relish (or minced dill pickle)

Salt and pepper to taste

Whisk the dressing to combine and then add to the meat mixture. Mix well, chill and serve over a bed of mixed greens. Tomatoes and avocado on the side are a nice addition to this meal. I’ll often also garnish my chicken salad with pumpkin seeds or mix into the salad sesame or poppy seeds.

Mushroom Stuffed Potato Cakes

Delicious side dishes that the entire family will enjoy are hard to come by, especially if one believes the television commercials! Here’s one that takes a little time but is worth the effort. And it’s quite easy to adjust to a particular taste – the dill can be replaced by one of a dozen herbs or spices. Potatoes are the type of food that can be enjoyed with a multitude of preparations. I made the mushroom stuffing several days in advance, prepared the mashed potatoes for the cakes a day ahead so it cooled overnight (no one wants to try to form hot potatoes into disks!), and then assembled them on the third day. They take very little time to assemble and fry so plan accordingly. About 15 minutes before my protein was ready, I started and had them fried and salted just as the ribs were coming out of the oven.

First prepare the mushrooms. In a 12″ skillet heat over medium high:

1 tablespoon olive oil

then add:

1 small onion minced (the food processor does this very quickly and easily)

8 ounces chopped mushrooms (again, a mince is best although not required)

1 teaspoon minced garlic

When the mushrooms and onion are soft and slightly browned, about 5-7 minutes, remove from heat and add:

1 large stem dill, chopped (fronds only)

Salt and pepper to taste

Pinch of red pepper flakes (or a dash of hot sauce) [Optional]

Set aside to cool. Peel and dice:

2-2 1/2 pounds russet potatoes

Cover with cold water and boil until soft. Depending on the size of the dice, this could take 10-30 minutes. Once cooked, drain the water and mash the potatoes, being sure to remove all lumps. DO NOT ADD ANY LIQUID TO THE MASH POTATOES.

In a large soup dish or pie plate (or paper plate), mix together the dredge:

1/4 cup all purpose gluten free flour

1 tablespoon tapioca flour

Salt and pepper to taste (about 1/8-1/4 teaspoon)

1/4 teaspoon garlic powder

1/4 teaspoon paprika

To assemble the potato cakes, in the palm of a hand, scoop:

1/4-1/2 cup mashed potatoes (depending on the size cake desired)

Flatten until about 1/4″ thick and then make an indenture in the middle. Add about:

1-2 tablespoons mushroom mixture

Cover with about 2 tablespoons-1/4 cup scoop of mashed potatoes, spread to cover the stuffing and then lightly seal the edges of the disk to form a cake. Roll in the dredge mixture and set aside. The mixture should make 6-8 medium sized cakes.

Heat in a large skillet over medium high heat:

1/2 cup olive and avocado oil (the avocado oil has a much higher smoke point than the olive so a combination works best)

When shimmering hot, add the cakes to the oil and lower heat to medium. Fry on each side until well browned, about 3-5 minutes per side. Remove to a paper towel and salt to taste. After a minute remove from the paper towel so that the cakes don’t get soggy. Serve immediately. Garnish with chopped dill or scallions.

TIP: When I next make these, hopefully when my grandson comes to visit, I’ll add some crispy bacon bits to the mushroom mixture!

TIP 2: I think I’ll also try this recipe with sweet potatoes but it will need different handling since they are quite moister than russet potatoes. Flour will need to be added to the sweet potatoes before shaping. I’ll give it a try and let you know how it works out.

Rice Crispy Bars

This is a rice bar that is carob rather than marshmallow based so it’s much simpler to make. Quick and easy it makes a tasty treat. I cut them, put several into a baggie and put them in the freezer so I can take one out when I really need something sweet.

Prepare an 8×8 or 9×9 baking dish by lining it with parchment paper. Into a medium size bowl place:

1/3 cup avocado oil

2/3 cup tahini (thicker rather than thinner tahini) or pumpkin butter (or any seed or nut butter you like)

1/4 cup agave or coconut nectar, date or maple syrup

1 teaspoon vanilla extract (or 1/4 teaspoon mint extract if a minty flavor is desired)

Whisk together until smooth. Add:

1/2 cup carob powder (or cocoa if you can have it)

1/4 cup pumpkin seeds (or any other seed or nut chopped that your family enjoys)

1 1/4 cup puffed rice cereal (or any puffed cereal your family likes)*

Stir to combine. (*More or less cereal may be needed depending on the consistency of the butter added.) Spread in the prepared dish and put in the freezer for 1 hour or until it is solid when you lift the parchment paper out of the dish. Slice and enjoy!

White Fish with Lemon Garlic Sauce on Sautéed Bok Choy

Any white fish will work with this recipe – cod, flounder, sole, swordfish or even sea bass (my very favorite fish!). The most difficult part of the whole recipe is roasting the garlic and that’s really very easy in the oven. If you’re not familiar with the process, here are the instructions:

Heat oven to 400 degrees. Peel most of the paper off the outside of the head of garlic being careful to leave the head intact. If a faster process is desired, the cloves can be separated and baked individually, it takes about half the baking time of doing a whole head. With kitchen scissors, trim about 1/4 inch off the top of the head, or each individual clove. Drizzle with 1 or 2 teaspoons olive oil per head. Wrap in parchment paper and bake for about 30-40 minutes depending on the size of the heads (or 15-20 if doing individual cloves). Cool then press the bottom of each clove to squeeze out the garlic. Stores in the refrigerator for 2 weeks or in the freezer for 3 months. Be sure to open windows or turn on the stove vent because the kitchen, and whole house if you have a small house, will be filled with the aroma of roasted garlic.

For each pound of fish, preheat oven to 350 degrees, prepare a baking dish large enough to accommodate the fish without crowding. Spray with non-stick cooking spray or coat with olive oil. Dry the fish with paper towels, salt and pepper to taste and arrange in the dish. Bake, depending on thickness, 15-35 minutes, until fish is flaky but still moist. Fish turns quite white in color when it’s cooked.

Want to make it vegan? Use firm tofu in place of the fish but fry it in a skillet instead of baking.

Make the lemon garlic sauce. In a small bowl, mix together:

1/2 teaspoon mashed roasted garlic (about 1 clove)

juice of 1 lemon

1/2 cup vegan mayonnaise*

salt and pepper to taste

Set aside and prepare the bok choy. In a large 12″ skillet, heat over medium:

1 teaspoon olive oil, then add:

1 small onion diced

6-8 baby bok choy, cleaned and cut in half or quarters

1 teaspoon minced garlic (or some of the roasted garlic)

Cook, stirring for the first few minutes, then reduce heat to medium low and cook 5-7 minutes until the onion and bok choy are softened.

Place the sautéed bok choy in the bottom of a serving dish, add a serving of the fish. Spoon about 2 teaspoons of sauce over each fish, garnish with scallions, chives or dill (chopped). Serves 4.

*Don’t have any vegan mayonnaise? See my recipe under sauces for egg-free mayonnaise.

Coffee Energy Bites

In a medium to large bowl combine:

Ever look for something, not much, you just need a little something to lift you up in the middle or towards the end of your day? These will work – full of energy (and carbs), these bites will get you going and the whole grain oats and flax will sustain your energy for awhile. Easy to make, variable by your taste, and chock full of flavor, can’t beat the combination!

1 cup whole grain gluten-free oats (organic if possible)

1/2 cup ground flax

1 tablespoon instant coffee granules*

1/4 cup dried berries (small pieces work best but not powder)

1/4 cup carob chips (or chocolate if you can have them)

Mix to combine evenly. In a small bowl stir together:

1/2 cup tahini (slightly thick better than runny)**

1/4 cup honey, agave or coconut nectar, or maple syrup depending on taste

1 teaspoon vanilla

Pour the wet ingredients into the large bowl with the oat mixture and stir with a large fork to combine. Mixture will be slightly sticky but shouldn’t be too sticky. It should easily stick together when pressed into your hand. With DRY hands, form into roughly 1″ balls. I found I had to rinse off my hands every 2-3 balls to keep the mixture from sticking to me instead of itself! Should make 20-24 balls. Store in airtight container.

*I used 2 tablespoons of instant coffee granules and after eating several of these bites, I’ve decided it was a little too much coffee – they taste a little bitter to me so depending on your love for coffee, add 1 or 2 tablespoons.

**I used tahini because of my nut allergy but feel free to use any seed or nut butter you like. But if you use a really thick butter, add a little water or liquid sweetener to it to thin it slightly. If your tahini is too thin, add a little more of the dry ingredients.