I made some pear donuts this morning, fried a couple of fritters from the dough as well. While I found them sweet enough without a glaze, I know my daughter-in-law and grandson will prefer them with one. Took me several tries to find the glaze I wanted on my blog so I thought putting the several I’ve used in my blogs in one place might be a good idea. So here they are – ones used cold after baking and the Honey Bee Glaze that’s baked on the dough.
Maple Glaze
In a small bowl whisk together:
1/4 cup vegan margarine (I use Earth Balance soy free)
1/2 cup powdered monkfruit sweetener (Lakanto makes one that Whole Foods or Amazon carries)
2 tablespoons maple syrup
1 teaspoon non-dairy milk
1/2 teaspoon vinegar
2-3 shakes of salt (or a dash!)
When the donuts are still warm, dip one side into the glaze.
Standard Confectioner’s Sugar Glaze
Whisk togetherfor a thin glaze:
1/3 cup sugar free confectioners’ sugar (Lakanto has a monkfruit based powdered sugar)
2 tablespoons non-dairy milk
1/2 teaspoon vanilla extract
OR for a thicker glaze:
6 tablespoons vegan margarine
1/2 teaspoon vanilla extract
1 cup sugar-free confectioners’ sugar
1-2 tablespoons non-dairy milk
If you don’t care for the taste of monkfruit sweetener, mix together 1/2 cup agave or coconut nectar with 2 tablespoons of non-dairy milk and 1 tablespoon of ground chia seed (white). Pour over or dip donuts in glaze.
Honey Bee Glaze
In a small bowl whisk:
1/2 cup agave nectar (or date syrup or coconut nectar)
1/4 cup non-dairy milk
1/4 cup avocado oil
1/4 cup honey
1/2 cup crushed nuts, sesame seeds, or hemp hulls (Optional)
Pour over unbaked dough and bake per recipe directions.
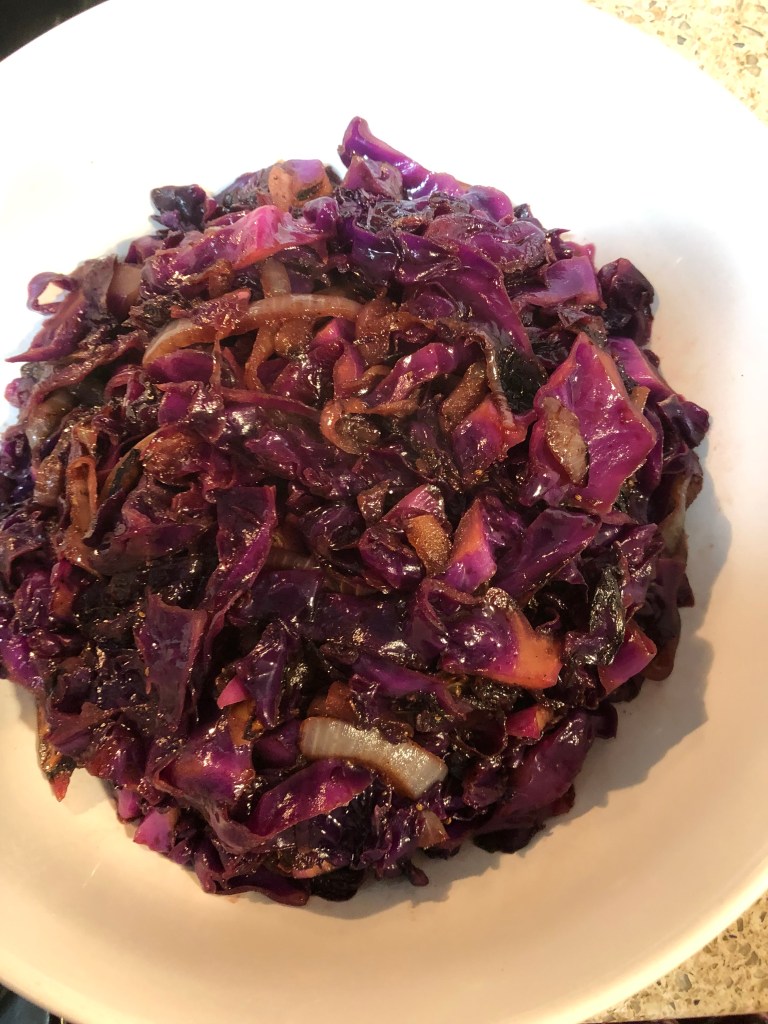
Want a quick and easy side dish? Here’s one that even those who don’t care much for cabbage may enjoy. Use either red or green cabbage, or be lazy and buy a bag of cole slaw mix, doesn’t matter if there’s a few shredded carrots in there as well. Goes very well with any meat but for some reason cabbage especially likes pork or beef – steaks, chops, or roasts doesn’t matter. And feel free to change out the ground cloves for whatever spice your family prefers – cinnamon, allspice, nutmeg, coriander, etc.
Heat a 10-12″ high-sided skillet over medium high heat and add:
2 tablespoons olive oil
Heat until shimmering and add:
1/4 teaspoon ground cloves
1/2 large onion, sliced
Cook over medium heat until beginning to soften, 2-3 minutes. Add to the skillet:
2 cups shredded cabbage
Salt and ground pepper to taste
2 tablespoons water
Cover, reduce heat to medium low and cook until the cabbage is softened, about 5 minutes. While it cooks, in a small bowl combine:
2 tablespoons vinegar (whatever kind your family prefers, I used white)
1 tablespoon date syrup (agave or maple would also work)
1/4 teaspoon celery seed or caraway
Whisk to combine and set aside. When cabbage is ready, pour the vinegar mixture into the skillet, stir to combine and let heat for about 30 seconds. Serve. Makes 2-4 servings.
TIP: Like braised cabbage, adding a diced apple or pear when the cabbage is added to the skillet and topping with some bacon bits would be great in this dish.
This is a very easy recipe to make, cutting up the vegetables and pork are the most time consuming parts of the recipe. Be smart and use pork chops rather than pork roast so you don’t have to deal with as much fat and silver skin. I also used pre-cut carrots. Makes 4 servings.
In a 6-quart or larger Dutch oven, heat over medium high heat:
1 tablespoon olive oil
When shimmering, add:
3-4 cups diced pork (4-6 boneless pork chops depending on size and thickness)
1 teaspoon sea salt
1/2 teaspoon ground black pepper
Cook until the meat is browned on all sides. Lower heat to medium and add:
2 medium onions, diced
2 teaspoons minced garlic
Cook until the onions are translucent before adding:
2 tablespoons gluten-free, all-purpose flour
Mix the flour into the pan so that it absorbs the fat before adding to the pan:
1-1 1/2 cups sliced carrots
2 cups button or baby bella mushrooms, cleaned and cut into quarters (or 6ths if they are larger)
1 cup chicken stock (or bone broth)
Stir to combine these ingredients and mix the chicken stock into the meat mixture. In a small bowl combine:
2 tablespoons tomato paste
1-2 teaspoons siracha (optional)
1 tablespoon date syrup
Add to the pot along with:
5 large RIPE tomatoes, peeled and cut into quarters or eighths
2 teaspoons dried basil (or, if preferred add 2 tablespoons fresh chopped basil right before serving)
Stir to combine, reduce heat to low and let simmer for 45-50 minutes until meat is tender and carrots are cooked. Be sure to taste before serving and adjust salt and pepper as needed.Serve it over any starch your family likes – it will go great with rice, mashed potatoes or pasta, or any other grain such as quinoa.
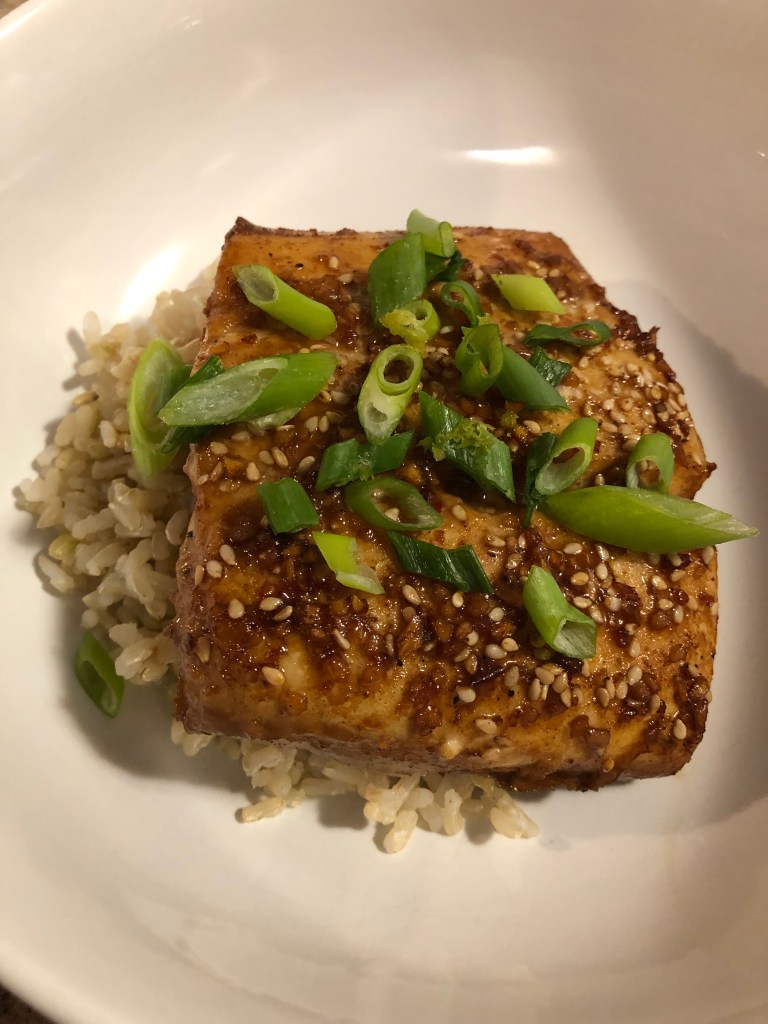
I’m always looking for new ways to cook fish to make it more interesting and succulent. Here’s one that’s really mouth wateringly good! And so easy to make and quick to make. In less than 45 minutes, you can have dinner ready with this one. While I used Halibut, any dense white fish will work like haddock or cod. Make sure your fish steaks are at least an inch thick.
Preheat oven to 425 degrees. Spray a baking dish with non-stick spray that will comfortably hold the fish (I used my 5″x 8″ dish). Dry with paper towels:
2 halibut steaks (6-8 ounces each)
Place them in the prepared baking dish. In a small bowl mix:
1 teaspoon sesame oil
3 tablespoons date syrup (honey, agave, etc., would also work)
3 tablespoons soy sauce substitute (see recipe under sauces)*
1 tablespoon fish sauce
1 teaspoon lime juice (juice from 1/2 lime)**
1 teaspoon grated or finely minced ginger
1 teaspoon minced garlic
1/2 teaspoon chili sauce (or 1/2 teaspoon hot sauce) [Optional]
Whisk to combine and pour over the fish. Sprinkle over the fish:
1 tablespoon toasted sesame seeds
Bake 20-30 minutes depending on the thickness of the fish. After about 15 minutes, open the oven and baste the fish with the surrounding sauce. When cooked, remove fish from oven and let sit for a couple of minutes before serving. Garnish with:
thinly sliced greens from 2 scallions
**zest from 1 lime (zest before slicing and juicing the lime)
*Of course, use soy sauce instead of the substitute if there’s no allergy to soy. Use 2 tablespoons soy and 1 tablespoon hoisin sauce in place of the soy substitute sauce.
Serve over rice to soak up the tasty sauce.Makes 2 servings.
I do love squash, doesn’t matter to me what kind, color, shape, etc., it’s all delicious. My mother used to cut acorn squash in half and fill the halves with butter and maple syrup and bake them, so good! It never occurred to me to stuff winter squash but here’s a recipe that’s succulent and almost sinfully good. It doesn’t hurt that it’s extremely easy to make either! Use whatever kind of winter squash you like (I used acorns and the recipe would have stuffed 3 or 4 (so 6-8 halves).
Preheat oven to 400 degrees. Halve and seed squash, the number will depend on what kind you use and how big a hole will need filling. Rub the inside of the squash with:
1 tablespoon olive oil (2 if you have more than 4 halves)
Place each half, meat side down, on a baking sheet covered with parchment paper and bake for 40-60 minutes or until fork tender.
While the squash bakes prepare the stuffing. In a 12″ skillet, heat:
1 tablespoon olive oil
When hot add:
6-8 ounces chopped shitake mushrooms
1 bunch scallions (8-10), sliced (put 1/4 cup aside for garnish)
Cook until softened, about 2 minutes. Add:
1 pound bulk Italian sausage (mild or hot depending on your family’s taste)
Cook, crumbling the meat as it cooks, until the meat is cooked through, about 5 minutes. Add:
1 1/2-2 cups cooked quinoa, again depending on how much stuffing you need for your squash halves (I used a bag of frozen cooked quinoa from Whole Foods)
1 teaspoon minced garlic
Cover, reduce heat to medium low and cook until the quinoa is heated through and the garlic tender, about 3 minutes. Keep warm until the squash is cooked.
When the squash is tender, remove from oven, turn meat side up and fill the cavity with the stuffing. Garnish with reserved scallion greens and:
2-4 tablespoons (depending on how many halves you have) date syrup (honey or maple syrup).
When I worked at Arizona State University, the chair of the department and I shared the same birthday so we’d go out for lunch annually on our birthday. There was a little Chinese restaurant near campus where we’d devour several orders of pot stickers and a soup bowl of hot and sour soup. I’ve been checking every grocery store I go to and I couldn’t find gluten-free wonton wrappers but a check on-line found a recipe. So, although this process is somewhat lengthy, the dumplings are well worth the effort.
First, make the wonton wrappers by combining:
1/2 cup all purpose gluten-free flour
1/2 cup tapioca flour
1/2 white rice flour
1/2 teaspoon sea salt
1 teaspoon guar gum
Whisk together the dry ingredients then stir in:
1/2 cup boiling water
Dough will start to come together. Add:
2 tablespoons cold water
1 1/2 teaspoons olive oil
Stir to combine, kneading with hands if necessary. Form into a ball, cut in half. Place one half under plastic wrap to stay moist while working with the other half. Roll the dough into a log then cut into 12 pieces, about 1 tablespoon each. Roll the pieces into balls and place in a sandwich bag until ready to fill. Repeat with the other half of the dough.
Next, make the filling. In the bowl of a food processor, pulse:
8-10 scallion whites
6 ounces shitake mushrooms
1/2 cup shredded carrots
Pulse until well ground. Put into a medium bowl with:
3/4 pound ground turkey (or pork)
3 teaspoons date sugar
3 tablespoons soy sauce substitute (see recipe under sauces)
1/2 teaspoon ginger juice (or freshly grated ginger)
1/2 teaspoon toasted sesame oil
Combine, cover and store in the refrigerator until ready to fill the wontons. Using a bamboo steamer (or a steamer basket or pot but you won’t be able to cook as many at once), place over water on the stove. Take one dough ball, place between two pieces of plastic wrap, and using a small rolling pin (or any can), roll out to about a 3″ circle. Place about 1 tablespoon filling in the middle. Using the plastic wrap, bring the sides of the wonton wrapper together in the middle. Pick up the ball and gently press the edges together to seal the dumpling (these can be either round or rectangular). If the dough is dry, wipe the edges with a small amount of water to moisten and seal. Place in the steamer and repeat until the steamer is filled, without the dumplings touching the edges or each other because they will stick as they cook. Bring the steamer water to a boil and cook the dumplings 10-12 minutes. Serve with a sesame garlic sauce and garnish with the scallion greens.
Easy and quick to make and delicious, nutritious snacks. I’ve been making chickpea carob chip cookies and chickpea brownies for years. I made sweet potato blondies a few weeks ago and those turned out almost fudge-like. These are thicker but every bit as “fudgy”. Feel free to substitute the sweetener as well as the quinoa flakes for quinoa flour. And of course, sunflower butter (or any nut butter if possible) would substitute quite well for the pumpkin seed butter.
Preheat oven to 350 degrees. In the bowl of a food processor combine:
2, 15 ounce cans of garbanzo beans (chickpeas), drained and rinsed (save the aquafaba for another recipe; it’ll store in the refrigerator for a week)
1 cup quinoa flakes (find it in the cereal aisle)
3/4 cup pumpkin seed butter
1 tablespoon avocado oil
1 teaspoon vanilla extract
1 teaspoon cinnamon
1/4 teaspoon sea salt
1/3 cup date syrup (or honey, agave or coconut nectar, or maple syrup)
1/3 cup unsweetened non-dairy milk
1 teaspoon baking soda
Pulse until the garbanzo beans are creamed and incorporated into the batter. The batter will look mottled because of the quinoa flakes. While it’s pulsing, line an 8″ square baking pan with parchment paper and spray with a non-stick cooking spray. Scoop the batter into the pan and bake in a preheated 350 degree oven for 25-30 minutes. Cool before serving.
If you’re like me, the only bad thing about making pancakes is standing at the stove cooking 3 or 4 at a time when there’s at least a dozen to cook. Well, this recipe takes that away! These are the lightest, fluffiest pancakes I’ve had since I went gluten-free and oh so mouth-wateringly delicious. Of course, pumpkin or butternut squash can be substituted for the sweet potato puree, just make sure that they aren’t too wet so a drier squash would work best. I used Trader Joe’s frozen sweet potato mash in this recipe thinking canned sweet potato puree might be too wet. And it worked just fine. Also be sure to let the mixture sit in the baking pan for 10-15 minutes after you spread it. Gluten free flours take longer to absorb moisture than regular flour and letting it sit on the counter before cooking gives the flours time to absorb some of the liquid and the end product won’t be gummy.
In a large mixing bowl whisk together:
2 tablespoons ground flax
1/3 cup aquafaba (or 1/3 cup water with 1/2 teaspoon aquafaba powder)
While the flax gel is working, about 5 minutes, prepare an 15×9″ baking sheet by covering with parchment paper and spraying generously with a non-stick spray (I use Chosen Foods Avocado spray because it’s 100% avocado oil).
When the flax gel is set, add:
1/2 cup sweet potato puree
1/4 cup avocado oil
1/4 cup date syrup (or coconut or agave nectar, honey, or maple syrup)
1 1/2 cup non-dairy milk
1 teaspoon pumpkin pie spice
3/4 cup protein powder (I used Probase organic pumpkin seed protein, unflavored)
Whisk to combine before adding:
1 1/2 cups all purpose gluten-free flour
1/2 cup chickpea flour
1 teaspoon xanthan gum
2 1/2 teaspoons baking powder
1 teaspoon baking soda
1/4 teaspoon sea salt
1/3 cup dried cranberries (optional)
1/4 cup carob (or chocolate) chips (optional)
Stir to combine making sure to moisten all the flour but not overmix, batter will be thick. Spread in the prepared baking sheet and let sit 10-15 minutes while the oven heats to 400 degrees. Bake 18-20 minutes until spongy in the middle and golden brown. Cut into 12 pieces and serve with a drizzle of maple syrup. I found 2 pieces were enough for me so 4-6 servings depending on your appetite.
Here’s another recipe adapted from the Chicken Bible. It’s somewhat spicy due to the abundance of freshly grated ginger as well as just a 1/4 teaspoon Vietnamese chili sauce.* The original recipe called for 1/4 teaspoon of red pepper flakes so use those if you can’t find a chili sauce that works for your family. I also cut back slightly on the amount of freshly grated ginger – the original recipe called for 1 tablespoon but I used only about 1 teaspoon and it was sufficient for my tastes. This is a recipe that may sound difficult and complex but if you follow the steps, it’s really quite easy to make and oh so worth the effort – just as good as any dish in your favorite Chinese restaurant.
First, cut up everything:
1 pound bok choy (I used three medium sized baby), cut off the stems and cut into bitesize pieces and then separately chop the greens and put them in a separate bowl
2 small sweet red peppers, cut in thin slices
1 pound boneless skinless chicken breasts, sliced as thinly as possible (if the breasts are partially frozen, they will slice much easier although the hand holding the meat will get quite chilly!)
1 garlic clove minced
about 1″ of fresh ginger peeled and grated to produce roughly 1-2 teaspoons
2-3 scallions, slice at an angle, add the white parts to the bok choy stems and peppers and set the greens aside in a medium bowl
Next, mix together in a medium bowl:
1 tablespoon soy sauce substitute
2 teaspoons rice vinegar
1 teaspoon date syrup
1 teaspoon fish sauce
1 tablespoon sesame oil
1 teaspoon cornstarch (or arrowroot)
Whisk together and add the sliced chicken. Mix to ensure all the chicken is coated with the marinade. Refrigerate until needed.
Third, put on a pot of water to boil:
6 quarts water in a large pot
When the water comes to a bowl, add:
1 teaspoon sea salt
9 ounces of noodles (I used brown rice pad Thai noodles)
Cook for only 3 minutes until el dente (or the amount of time on the package of your noodles). Drain and add to the bowl with the green scallion slices. Mix to combine. In a 12″ non-stick skillet, heat over medium high heat:
2 tablespoons olive oil
Add the noodle/scallion mixture and spread out in the pan. Use a strong spatula (or I used a bacon flattener) to flatten the noodle mixture in the pan (see photo below). Cook 5-7 minutes until browned and then using a large spatula, flip and brown again on the second side 5-7 minutes. Remove to an oven proof plate and stick in a 200 degree oven to keep warm.
Now, in a small bowl mix together:
2 tablespoons olive oil
the minced garlic
the grated ginger
In another small bowl make the sauce by combining:
1/3 cup chicken or vegetable stock
2 tablespoons soy sauce substitute
1 tablespoon rice vinegar
1/2 tablespoon date syrup
1/4 teaspoon chili sauce or red pepper flakes (or hot sauce!)
1 teaspoon cornstarch (or arrowroot)
Stir to combine. Set aside until needed. Pour into the empty skillet and heat:
2 teaspoons olive oil
Add:
sliced chicken (and marinade)
Cook over medium high heat, stirring constantly and turning frequently until the meat is cooked, about 2 minutes. Remove to a dish and set aside. Into the same skillet heat over medium heat:
the olive oil mixture with the garlic and ginger
When hot, add:
the bok choy stems
red pepper slices
scallion whites
Cook over medium high heat stirring frequently until they just begin to soften, about 3 minutes. Add:
the bok choy greens
Cook just until the greens begin to wilt, add the cooked chicken along with any juice in the dish. Whisk the sauce mixture to be sure it’s still combined and pour over the chicken in the skillet. Stir continuously until the sauce thickens about 30 seconds and the chicken is reheated. Remove the noodle cake from the oven and cut into wedges. Serves 2.
*I had a lot of difficulty finding a chili sauce that didn’t contain either sugar or soy. I finally located one (at the 4th store I checked!) – Tuong Ot Toi Viet-Nam Chili Garlic Sauce. It’s VERY hot so the amount used should be to the level of your taste buds. I don’t mind spicy but super hot is not to my liking therefore the recipe calls for just 1/4 teaspoon.
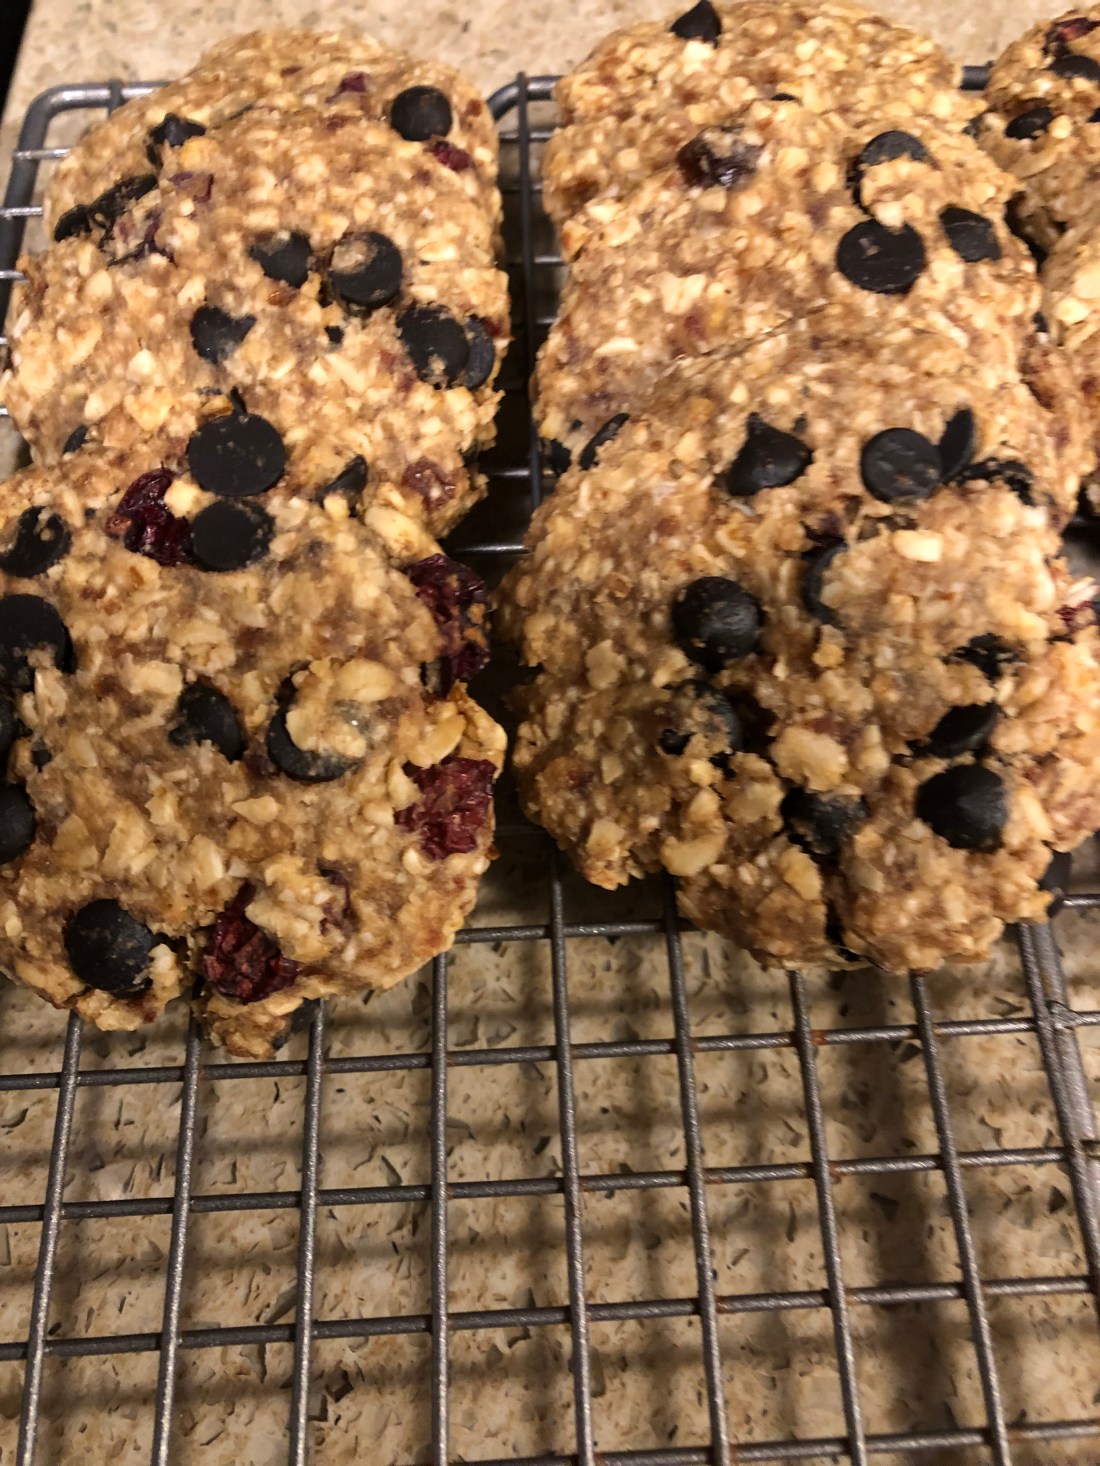
My husband’s favorite cookie was oatmeal raisin. These are very easy to make (if you have a food processor) and very tasty. And they don’t have very many ingredients, also a pretty good thing. If you have dried dates which most of us do since fresh dates are not always available, soak them in boiling water for 5-10 minutes to soften them before using them in this recipe.
Preheat oven to 350 degrees. Spread a medium size cookie sheet with parchment paper. In the bowl of a food processor, add:
1 1/2 cups gluten-free old fashioned oats, preferably organic
1/2 cup seed butter like sunflower or pumpkin butter or tahini
10-12 softened dates, medium sized
1/4 cup date syrup (or if you don’t have date syrup, use some of the water from soaking the dates just increase the number of dates if you want a sweeter cookie)
1/4 teaspoon sea salt
1 teaspoon vanilla extract (optional)
Blend until combined and the oatmeal is partly ground and a dough forms. This should take only about a minute. Remove from the food processor to a bowl and stir in:
1/2 cup carob chips (optional)
1/4 cup raisins or dried cranberries (optional)
Scoop out several tablespoons (to a 1/4 cup depending on how large you’d like the cookies) of the dough and form into a flat, round disc. Repeat with the remaining dough. The recipe should make approximately 12 cookies. Bake for 10-12 minutes. Let cool for about 5 minutes before removing from the baking sheet.