Mahogany Chicken

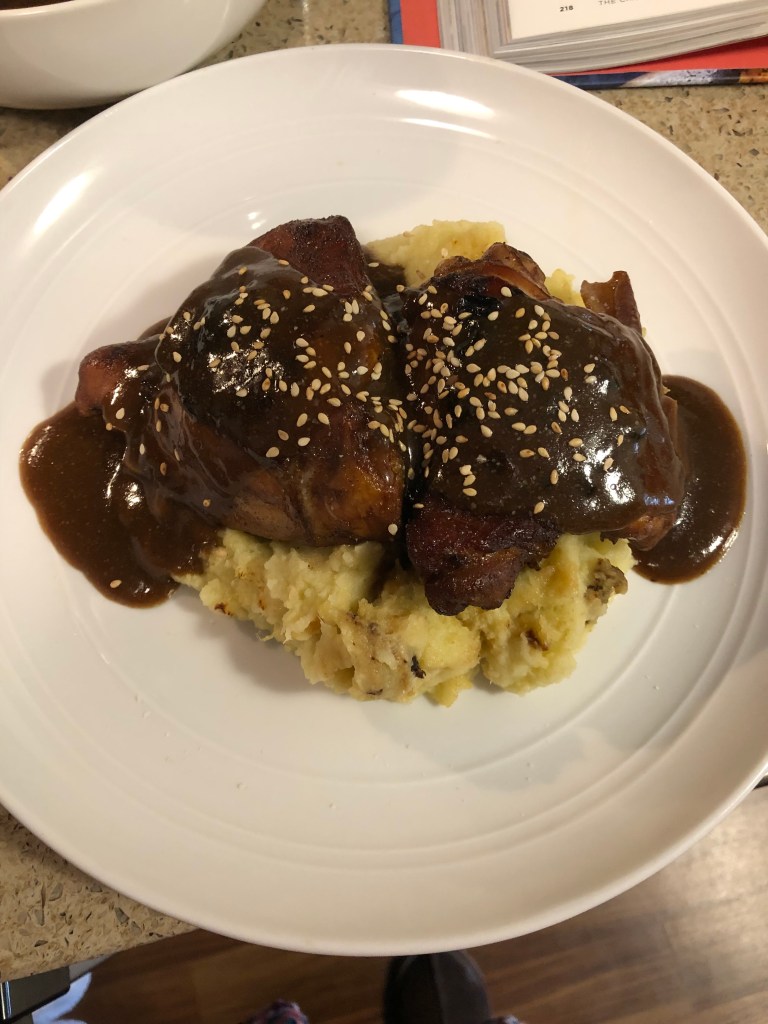
The CHICKEN BIBLE strikes again! Once more, I needed to make changes to the recipe but another delicious, succulent chicken. I was impressed on how moist the chicken stayed even though I think I cooked it about 10 minutes too long. I was also impressed that it didn’t come out as sweet as I thought. Not difficult, a fairly easy recipe to make, very little preparation time, less than an hour, beginning to end. This would also work great for turkey or even duck. I did find the sauce a little bland so I added a dash of hot sauce but some coriander would also work.

In a 12″ skillet (oven proof) combine:

1 cup water

1 cup soy sauce substitute (of course if you are able, you can use regular soy sauce)

1/4 cup chicken stock

2 tablespoons date sugar

2 tablespoons unsulfured molasses

1 tablespoon rice vinegar (or white vinegar)

1/2 teaspoon sea salt

1/2 teaspoon hot sauce (optional)

Whisk to combine and dissolve the sugar. Place in the sauce, skin side down:

4 chicken leg quarters (leave whole or cut between legs and thighs)*

2″ stick of fresh ginger, peeled and halved (lengthwise) then smashed

6 cloves of garlic, peeled and smashed

Bring to a boil and simmer over medium low heat for 5 minutes. Preheat oven to 300 degrees. After 5 minutes place skillet in the oven uncovered and cook for 25-30 minutes. Turn chicken pieces over so that the skin side is now up and bake another 15-25 minutes or until chicken reaches 195 degrees. Remove from oven. Remove chicken from skillet and set aside.

At this point, pour the cooking liquid through a strainer to remove the bits of garlic and pieces of ginger. Strain into a fat separator if you have one and let sit for 5 minutes so the fat rises to the surface and can be removed.* Turn the oven to broil.

Add the strained and defatted liquid back into the skillet and bring to a boil over medium high heat. Add:

Slurry made with 1 tablespoon arrowroot (or tapioca starch) mixed into 1/2 cup water (or chicken stock)

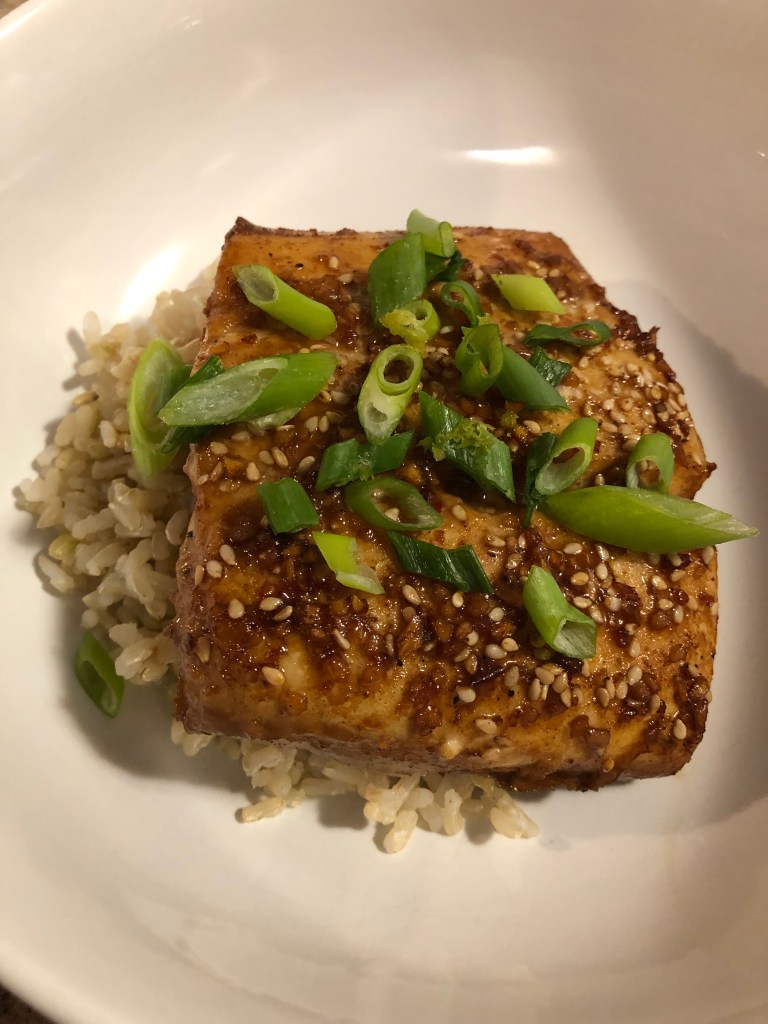
Whisk to combine and continue whisking until the sauce thickens, about 30 seconds to 1 minute. Pour into a bowl and set aside. Place chicken, skin side up, back into the skillet and place under the broiler for 4-5 minutes until the skin is crispy and crackling. (I put my chicken pieces on a small baking sheet lined with parchment and broiled them while I made my sauce.) Serve with the sauce on the side. Makes 4 servings. Serve over rice or mashed potatoes. I sprinkled some toasted sesame seeds on mine after I served it with the sauce.

*I don’t have a fat separator so I didn’t do this step but there wasn’t a lot of fat in my pan because I trimmed the fat off the thighs before putting them in the skillet.

Empanadas

I know you’ll take one look at the picture and say, But Jean, empanadas aren’t round! I know, they’re supposed to be half-circles but this gluten-free dough is supposed to have an egg to bind it together and the flax egg just didn’t work as well so I made full-moons. They taste delicious, just don’t try to eat them with your hands! I used ground turkey in mine but any ground meat will work.

In a small bowl combine:

1 tablespoon ground flax

3 tablespoons water or aquafaba

Let sit about 5 minutes until it sets then make the dough. In the bowl of the food processor put:

3 cups gluten-free flour (whatever blend you have works)

1 teaspoon xanthan gum

2 tablespoons date sugar

1 teaspoon sea salt

1 cup vegan margarine, Earth Balance, or Spectrum shortening (put in around the food processor, not in just one spot)

Pulse until the mixture is a coarse meal. In a small bowl combine:

1 flax egg (that you made above) [OR if you can use it, 1 large egg)

1/2 cup oat milk (or other non-dairy milk)

Add to the food processor and pulse until the dough comes together. Remove from the processor into a food storage bag and refrigerate for 30-45 minutes. While the dough chills, make the filling. In a 12″ skillet heat over medium heat:

1 tablespoon olive oil

Add:

1/2-1 teaspoon paprika

1/2-1 teaspoon cumin

1-2 teaspoon dried oregano

Heat just until fragrant, about 30 seconds then add:

1 small onion diced

Cook to soften the onion, about 2 minutes and then add:

1 pound ground meat, like turkey, beef, or pork

1 teaspoon minced garlic

Cook, breaking the meat apart as it cooks, until the meat is done, about 8-10 minutes. Remove from the skillet to a bowl. Add:

1/3 cup sugar-free ketchup mixed with 1-3 teaspoons hot sauce (hot sauce optional)

1 small can mild (or medium whichever your family likes) green chilies

1/2 cup non-dairy cheese shredded, whatever cheese you can eat (I used parmesan)

1/2 teaspoon sea salt

1/4 teaspoon ground black pepper

Stir to combine and let cool. Before the dough is chilled, line a 24×24″ space on a counter with plastic wrap and line 2 cookie sheets with parchment paper. Preheat oven to 350 degrees.

When the dough is ready, take out of the bag and cut the dough into two pieces. Put one half back into the bag and the refrigerator and put the other half on the counter with the plastic wrap. Press down on the dough to flatten slightly and then cover with a sheet of parchment paper. Roll out the dough to about 1/8″ thickness. Cut in whatever size you desire (I used a bowl that’s about a 6″ circle). Use a spatula to pick up the dough and move to the lined cookie sheet. Place about 3/4 of a cup of the filling** in the center of the disk and cover with a second disk of dough. Seal the edges together, if necessary moisten the edge with water (I didn’t need any water with my dough).

Repeat, rerolling the dough until all the dough is used and the filling is gone. I was able to make 4 of the 6″ size. If you’re able to use the egg in the dough, you can probably fold over the dough to make the half-circles and therefore can make more empanadas. Use a small knife to cut air holes in the tops of the empanadas so steam can escape. Spray with a non-stick cooking spray or brush with oat milk or egg wash if you can use eggs. Bake for 25-30 minutes or until the tops are golden brown. Makes four servings (6″ size). Serve with guacamole, salsa, or as I did, just slices of avocado.

**Of course, if you’re using a smaller circle to cut your empanadas, you’ll use less filling in each.

Baked Asian-style Halibut

I’m always looking for new ways to cook fish to make it more interesting and succulent. Here’s one that’s really mouth wateringly good! And so easy to make and quick to make. In less than 45 minutes, you can have dinner ready with this one. While I used Halibut, any dense white fish will work like haddock or cod. Make sure your fish steaks are at least an inch thick.

Preheat oven to 425 degrees. Spray a baking dish with non-stick spray that will comfortably hold the fish (I used my 5″x 8″ dish). Dry with paper towels:

2 halibut steaks (6-8 ounces each)

Place them in the prepared baking dish. In a small bowl mix:

1 teaspoon sesame oil

3 tablespoons date syrup (honey, agave, etc., would also work)

3 tablespoons soy sauce substitute (see recipe under sauces)*

1 tablespoon fish sauce

1 teaspoon lime juice (juice from 1/2 lime)**

1 teaspoon grated or finely minced ginger

1 teaspoon minced garlic

1/2 teaspoon chili sauce (or 1/2 teaspoon hot sauce) [Optional]

Whisk to combine and pour over the fish. Sprinkle over the fish:

1 tablespoon toasted sesame seeds

Bake 20-30 minutes depending on the thickness of the fish. After about 15 minutes, open the oven and baste the fish with the surrounding sauce. When cooked, remove fish from oven and let sit for a couple of minutes before serving. Garnish with:

thinly sliced greens from 2 scallions

**zest from 1 lime (zest before slicing and juicing the lime)

*Of course, use soy sauce instead of the substitute if there’s no allergy to soy. Use 2 tablespoons soy and 1 tablespoon hoisin sauce in place of the soy substitute sauce.

Serve over rice to soak up the tasty sauce. Makes 2 servings.

Spicy Plum Sauce Pork Chops

I have jars of jam in my freezer and since I don’t eat much toast or other things where jam would be good, I’ve been looking for recipes to use up these jams. Here’s one I found for my plum jam. If you do a search on my blog, you’ll find a recipe for strawberry jam (sugar-free of course) which you can use to make sugar free plum jam which is the base for the oriental spicy plum sauce for these pork chops. I served these chops with sauteed bok choy (find recipe under side dishes).

First, preheat oven to 350 degrees then make the plum sauce by combining in a small saucepan:

1 1/2 cups plum jam

3 tablespoons rice vinegar

2 tablespoons date sugar

1 tablespoon dried onion (flakes or granules, both work)

1/2 teaspoon spicy chili sauce (or 1 teaspoon crushed red pepper flakes)

1 teaspoon minced garlic

1/2 teaspoon ground ginger

1/4 teaspoon sea salt

Whisk to combine and bring to a boil, stirring constantly, over medium high heat. Once it boils, remove from heat.

In a 12″ skillet, over medium high heat, heat:

1 tablespoon olive oil

When shimmering, add:

4 pork chops, about 1/2 to 3/4 inch thickness

Sear on all sides, including the outsides, until browned. Place in a 9×9″ baking dish (or whatever size fits your pork chops) and cover with the spicy plum sauce. Bake, uncovered, for 30-45 minutes depending on the thickness of your pork chops. Serves 4.

Sesame Turkey with Green Beans and Shitake Mushrooms

Here’s another recipe amended from the CHICKEN BIBLE, modified a little since I don’t like really hot and spicy foods. Once the vegetables and turkey are diced, the recipe is very fast and simple to put together. It only took me about 15 minutes to put together, after about 45 minutes of cutting and dicing! Be sure to follow the temperature instructions or it will take longer to cook and the turkey breast meat may get dried out.

In a small bowl (2 cup) combine the sauce ingredients:

1/2 cup chicken stock

2 tablespoons rice vinegar

5 teaspoons date sugar

1-4 teaspoons sriracha*

1 tablespoon soy sauce substitute

2 teaspoons toasted sesame seeds

2 teaspoons toasted sesame oil

1 teaspoon arrowroot, tapioca (or cornstarch)

1 minced garlic clove

Whisk to combine and set aside. In another small bowl (1/2 to 1 cup size), combine the garlic mixture:

1 teaspoon olive oil

2 minced garlic cloves

1 teaspoon grated (or minced) fresh ginger

Mix to combine and set aside. In a medium bowl (or I used a gallon food storage bag) combine the seasoning mixture:

2 tablespoons toasted sesame oil

1 tablespoon sesame seeds

3 teaspoons soy sauce substitute

1 teaspoon arrowroot, tapioca (or cornstarch)

Add:

1-2 turkey tenderloins (1 1/2 pounds), cut in bite size pieces

Mix to coat the turkey with the season mixture. In a 12″ (or larger) high sided skillet (or a wok if one if available), heat over medium heat:

2 teaspoons olive oil

When shimmering, add half the turkey and stirring constantly over HIGH heat, brown for 3-4 minutes. Remove to a bowl and cover with a clean kitchen towel and repeat with the other half of the turkey, removing the second portion to the same bowl and recover with towel. Into the empty skillet, heat over medium heat:

1 tablespoon olive oil

When shimmering (this will only take a second since the pan should already be sizzling hot from the turkey), add:

1 pound green beans, trimmed and cut on the bias into 1″ pieces

Cook, stirring constantly over medium high heat for a minute or two. Add:

8-10 ounces sliced shitake mushrooms

Stir constantly until mushrooms start to brown and beans are slightly crunchy. Move the beans and mushrooms to one side of the skillet and add the garlic mixture and heat until you can smell the garlic, about 30-45 seconds. Mix into the vegetables then add the turkey and any juices back into the skillet. Whisk the sauce mixture and pour it into the skillet. Stir constantly until it thickens, about 2-3 minutes. Sprinkle with more sesame seeds if desired or sliced green scallions. Make 4 servings. Serve over rice or quinoa.

*Most Sriracha sauces contain cane sugar. If you, like me, wish to avoid cane sugar, I found one sriracha sauce at Whole Foods, YELLOWBIRD Blue Agave Sriracha Sauce which has no sugar in it but uses Blue Agave syrup instead. If like me, you prefer your food to be on the mild side with just a little spice, use 1 teaspoon of sriracha sauce. It gave me just a hint of heat in the back of my throat. I might increase it just a little in the future, especially if I make the dish for my grandson who likes things, the hotter the better!

Chicken Vindaloo-Style

I was looking through the CHICKEN BIBLE this morning seeking a new, different chicken recipe for the chicken thighs I took out of the freezer and found this one. It was fairly easy to make allergy-free. A relatively easy stew to put together, slightly spicy, vindaloo is a mix of Indian and Portuguese styles. Very flavorful, this dish serves 4.

Preheat oven to 325 degrees. In an ovenproof Dutch oven heat over medium high:

1 tablespoon olive oil

When shimmering add:

1 1/2 pounds diced chicken thighs

Sprinkle chicken with:

1/2 teaspoon salt

1/4 teaspoon ground black pepper

Let the chicken brown for 2-3 minutes before turning and cooking another few minutes until well browned. Remove to a bowl. Add to the pot:

1 tablespoon olive oil

1 1/2 medium onions, diced

1 tablespoon minced garlic

Sprinkle with:

1/2 teaspoon salt

Cook over medium heat, stirring occasionally, until onion is translucent, about 4-5 minutes. Add:

2 teaspoons paprika

1/2 teaspoon ground cumin

1/4 teaspoon cardamon

1/4 teaspoon cayenne pepper

1/4 teaspoon ground cloves

Stir to combine and cook about 1 minute. Add:

2 tablespoons gluten-free, all-purpose flour

Stir to combine and cook for a minute to cook out the flour. Add:

3/4 cup chicken stock

Stir to combine. Add the chicken back into the pot and then add:

6 ounces sliced shitake mushrooms

1 small can (15 ounce) diced tomatoes with juice

1 tablespoon rice vinegar

2 teaspoons mustard seeds

1 bay leaf

2 tablespoons diced dates (or 2 teaspoons date sugar)

Stir to combine, cover and bake in the oven for about 1 hour. Remove bay leaf. Serve over rice.

Stuffed Winter Squash

I do love squash, doesn’t matter to me what kind, color, shape, etc., it’s all delicious. My mother used to cut acorn squash in half and fill the halves with butter and maple syrup and bake them, so good! It never occurred to me to stuff winter squash but here’s a recipe that’s succulent and almost sinfully good. It doesn’t hurt that it’s extremely easy to make either! Use whatever kind of winter squash you like (I used acorns and the recipe would have stuffed 3 or 4 (so 6-8 halves).

Preheat oven to 400 degrees. Halve and seed squash, the number will depend on what kind you use and how big a hole will need filling. Rub the inside of the squash with:

1 tablespoon olive oil (2 if you have more than 4 halves)

Place each half, meat side down, on a baking sheet covered with parchment paper and bake for 40-60 minutes or until fork tender.

While the squash bakes prepare the stuffing. In a 12″ skillet, heat:

1 tablespoon olive oil

When hot add:

6-8 ounces chopped shitake mushrooms

1 bunch scallions (8-10), sliced (put 1/4 cup aside for garnish)

Cook until softened, about 2 minutes. Add:

1 pound bulk Italian sausage (mild or hot depending on your family’s taste)

Cook, crumbling the meat as it cooks, until the meat is cooked through, about 5 minutes. Add:

1 1/2-2 cups cooked quinoa, again depending on how much stuffing you need for your squash halves (I used a bag of frozen cooked quinoa from Whole Foods)

1 teaspoon minced garlic

Cover, reduce heat to medium low and cook until the quinoa is heated through and the garlic tender, about 3 minutes. Keep warm until the squash is cooked.

When the squash is tender, remove from oven, turn meat side up and fill the cavity with the stuffing. Garnish with reserved scallion greens and:

2-4 tablespoons (depending on how many halves you have) date syrup (honey or maple syrup).

Serve immediately.

Crispy Sticky Asian Chicken Wings

Like ribs, wings are high on my favorite foods list. I usually just bake them and barbecue sauce them (see recipe under Appetizers and Snacks) but I wanted to do something a little different today so I found three or four recipes for Asian wings and took what I liked from each to get you this divinely mouth-watering succulent wing recipe. In fact, I enjoyed them so much I went to the store and bought another package of wings just so that I could make them again! If you want to make them a meal, serve with cooked rice and some sauteed bok choy (see recipe under side dishes).

First, if your wings are whole, cut off the mini pointed section (the wing tips) and then cut the wing between the mini wing and the drumette. Throw the wing tips in the garbage and the other two parts into a gallon food storage bag. You should have about 2 pounds of wings.

Second, preheat the oven to 425 degrees. Prepare a medium size baking sheet by spraying it with non-stick spray. Next, add to the bag:

1 tablespoon all-purpose gluten-free flour

1/4 teaspoon sea salt

1/8 teaspoon ground black pepper

1/4 teaspoon garlic powder

1/4 teaspoon paprika (more or less depending on your taste)

Seal the bag and shake to coat the wing sections. Place each piece on the prepared baking sheet. Best to make sure they don’t touch. Bake for 30-40 minutes. While the wings bake, prepare the sauce. Mix together in a small saucepan:

1 teaspoon avocado oil

1 teaspoon ginger juice (don’t have ginger juice? Peel and finely mince a thumb size piece of ginger)

1 teaspoon to 2 tablespoons chili sauce (depending on the heat level you want in your wings)*

2 tablespoons honey

2-4 tablespoons date sugar, depending on how sweet and sticky you want them

1/3 cup soy sauce substitute

1/2 tablespoon minced garlic

Whisk together and bring to a boil over medium heat. Cook for about 5 minutes until slightly reduced. Remove from heat and set aside.

When the wings are cooked, remove from the pan to a medium size bowl and pour over the sauce.** Mix together with a serving fork or large kitchen spoon. Add:

1 tablespoon toasted sesame seeds

Move to a plate and garnish with:

1/2 cup sliced scallion greens

Serve hot.

*I used 2 teaspoons and it was quite spicy but not overly hot, just the way I like it. And the addition of the sesame seeds and scallions help cool the wings a little.

**I used only half the sauce for my 1 1/2 pounds of wings.

Spatchcocked Roasted Cornish Game Hen

This is a very simple recipe as long as you have a sharp pair of kitchen shears. Spatchcocking is cutting out the backbone of the chicken and laying it flat. It cooks faster and is easier to grill, just don’t try to stuff it or you’ll have to tie it back up!

Preheat the oven to 375 degree. Spray a large baking dish with non-stick spray. For each hen, prepare a mixture of:

2 teaspoons pureed garlic*

1/8 teaspoon herbamare (or plain sea salt)

1/8 teaspoon dry sage**

dash of black pepper

Spatchcock each hen by cutting along the backbone on each side using a sharp pair of kitchen shears, cutting the bones attached to the backbone. Wash the inside of the bird and then dry thoroughly using paper towels. Discard the backbone. Release the skin from the meat by inserting your finger between the skin and the meat and shifting it to loosen. (I personally prefer to just cut along one side of the backbone to open the chicken (or hen) since I’m a lover of the tail, a bad taste inherited from my grandmother.)

Next, take 1/2 of the garlic mixture and rub it in one side of the hen between the skin and the meat. Repeat on the other side with the other half of the garlic mixture. Place in the prepared pan and repeat for the other hens you want to cook. Generally, one hen per person depending on their size and what else you’re serving with them. I actually only ate half a hen. Larger birds will feed more people but they generally average about 1 1/2 pounds per bird.

Rub the skin of the birds with oil and bake 45-55 minutes depending on how your oven temperature runs or until the thigh meat measures 175 degrees.

*I bought pureed garlic but it’s fairly simple to puree whole garlic cloves by using the flat side of a knife. Place the peeled garlic clove(s) on a cutting board and sprinkle with salt. Smash with the flat side of a large knife and then pull the knife towards you to smear the garlic and voila, pureed garlic. Or use a small food processor to puree cloves.

** I happen to love sage with poultry but if you don’t, feel free to use thyme, rosemary or whatever other herb your family prefers.

Roasted Brussel Sprouts with Bacon and Onions

My grandson loves Brussel sprouts so for Christmas this year instead of simply steaming them, I decided to try something different. Quite an easy dish to make, these roasted sprouts get quite crunchy which only adds to the delicious combination of sprouts and bacon! I’m sorry I didn’t get a photo before we ate them all.

Preheat oven to 375 degrees. In a medium size bowl combine:

1-1 1/2 pounds Brussel sprouts, trimmed and halved

2 small to medium red onions, peeled and cut into good sized pieces

1 teaspoons garlic powder

1/2 teaspoon sea salt

1/4 teaspoon ground black pepper

2 tablespoons olive oil

Toss to coat all the sprouts. TIP: I generally toss the sprouts before adding the olive oil. Spread mixture out onto large baking sheet in a single layer. TIP: I like to make sure all the sprouts are cut side down so they get extra crispy. Cut into thin strips:

1/2 pound bacon

Sprinkle the bacon strips over the Brussel sprouts and bake for 30-35 minutes until bacon is cooked and the sprouts are nicely browned. The onions will also be nicely caramelized. Serves 4-6. Serve warm.