Lemon Chicken Soup with Vegetables

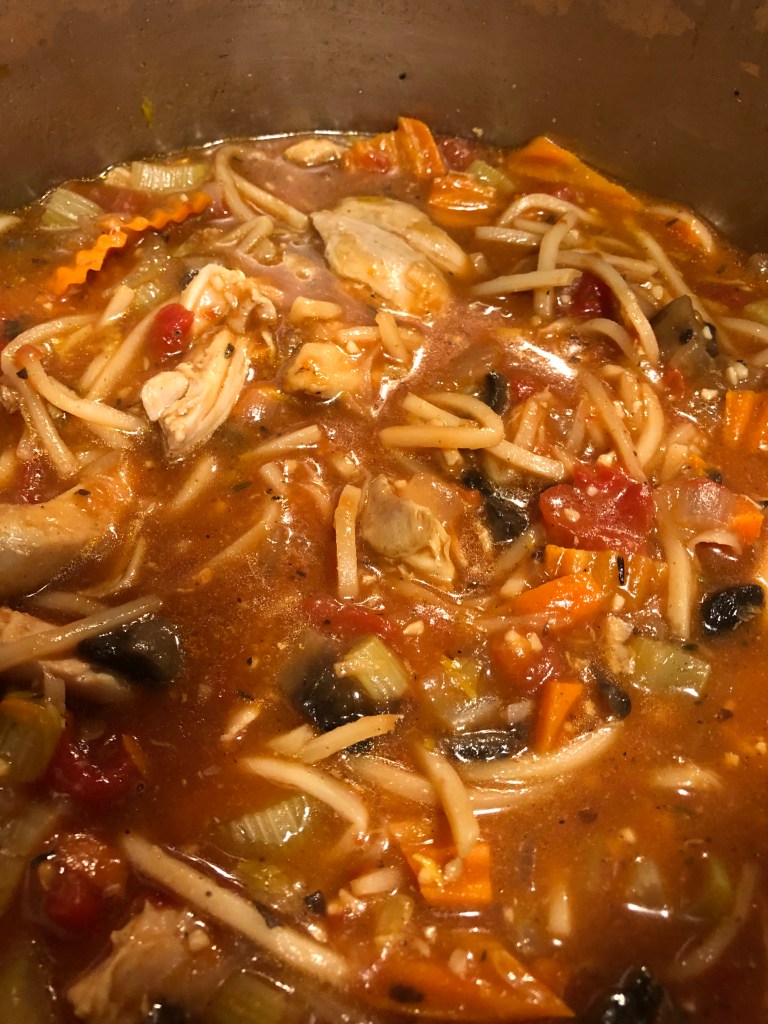
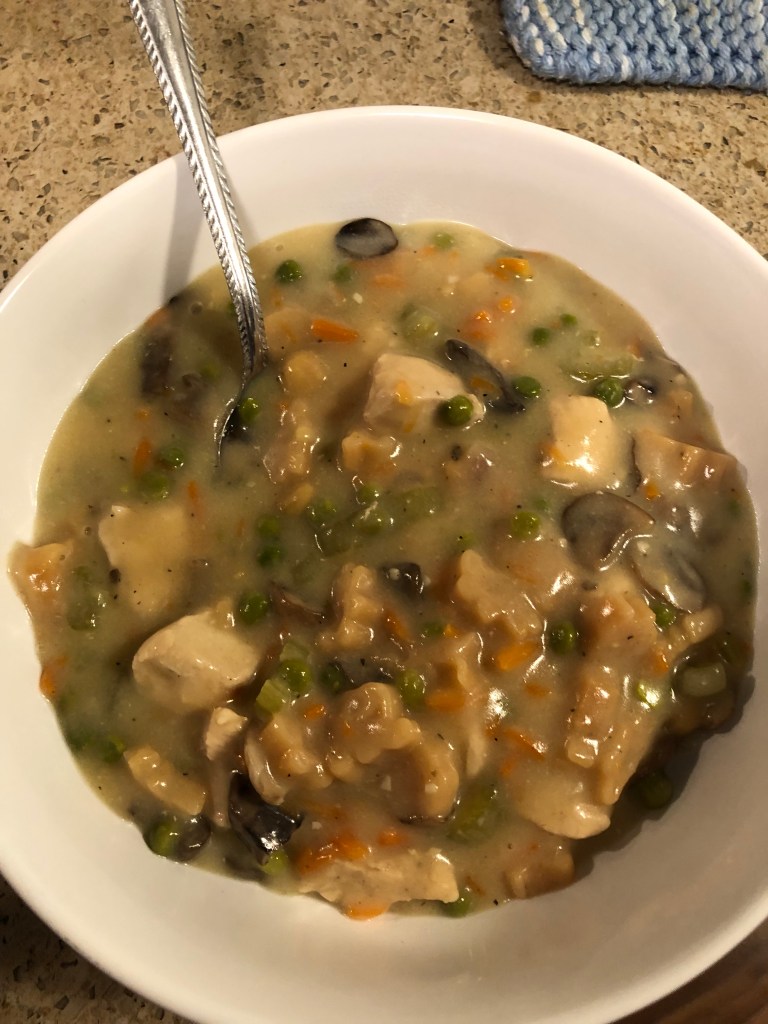
Chicken is one of my staple proteins. I had some chicken breasts in my fridge that needed to be used but I didn’t have time today to do a lot with it. Chicken soup I thought! Quick, easy, not too much work. Then I thought about the lemon beurre blanc sauce I made a few nights ago to go with some fish and thought I love chicken and lemon. It won’t be too hard to put them together. This soup is the outcome of that thought process. Hope you enjoy it as much as I did!

First, heat a small Dutch oven over medium high heat. When it gets hot, add:

1 tablespoon olive oil

When the oil is shimmering add:

1 small onion, diced

2 stalks celery, diced

1/2 cup shredded carrots

3-4 ounces sliced mushrooms (any kind you like)

Stir to combine and let cook reducing heat to medium until the vegetables begin to soften. Add:

6-8 ounces white meat chicken, cut into bite size pieces

1/2 teaspoon sea salt

1/4 teaspoon ground black pepper

1/2 teaspoon garlic powder

Stir so the chicken goes to the bottom of the pot, or as much as possible. When chicken is browned, add:

2 teaspoons minced garlic

approximately 1 tablespoon lemon zest (zest of one large lemon)

3 cups chicken stock

8 ounces of small pasta like elbows (I used green lentil safari)

8 ounces whole chickpeas

Stir to combine, cover, reduce heat to medium low so that the stock is on a low boil to cook the chicken and pasta, about 12-15 minutes. While it’s cooking combine in a small bowl (2 cups):

1/4 cup lemon juice (juice from one large lemon)

1/2 cup oat milk

2-3 tablespoons gluten-free all-purpose flour

Whisk to combine the flour. When the pasta and chicken are cooked, add:

1/2 to 1 cup frozen peas

Cook for 3-5 minutes longer to cook the peas before adding the milk mixture. If necessary pour the milk mixture through a small sieve to keep any flour lumps out of the soup. Stir the soup to mix in the flour and continue stirring for 2-3 minutes while the stock thickens and the flour cooks. Stir in:

2 tablespoons honey

Salt and pepper to taste

Serves 4.

Of course you can add any vegetables your family likes. Asparagus would work very well in this soup as it goes great with lemon. And rice would work as well as pasta depending on taste.

Lemon Chicken with Asparagus and Chickpeas

My grandson and I made this the other night. He ate two helpings! Very simple to make and quite delicious especially if you like chicken and lemon like we do.

First, dry and trim any fat from:

4 boneless, skinless chicken breasts

Cut each breast into large chunks then salt and pepper to taste. Heat in a 12″ skillet with high sides over medium high heat:

1 tablespoon olive oil

When shimmering add chicken chunks, brown on every side. Remove to a plate and add to the pan:

1 pound asparagus, washed, trimmed and cut into 2″ pieces

Sauté 2-3 minutes before removing from the pan. Pour off oil in pan to leave about 1 tablespoon. Add:

1 teaspoon ground coriander

2 teaspoons minced garlic

3 teaspoons lemon zest

1/2 teaspoon red pepper flakes (optional)

Sauté just until the coriander becomes fragrant, about 30 seconds. Add:

1 1/4 cups chicken stock

1 tablespoon honey

3 tablespoons lemon juice

chicken breasts along with any juices on the plate

1/2 can (about 1 cup) drained and mashed chickpeas*

Reduce heat to medium low or low and cook just until the chicken registers 175 degrees or is completely firm to the touch, about 10-15 minutes. Turn the chicken several times while cooking to ensure an even cook. If the sauce is reducing too much, reduce heat to low and/or cover the pan to keep in the remaining sauce. When chicken is cooked, remove to the plate and add the asparagus back into the pan to cook for an additional 2-3 minutes until just tender. Stir the chicken back into the pan. Serve over rice, garnish with fresh parsley or green onions. Makes 4 servings (unless you’ve got someone like my grandson around!).

*If you like the texture of whole chickpeas you can also add the other half can whole when you add the asparagus back into the pan towards the end.

Chicken Cacciatore

There are probably as many recipes for chicken cacciatore on the internet as there are recipe sites. But here’s another one that’s easy to prepare and tastes oh so good! The chicken stays fairly moist (because it’s browned before stewing), the portobellos add some depth to the dish and the sauce is rich and succulent. Using boneless, skinless chicken thighs cuts down on the cooking time so this can be ready in about 40 minutes for a fairly quick midweek supper.

Trim fat and dry with paper towels:

6-8 boneless, skinless chicken thighs

Salt and pepper lightly. Over medium heat begin heating a Dutch oven and add:

1 tablespoon olive oil

Add the chicken thighs and cook, about 4-5 minutes before turning and browning on the other side. If the chicken sticks to the bottom of the pan when trying to turn it, it’s not ready to turn so brown a little longer. Once browned on both sides, remove to a plate and add to the pan:

1 medium onion, diced

5-6 stalks celery, chopped

3 large or 5 medium portobello mushroom caps, cleaned and chopped

3/4 cup diced carrots

Lightly salt and saute until the onion is translucent and the celery and mushrooms are softened. Add:

2 teaspoons minced garlic

1 1/2 tablespoons gluten-free all-purpose flour

Mix to combine and cook out the flour over medium low heat for a minute before adding:

2 cups chicken stock (or 1 cup white wine and 1 cup chicken stock, or 1 cup chicken stock and 1 cup mushroom stock)

1/2 teaspoon dried thyme

1/2 teaspoon dried sage

14-15 ounce can diced tomatoes, drained

Stir to combine and then place the chicken thighs into the stock, pushing down to cover. Be sure to add any juices that have accumulated on the plate as well. Cover the pot and reduce heat to low simmer and cook for 20-25 minutes until chicken reaches 175 degrees internally. It will start falling apart when completely stewed so don’t worry if you don’t have a meat thermometer to measure the internal temperature. Add:

2 tablespoons tomato paste

Stir to combine. Serve over rice, pasta, or potatoes. I’ve discovered at my local Whole Foods Market, a heart of palm pasta (365 brand) that is very low in carbs and very tasty so I added a bag of it (drained and rinsed) about 10 minutes before the cacciatore was done. Serve with parmesan cheese if desired. Serves 4.

Chinese Dumplings

When I worked at Arizona State University, the chair of the department and I shared the same birthday so we’d go out for lunch annually on our birthday. There was a little Chinese restaurant near campus where we’d devour several orders of pot stickers and a soup bowl of hot and sour soup. I’ve been checking every grocery store I go to and I couldn’t find gluten-free wonton wrappers but a check on-line found a recipe. So, although this process is somewhat lengthy, the dumplings are well worth the effort.

First, make the wonton wrappers by combining:

1/2 cup all purpose gluten-free flour

1/2 cup tapioca flour

1/2 white rice flour

1/2 teaspoon sea salt

1 teaspoon guar gum

Whisk together the dry ingredients then stir in:

1/2 cup boiling water

Dough will start to come together. Add:

2 tablespoons cold water

1 1/2 teaspoons olive oil

Stir to combine, kneading with hands if necessary. Form into a ball, cut in half. Place one half under plastic wrap to stay moist while working with the other half. Roll the dough into a log then cut into 12 pieces, about 1 tablespoon each. Roll the pieces into balls and place in a sandwich bag until ready to fill. Repeat with the other half of the dough.

Next, make the filling. In the bowl of a food processor, pulse:

8-10 scallion whites

6 ounces shitake mushrooms

1/2 cup shredded carrots

Pulse until well ground. Put into a medium bowl with:

3/4 pound ground turkey (or pork)

3 teaspoons date sugar

3 tablespoons soy sauce substitute (see recipe under sauces)

1/2 teaspoon ginger juice (or freshly grated ginger)

1/2 teaspoon toasted sesame oil

Combine, cover and store in the refrigerator until ready to fill the wontons. Using a bamboo steamer (or a steamer basket or pot but you won’t be able to cook as many at once), place over water on the stove. Take one dough ball, place between two pieces of plastic wrap, and using a small rolling pin (or any can), roll out to about a 3″ circle. Place about 1 tablespoon filling in the middle. Using the plastic wrap, bring the sides of the wonton wrapper together in the middle. Pick up the ball and gently press the edges together to seal the dumpling (these can be either round or rectangular). If the dough is dry, wipe the edges with a small amount of water to moisten and seal. Place in the steamer and repeat until the steamer is filled, without the dumplings touching the edges or each other because they will stick as they cook. Bring the steamer water to a boil and cook the dumplings 10-12 minutes. Serve with a sesame garlic sauce and garnish with the scallion greens.

Sesame Garlic Sauce:

1/4 cup soy sauce substitute

1 tablespoon toasted sesame oil

1 tablespoon fish sauce

1 teaspoon minced garlic

1 tablespoon date syrup or honey

1/4 teaspoon chili sauce or red pepper flakes

Baba Ghanoush

Yes, another eggplant recipe! And a very simple dip to prepare; the hardest part is roasting the eggplant and that’s not especially difficult, just time consuming. I can’t tell you exactly what size eggplant to buy – you’ll want about 2 cups of eggplant pulp. The 3 oriental eggplant I used only gave me about 1 cup of pulp so I would recommend a medium to large Italian eggplant for this recipe or else adjust the other ingredients to the amount of eggplant pulp you roasted.

First, roast the eggplant by slicing it into 1″ slices. Place on a baking sheet lined with parchment paper. Spray or brush the eggplant slices with olive oil then turn them over and repeat. Roast in a preheated 425 degree oven for 20-25 minutes.

While the eggplant is roasting, in a small skillet heat:

2 tablespoons avocado oil

1 teaspoon cumin

Heat only until you can smell the cumin, about 1 minute. Remove from heat and set aside to cool.

Remove the eggplant and let cool slightly before peeling the skin from around the outside of each slice. Place in a food processor and add:

2 tablespoons tahini

1 teaspoon minced garlic

salt and pepper (about 1/8 teaspoon salt and a dash of pepper)

1 tablespoon lemon juice

the cumin and avocado oil mixture

Pulse until smooth, spoon into a serving bowl and sprinkle with dried or fresh parsley. If desired, sprinkle with olive or avocado oil as well. Serve with gluten-free pita or quinoa buns (see recipe below).

Quinoa Buns

I thought these sounded interesting – avocado and quinoa with lime juice? Who puts lime juice in a bread? But I thought it sounded like it might be a good vehicle for the baba ghanoush. And it sounded very easy to make so I gave it a try and it actually is delicious but just be miserly with the lime zest or it overpowers the other flavors in the buns.

In a medium to large bowl combine:

1 1/2 cup quinoa flour (if you don’t have any but you have quinoa, simply pulse in a food processor to make flour from the raw quinoa)

1/4 cup gluten-free oat flour

2 tablespoons ground flaxseed

2 tablespoons sesame seeds

1 teaspoon baking powder

1/8 teaspoon sea salt

In a smaller bowl mash:

1 whole large ripe avocado being sure to take out any brown bruise spots which won’t mix into the batter

Add to the avocado:

1-2 tablespoons lime juice (juice from 1 lime)

1/2 teaspoon lime zest

1 tablespoon honey

3/4 cup water

Using a whisk or hand mixer, combine the wet ingredients until fairly smooth. Add to the dry ingredients and stir to combine. It’s a sticky dough so using wet hands shape into 6-7 balls. Place on a baking sheet lined with parchment paper and flatten to about 1/4 inch thickness. Sprinkle with more sesame seeds and let sit while the oven heats to 425 degrees. Bake about 25 minutes total, turning the buns over at 15 minutes to brown both sides. Test with a toothpick for doneness. REMEMEBER GLUTEN FREE BREADS CAN BE GUMMY SO EVEN IF THE TOOTHPICK COMES OUT CLEAN, THEY STILL MAY NOT BE COOKED THROUGH. Cool completely before cutting.

Chicken Marengo

Here’s another great recipe adapted from the Chicken Bible. Because of salt restrictions, I left out the chopped olives and brandy also isn’t allowed in my diet so that’s gone as well but I’ll list them as optional if you want to add them to your dish. It was quite tasty and fairly easy to make. Be sure to use an oven safe pan or after making the sauce, transfer the sauce and then the chicken to an oven proof dish.

Preheat oven to 400 degrees. Peel and chop:

1 medium onion, diced fairly small

Using paper towels, dry:

4 medium size bone-in chicken breasts or 2 breasts and 4 thighs

After drying sprinkle with:

1/2 teaspoon salt (I used herbamare)

1/4 teaspoon ground black pepper

Heat over medium high, in a skillet large enough to cook the chicken without cramping:

1 tablespoon oil

Add the seasoned chicken pieces, skin side down and leave them alone for at least 5 minutes to brown the skin and get it crispy. Then turn and cooked for 2-3 minutes on the other side. Remove from the pan, drain all but 1 tablespoon oil from the skillet and add:

the diced onion

Cook over medium heat for 2-3 minutes until softened before adding:

2 teaspoons minced garlic

10 ounces sliced shitake mushrooms

Cook over medium heat until the mushrooms start to soften and give off their liquid before stirring in:

28 ounce can of diced tomatoes, drained

1 tablespoon minced fresh thyme (or 2 teaspoons dry thyme)

Combine and then add a sauce made with:

3/4 cup chicken stock

2 tablespoons tomato puree

1/3 cup brandy (Optional)

2 teaspoon hot sauce (or more if your family likes it spicier OR 1/4 teaspoon crushed red pepper flakes)

6 Kalamata olives, chopped fine (Optional)

Stir to incorporate before placing the chicken pieces on top of the sauce mixture. Bake for 35-40 minutes or until the breasts reach 160 degrees and the thighs register 170 degrees. Remove from oven and move the chicken to a serving platter. Add to the sauce:

2 tablespoons avocado oil

Whisk to combine and then spoon the sauce around the chicken and serve. Serves 4.

Chicken and Vegetables in Plum Sauce

Had a little of the soy substitute sauce left over from the recipe a couple of days ago so thought I’d make some choy mein. But there wasn’t quite enough sauce for that and I’d gotten a jar of plum jam out of the freezer and added some of that and oh my goodness, how mouth-watering is this! Like adding a little pear or apple to a pork or chicken gravy, adding a little plum to this Chinese sauce turned out luscious. Don’t have any plum jam around the house? Stew up 2 plums (skin too if organic) along with about 2 tablespoons of date syrup and then puree it and you’ve got plum jam!

Just like with most Chinese recipes, the first step is always to cut everything up!

Peel:

1 small to medium onion, slice in half thin slices

1 large o 2 smaller carrots, slice on the diagonal

2 garlic cloves, minced

Trim:

2 whole stalks or 4 stalks from the celery heart (about a cup altogether), slice diagonally

6 ounces of shitake mushrooms, sliced

Put the vegetables in a bowl and set aside until ready to cook. Trim the fat and slice:

2 skinless, boneless chicken breasts*

Place the slices in a food storage bag and add:

2 tablespoons soy sauce substitute (see recipe under sauces)

2 tablespoons rice vinegar

1 tablespoon cornstarch or arrowroot

1/4 to 1/3 cup plum jam

Seal and refrigerate 15-30 minutes until ready to cook. When ready to cook, heat over medium heat in a 12″ skillet:

1 tablespoon olive oil

Add the vegetables and cook, stirring frequently, for 1-2 minutes. Cover and lower heat to medium low and cook for 5-7 minutes, stirring often, until carrots are tender. Remove the vegetables to their bowl, turn the heat back to medium and add to the skillet:

the marinated chicken and marinade

Cook stirring constantly until the chicken is cooked through, about 2-3 minutes. Reduce heat to low and add the vegetables back to the skillet along with:

1 cup chicken or vegetable stock

Stir to combine and continue stirring until sauce thickens, about 1 minute. Serve with brown rice or rice noodles.

*Want a vegan entrée? Substitute firm tofu or your favorite plant-based protein.

Chicken with Bok Choy and Red Peppers and Crispy Noodle Cake

Here’s another recipe adapted from the Chicken Bible. It’s somewhat spicy due to the abundance of freshly grated ginger as well as just a 1/4 teaspoon Vietnamese chili sauce.* The original recipe called for 1/4 teaspoon of red pepper flakes so use those if you can’t find a chili sauce that works for your family. I also cut back slightly on the amount of freshly grated ginger – the original recipe called for 1 tablespoon but I used only about 1 teaspoon and it was sufficient for my tastes. This is a recipe that may sound difficult and complex but if you follow the steps, it’s really quite easy to make and oh so worth the effort – just as good as any dish in your favorite Chinese restaurant.

First, cut up everything:

1 pound bok choy (I used three medium sized baby), cut off the stems and cut into bitesize pieces and then separately chop the greens and put them in a separate bowl

2 small sweet red peppers, cut in thin slices

1 pound boneless skinless chicken breasts, sliced as thinly as possible (if the breasts are partially frozen, they will slice much easier although the hand holding the meat will get quite chilly!)

1 garlic clove minced

about 1″ of fresh ginger peeled and grated to produce roughly 1-2 teaspoons

2-3 scallions, slice at an angle, add the white parts to the bok choy stems and peppers and set the greens aside in a medium bowl

Next, mix together in a medium bowl:

1 tablespoon soy sauce substitute

2 teaspoons rice vinegar

1 teaspoon date syrup

1 teaspoon fish sauce

1 tablespoon sesame oil

1 teaspoon cornstarch (or arrowroot)

Whisk together and add the sliced chicken. Mix to ensure all the chicken is coated with the marinade. Refrigerate until needed.

Third, put on a pot of water to boil:

6 quarts water in a large pot

When the water comes to a bowl, add:

1 teaspoon sea salt

9 ounces of noodles (I used brown rice pad Thai noodles)

Cook for only 3 minutes until el dente (or the amount of time on the package of your noodles). Drain and add to the bowl with the green scallion slices. Mix to combine. In a 12″ non-stick skillet, heat over medium high heat:

2 tablespoons olive oil

Add the noodle/scallion mixture and spread out in the pan. Use a strong spatula (or I used a bacon flattener) to flatten the noodle mixture in the pan (see photo below). Cook 5-7 minutes until browned and then using a large spatula, flip and brown again on the second side 5-7 minutes. Remove to an oven proof plate and stick in a 200 degree oven to keep warm.

Now, in a small bowl mix together:

2 tablespoons olive oil

the minced garlic

the grated ginger

In another small bowl make the sauce by combining:

1/3 cup chicken or vegetable stock

2 tablespoons soy sauce substitute

1 tablespoon rice vinegar

1/2 tablespoon date syrup

1/4 teaspoon chili sauce or red pepper flakes (or hot sauce!)

1 teaspoon cornstarch (or arrowroot)

Stir to combine. Set aside until needed. Pour into the empty skillet and heat:

2 teaspoons olive oil

Add:

sliced chicken (and marinade)

Cook over medium high heat, stirring constantly and turning frequently until the meat is cooked, about 2 minutes. Remove to a dish and set aside. Into the same skillet heat over medium heat:

the olive oil mixture with the garlic and ginger

When hot, add:

the bok choy stems

red pepper slices

scallion whites

Cook over medium high heat stirring frequently until they just begin to soften, about 3 minutes. Add:

the bok choy greens

Cook just until the greens begin to wilt, add the cooked chicken along with any juice in the dish. Whisk the sauce mixture to be sure it’s still combined and pour over the chicken in the skillet. Stir continuously until the sauce thickens about 30 seconds and the chicken is reheated. Remove the noodle cake from the oven and cut into wedges. Serves 2.

*I had a lot of difficulty finding a chili sauce that didn’t contain either sugar or soy. I finally located one (at the 4th store I checked!) – Tuong Ot Toi Viet-Nam Chili Garlic Sauce. It’s VERY hot so the amount used should be to the level of your taste buds. I don’t mind spicy but super hot is not to my liking therefore the recipe calls for just 1/4 teaspoon.

Sesame Chicken with vegetables

I’ve talked about how much I love Chinese food and here’s another luscious, mouth watering, easy to make dish. It’s a little spicy with the chili paste (or hot sauce) and grated fresh ginger but not too spicy but feel free to leave those out if you don’t want it spicy. And be sure to check before purchasing oriental chili paste because most of them (all the ones I looked at in the store) contain wheat flour and therefore gluten. Serves 2-4 depending on serving size and the vegetables you add.

First prepare the chicken:

12 to 16 ounces boneless chicken breasts and/or thighs

Remove skin and whatever fat and silver skin you see. Cut into bite-size chunks and place in a gallon food storage bag. Add:

1/3 to 1/2 cup corn starch (or arrowroot)

Close the bag and toss the meat around to make sure it’s entirely covered by the starch. Place in the refrigerator for 15-30 minutes.

In a small saucepan combine:

2 tablespoons soy sauce substitute (see recipe under sauces)

1 1/2 tablespoons ketchup (sugar free)*

1/2 teaspoon chili paste (or hot sauce which is what I used)

1 1/2 tablespoons date sugar

1 tablespoon sesame oil

1 teaspoon freshly grated ginger (or 1/4 teaspoon ground ginger)

1 teaspoon minced garlic

Stir to combine. In a small bowl whisk:

1/3 cup stock (chicken or vegetable)

2 teaspoons cornstarch, arrowroot or xanthan gum

Whisk to make a slurry and then pour it into the saucepan. Heat the sauce over medium heat, whisking often until it starts to heat up and you see a few bubbles from a slow boil then whisk constantly until the sauce is thickened. Remove from heat and add:

2 tablespoons TOASTED sesame seeds (you can buy them that way)

Stir in the sesame seeds and set the sauce aside. Over medium heat, heat a 12″ skillet with:

1 tablespoon olive oil

When shimmering hot, add the cubed chicken. Using a spatula or wooden spoon, spread out the meat so it’s in a single layer in the pan and cook, stirring often, for 5-7 minutes until the meat is cooked through (time will depend on how large the cubes are). Once the chicken is cooked, pour in the sauce and mix to combine. Cover and remove from heat.

For vegetables, whatever your family likes will work. I used 1/2 cup of shredded carrots and 1/2 cup of frozen peas which I zapped in the microwave for 2 minutes before adding to the chicken mixture. But broccoli, bok choy, snow peas, celery, onions, water chestnuts, green beans, will work just be sure to cook them before adding to the sesame chicken. Or if you prefer, leave out the vegetables and serve a vegetable dish on the side. I served this over brown rice but again, Thai noodles or linguini would also work.

*For those of you unfamiliar with the product, Organicville makes a ketchup containing agave nectar instead of sugar. No one I’ve ever served it to knew it wasn’t “real” ketchup.

Thai “Peanut” Sauce with Spaghetti Squash

My obsession with eggplant has been demolished and replaced with spaghetti squash. Such a versatile vegetable, low in carbs, and good either as a “spaghetti” type vegetable or as a mashed squash. In this instance, it’s used as a spaghetti. And of course, I’ve left out the peanuts and substituted tahini but really any seed or nut butter will work in this recipe. And feel free to adjust the last four ingredients in the sauce to meet your family’s tastes. I used a lot more of the red curry paste because I just didn’t taste it at the prescribed amount.

First, preheat oven to 375 degrees. Cut in half:

1 small to medium spaghetti squash (size depending on how many you want to feed)

Sprinkle with about 1 tablespoon of olive oil, salt and pepper and place face down on a baking tray. Bake in preheated oven for approximately 30 minutes or until a knife can be easily inserted into the skin side of the squash. Baking time will depend on the size of the squash. When tender, set aside to cool while you make the sauce.

In a medium size saucepan, combine:

1 1/2 cups non-dairy milk (if you can have coconut milk, it would work well here)

2/3 cup tahini, sunflower, pepita, or other seed or nut butter

1/4 cup date sugar

1/4 cup water

2 tablespoons fish sauce (or soy substitute for vegans)

2 tablespoons rice vinegar

2 teaspoons sesame oil

2 teaspoons red curry paste (I used about 2 tablespoons)

Whisk to combine thoroughly although some heat may be needed to break down the seed or nut butter. Cook over medium high heat until it reaches a boil and then reduce heat to medium low and cook, stirring frequently, until thickened, about 5 minutes. Remove from heat.

In a 12″ skillet, heat over medium heat:

1 tablespoon olive oil

Add:

1/2 cup peas

1/2 cup shredded carrots

1 teaspoon minced garlic

Cover and cook until the carrots and peas are tender, about 5 minutes. Reduce heat to low. Using a fork, scrap the flesh from the inside of the spaghetti squash from end to end. Add to the skillet with the other vegetables along with 1/2 to 1 cup of the sauce. At this point, add:

1/4 cup chopped parsley (OPTIONAL)

Toss and cook for 2-3 minutes until squash is heated through. Serve with chopped nuts or seeds (I used roasted pumpkin seeds, delicious!). With a small squash as a side dish, serves 4.

This recipe makes about 3 times as much sauce as is needed for the dish. I spooned the remainder into 1 cup canning jars and put them in the freezer.