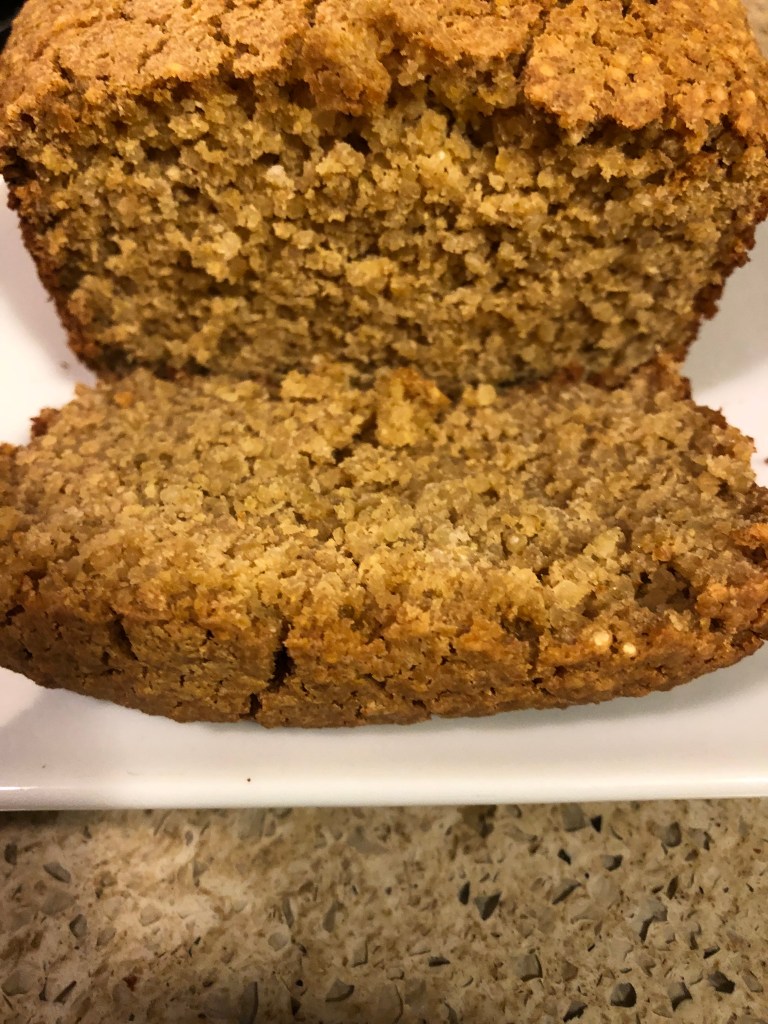
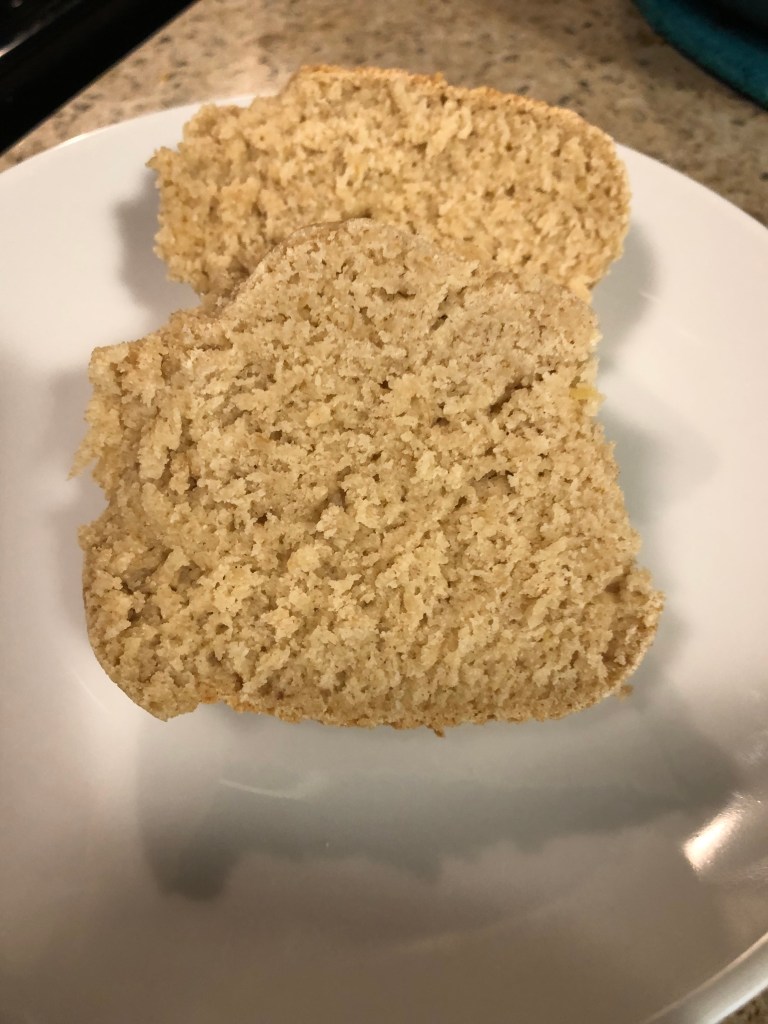
This is a quick bread – uses baking powder and baking soda as rising agents instead of yeast. Yet it comes out quite light and fluffy, almost a savory cake consistency. For a finer grain use quinoa flour rather than attempting to grind your own. Using my food processor, I pulsed the raw quinoa for almost five minutes without successfully grinding even half the two cups.
Preheat oven to 400 degrees. Liberally spray or grease an 8×5″ loaf pan (I used a glass one for more even cooking). In a medium to large mixing bowl combine:
2 cups ground raw quinoa (or flour)
1 cup oat flour
1 teaspoon baking soda
1 teaspoon baking powder
1/4 teaspoon sea salt
Whisk to combine and aerate. In a smaller (4 cup) bowl combine:
2 cups oat milk (or any non-dairy milk)
3 tablespoons avocado oil (or any oil will work)*
1 tablespoon vinegar
1 tablespoon maple syrup
Whisk and add to the dry ingredients. Using a spoon or hand mixer on low, mix until combined. Batter will be thinner than cookie dough. Pour into the prepared pan. Place in middle rack of oven with a piece of parchment paper loosely covering it so that it doesn’t over-brown. Remove the paper after 30 minutes. Bake for a total of 60-70 minutes until a toothpick comes out of the middle clean. Cool completely before removing from pan.
*TIP: Add your oil before any type of syrup and the sweetener will run right out of the measure.
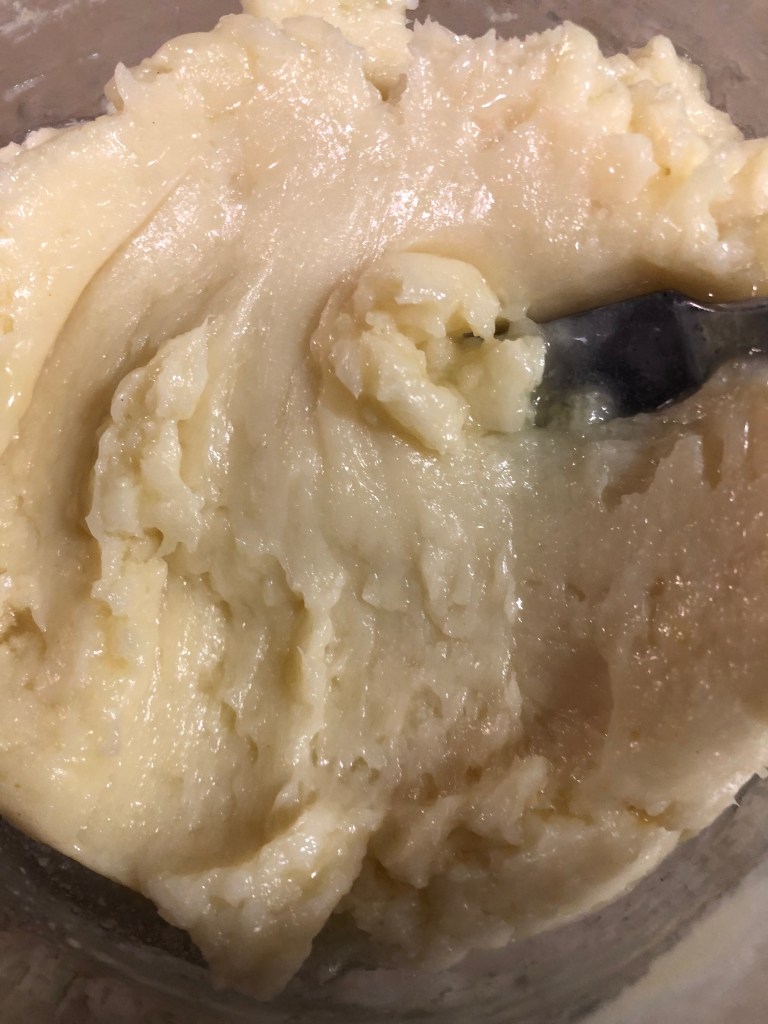
There are lots of recipes for vegan “butter” on the internet but most have a nut base.
In a blender combine:
1 cup avocado oil (or any oil you like but the avocado has a very light flavor)
1/3 cup non-dairy milk (I used oat)
1 teaspoon vinegar
2 teaspoons nutritional yeast
Pinch of turmeric
1/2 teaspoon of sea salt
Blend until smooth, about 30 seconds to 1 minutes. Pour into a 2-cup dish with a lid. Place in the freezer for 1 hour and then transfer to the refrigerator until set (about 2-4 hours or if you skip the freezer, overnight 6-8 hours).
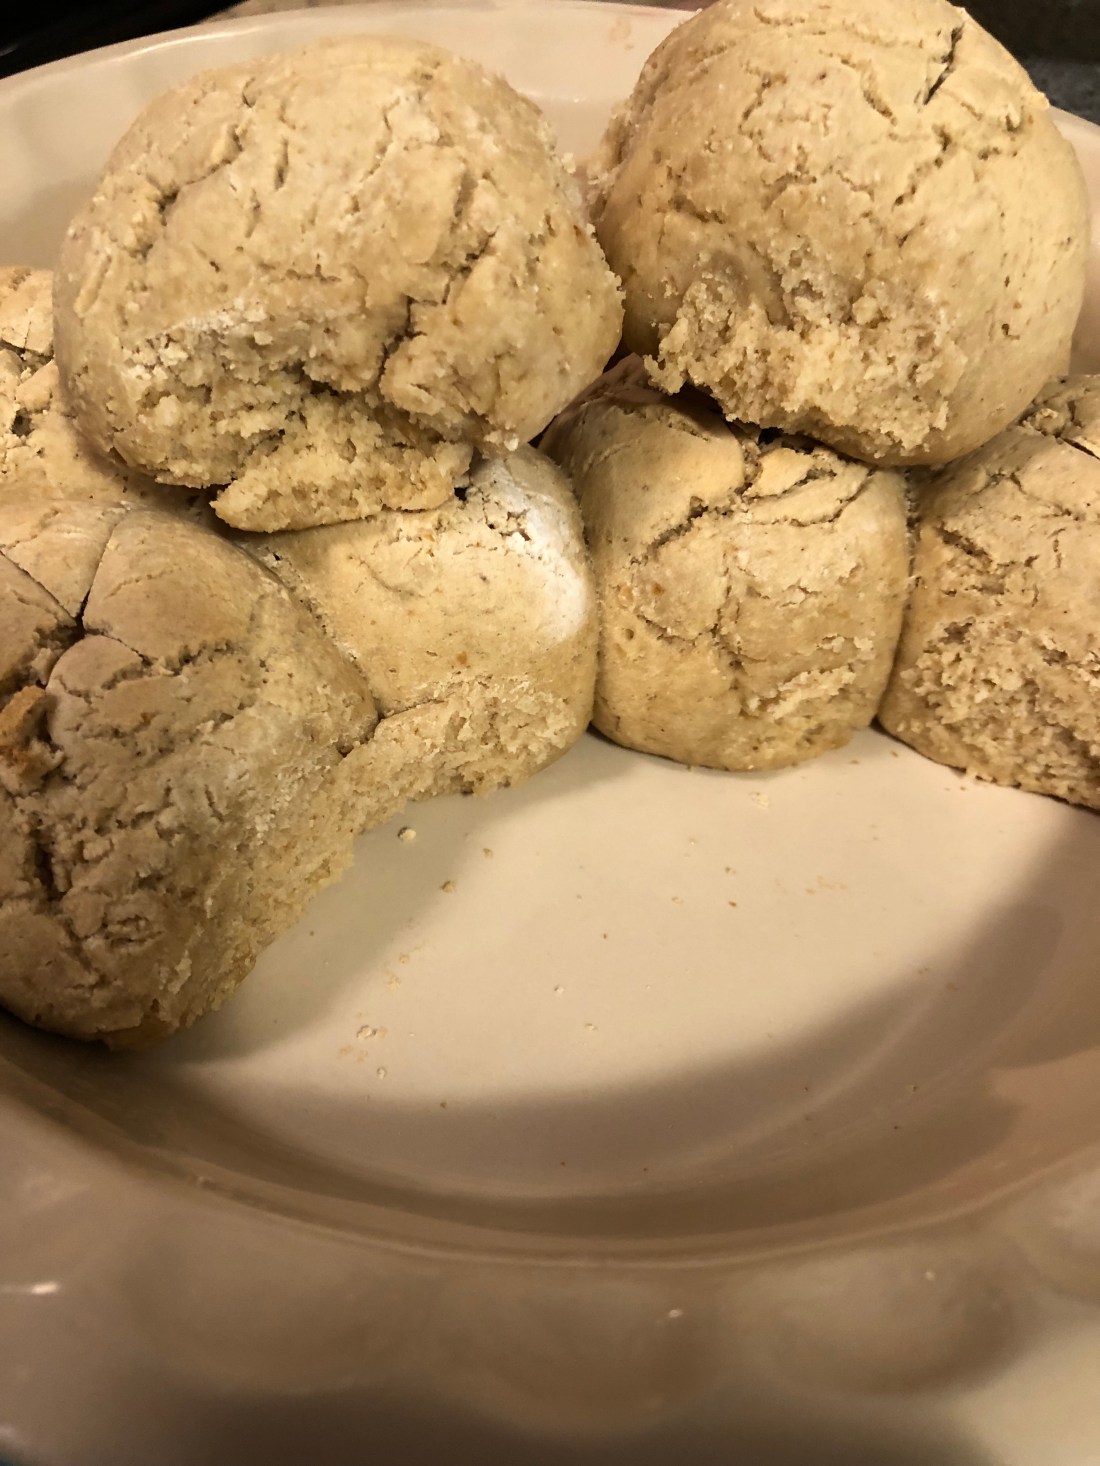
Gluten-free breads that don’t contain eggs are, more often than not, bricks, heavy and gummy in texture. For those of you who, like me, miss bread and keep looking for something to sop up that gravy, or make a small sandwich with, here we go! These rolls are hearty but not heavy and even when hot not gummy. Two tips to dispel the gummy texture – bake longer than a recipe suggests and slice the tops so that the moisture can escape.
If you don’t have a warming drawer or warm location, heat oven to 125 degrees. Grease a 9″ cake pan or pie plate and set aside. Then, in a small bowl combine:
1 tablespoon ground flax seed (golden is more appealing to the eye in baked goods)
3 tablespoons cup hot water
Set aside for 5-10 minutes until the mixture forms a flax gel. In the bowl of a mixer (or a medium-large mixing bowl) combine:
1 cup millet flour
1 cup oat flour
1/2 cup white rice flour
1/4 cup arrowroot or tapioca flour
2 teaspoons guar gum
2 teaspoons instant or rapid rise dry yeast
1/4 cup date sugar
Use a whisk to combine these ingredients before adding:
1 teaspoon sea salt
Put the dough hook on your mixer (or if you don’t have a stand mixer, use a wooden spoon). Using the lowest setting on the mixer add:
1 cup warm water (between 105 and 110 degrees)*
When blended, stop mixer and add:
2 tablespoons vegan butter (see recipe below or use one of your own), a prepared margarine such as Earth Balance, or Spectrum shortening, melted or softened
the prepared flax gel
1 teaspoon vinegar
Using the medium speed of the mixer, mix using the dough hook for 3 minutes, do not overmix! Or mix with the wooden spoon for several minutes. Use a cookie scoop (2″) or 1/4 cup measure (don’t quite fill the measuring cup) to scoop out the dough, form into balls and place in the prepared baking pan. Cover with a dry clean cloth.
TURN OFF THE OVEN before placing the rolls in the oven to rise for 45-60 minutes or until doubled in size. If you have a warm spot, like a radiator or warming drawer, use it instead. Remove the rolls when they are proofed and heat the oven to 400 degrees. Cut a cross in the top of each roll before placing them in the preheated oven. Bake 25-30 minutes (I baked mine about 32 minutes, having gotten interested in the Olympics while they were baking!). Makes 8-10 rolls.
If you want a soft top to the roll, brush with melted vegan butter or margarine. If you want a crusty roll bake on a sheet pan so that they don’t touch while baking (baking time may be shorter).
*Either use your wrist (like with a baby’s bottle) to be sure the water is only lukewarm, you shouldn’t feel either cold or hot on your wrist, or a thermometer to ensure the water is 105-110 degrees.
EASY VEGAN “BUTTER”
There are lots of recipes for vegan “butter” on the internet but most have a nut base.
In a blender combine:
1 cup avocado oil (or any oil you like but the avocado has a very light flavor)
1/3 cup non-dairy milk (I used oat)
1 teaspoon vinegar
2 teaspoons nutritional yeast
Pinch of turmeric
1/2 teaspoon of sea salt
Blend until smooth, about 30 seconds to 1 minutes. Pour into a 2-cup dish with a lid. Place in the freezer for 1 hour and then transfer to the refrigerator until set (about 2-4 hours or if you skip the freezer, overnight 6-8 hours).
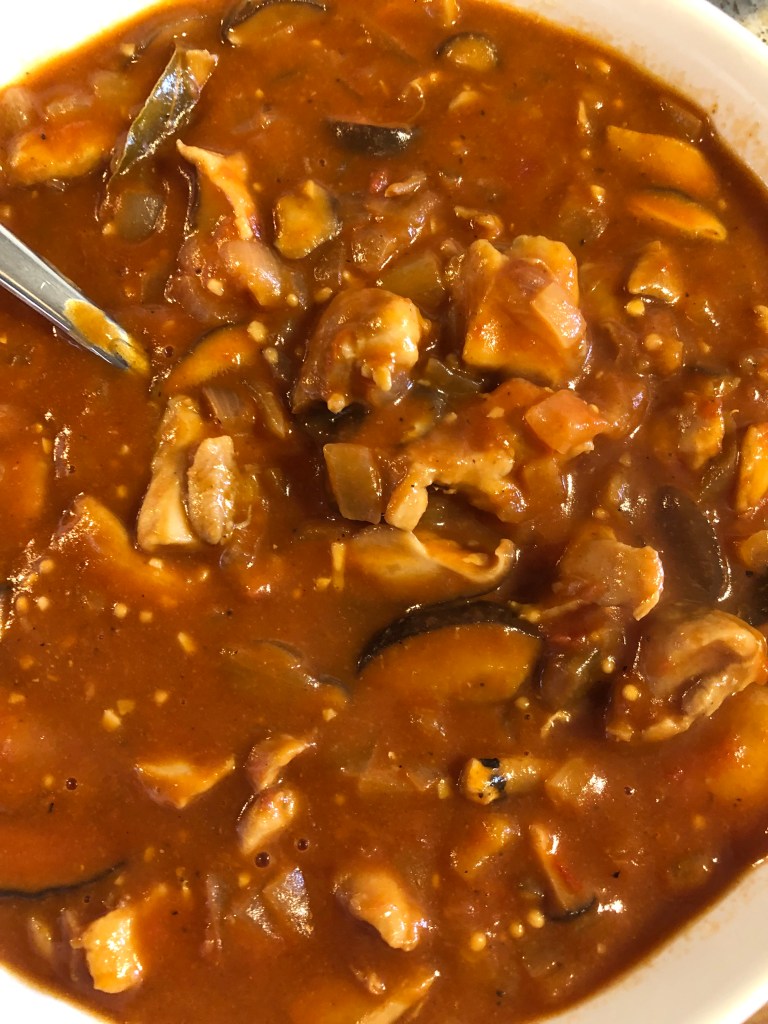
I was looking through the CHICKEN BIBLE this morning seeking a new, different chicken recipe for the chicken thighs I took out of the freezer and found this one. It was fairly easy to make allergy-free. A relatively easy stew to put together, slightly spicy, vindaloo is a mix of Indian and Portuguese styles. Very flavorful, this dish serves 4.
Preheat oven to 325 degrees. In an ovenproof Dutch oven heat over medium high:
1 tablespoon olive oil
When shimmering add:
1 1/2 pounds diced chicken thighs
Sprinkle chicken with:
1/2 teaspoon salt
1/4 teaspoon ground black pepper
Let the chicken brown for 2-3 minutes before turning and cooking another few minutes until well browned. Remove to a bowl. Add to the pot:
1 tablespoon olive oil
1 1/2 medium onions, diced
1 tablespoon minced garlic
Sprinkle with:
1/2 teaspoon salt
Cook over medium heat, stirring occasionally, until onion is translucent, about 4-5 minutes. Add:
2 teaspoons paprika
1/2 teaspoon ground cumin
1/4 teaspoon cardamon
1/4 teaspoon cayenne pepper
1/4 teaspoon ground cloves
Stir to combine and cook about 1 minute. Add:
2 tablespoons gluten-free, all-purpose flour
Stir to combine and cook for a minute to cook out the flour. Add:
3/4 cup chicken stock
Stir to combine. Add the chicken back into the pot and then add:
6 ounces sliced shitake mushrooms
1 small can (15 ounce) diced tomatoes with juice
1 tablespoon rice vinegar
2 teaspoons mustard seeds
1 bay leaf
2 tablespoons diced dates (or 2 teaspoons date sugar)
Stir to combine, cover and bake in the oven for about 1 hour. Remove bay leaf. Serve over rice.
I cooked a pork roast the other day and we only ate half of it so today I cut it up intending to make a hash with some sweet potato, onions and carrots. After I cooked the roast, I left the roasting pan out and it was cold when I decided to make some gravy to go with the rest of the roast when I reheated it. Threw in some cold chicken stock and all the fat congealed and I was able to spoon it out of the pan before I put it on the heat to get all the sticky parts off the bottom of the pan – made such a delicious gravy! So my hash turned into a stew, rich, succulent and soul warming on this single digit day in Minnesota! Let it be 9 degrees outside, I’m toasty warm in here with this stew in me.
In a high sided skillet, heat over medium heat:
1 tablespoon olive oil
When shimmering add:
1 small onion diced
1/2 cup shredded or chopped carrots
1 cup frozen peas
Stir to combine and cover. Cook over medium low heat until onions are sweated and carrots are softened, about 4-5 minutes. Add:
2 cups sweet potato (or white if preferred), diced and cooked
2 cups diced cooked pork
1 medium pear, cored and diced
Again, stir to combine, cover and heat until the pear is softened and pork and potatoes are reheated, about 3-4 minutes. Add:
2 cups gravy (see recipe for gluten-free gravy under sauces)
Salt and pepper to taste.
Serves 4-6. Some crusty bread would be great with it to mop up the gravy!
I do love squash, doesn’t matter to me what kind, color, shape, etc., it’s all delicious. My mother used to cut acorn squash in half and fill the halves with butter and maple syrup and bake them, so good! It never occurred to me to stuff winter squash but here’s a recipe that’s succulent and almost sinfully good. It doesn’t hurt that it’s extremely easy to make either! Use whatever kind of winter squash you like (I used acorns and the recipe would have stuffed 3 or 4 (so 6-8 halves).
Preheat oven to 400 degrees. Halve and seed squash, the number will depend on what kind you use and how big a hole will need filling. Rub the inside of the squash with:
1 tablespoon olive oil (2 if you have more than 4 halves)
Place each half, meat side down, on a baking sheet covered with parchment paper and bake for 40-60 minutes or until fork tender.
While the squash bakes prepare the stuffing. In a 12″ skillet, heat:
1 tablespoon olive oil
When hot add:
6-8 ounces chopped shitake mushrooms
1 bunch scallions (8-10), sliced (put 1/4 cup aside for garnish)
Cook until softened, about 2 minutes. Add:
1 pound bulk Italian sausage (mild or hot depending on your family’s taste)
Cook, crumbling the meat as it cooks, until the meat is cooked through, about 5 minutes. Add:
1 1/2-2 cups cooked quinoa, again depending on how much stuffing you need for your squash halves (I used a bag of frozen cooked quinoa from Whole Foods)
1 teaspoon minced garlic
Cover, reduce heat to medium low and cook until the quinoa is heated through and the garlic tender, about 3 minutes. Keep warm until the squash is cooked.
When the squash is tender, remove from oven, turn meat side up and fill the cavity with the stuffing. Garnish with reserved scallion greens and:
2-4 tablespoons (depending on how many halves you have) date syrup (honey or maple syrup).
I took a small pork roast out of the freezer yesterday morning and noticed that I have two bags of carrots in the frig. What to do with them, I asked myself. So on Taste of Home, I found a recipe that I thought would work once I modified it to remove the allergens. It’s really quite quick and easy if you buy already chunked pork and pre-shredded cabbage and carrots. One of the bags of carrots was shredded so I went and picked up a large container of cole slaw mix this morning. It took me about a half hour to cut up the roast and then only about 10 minutes to make the dish! Very tasty over some rice. Makes 4 servings.
In a large nonstick skillet over medium, heat up:
2 teaspoons olive oil
When hot, add:
4-6 cups chopped cabbage
Cook for about 2 minutes until cabbage starts to get tender but is still crisp. Add:
2 cups shredded carrots
Stir to combine and cook for about another 2 minutes until carrots start to get tender. Remove to a bowl. Add to the now empty skillet:
2 teaspoons olive oil
When hot, add:
2 cups diced pork
Cook over medium high heat until the pork is browned on all sides, about 2 minutes depending on how large your chunks of pork are, try to cut them into approximately the same size (I know, easier said than done!). Add to the skillet:
2 tablespoons finely minced ginger root*
Stir to combine and cook for about 2 more minutes until the pork is about cooked and the juices run clear. Combine in a separate bowl before adding to the skillet:
1 cup chicken stock
1/4 cup soy sauce substitute
2 tablespoons arrowroot
1/2 teaspoon sesame oil
Whisk to combine and add to the skillet. Stir constantly until it thickens. Add the cabbage mixture back into the skillet and heat through, about 1 minutes. Add salt and pepper to taste. Serve over rice.
*The easiest way to mince ginger root is to cut off the peel producing a rectangle of ginger root. Slice into thin slices and then, using a French knife, cut back and forth until finely minced. (A French knife is a long-bladed knife that is angled so that you can rock the blade back and forth to finely chop things.)
Like ribs, wings are high on my favorite foods list. I usually just bake them and barbecue sauce them (see recipe under Appetizers and Snacks) but I wanted to do something a little different today so I found three or four recipes for Asian wings and took what I liked from each to get you this divinely mouth-watering succulent wing recipe. In fact, I enjoyed them so much I went to the store and bought another package of wings just so that I could make them again! If you want to make them a meal, serve with cooked rice and some sauteed bok choy (see recipe under side dishes).
First, if your wings are whole, cut off the mini pointed section (the wing tips) and then cut the wing between the mini wing and the drumette. Throw the wing tips in the garbage and the other two parts into a gallon food storage bag. You should have about 2 pounds of wings.
Second, preheat the oven to 425 degrees. Prepare a medium size baking sheet by spraying it with non-stick spray. Next, add to the bag:
1 tablespoon all-purpose gluten-free flour
1/4 teaspoon sea salt
1/8 teaspoon ground black pepper
1/4 teaspoon garlic powder
1/4 teaspoon paprika (more or less depending on your taste)
Seal the bag and shake to coat the wing sections. Place each piece on the prepared baking sheet. Best to make sure they don’t touch. Bake for 30-40 minutes. While the wings bake, prepare the sauce. Mix together in a small saucepan:
1 teaspoon avocado oil
1 teaspoon ginger juice (don’t have ginger juice? Peel and finely mince a thumb size piece of ginger)
1 teaspoon to 2 tablespoons chili sauce (depending on the heat level you want in your wings)*
2 tablespoons honey
2-4 tablespoons date sugar, depending on how sweet and sticky you want them
1/3 cup soy sauce substitute
1/2 tablespoon minced garlic
Whisk together and bring to a boil over medium heat. Cook for about 5 minutes until slightly reduced. Remove from heat and set aside.
When the wings are cooked, remove from the pan to a medium size bowl and pour over the sauce.** Mix together with a serving fork or large kitchen spoon. Add:
1 tablespoon toasted sesame seeds
Move to a plate and garnish with:
1/2 cup sliced scallion greens
Serve hot.
*I used 2 teaspoons and it was quite spicy but not overly hot, just the way I like it. And the addition of the sesame seeds and scallions help cool the wings a little.
**I used only half the sauce for my 1 1/2 pounds of wings.
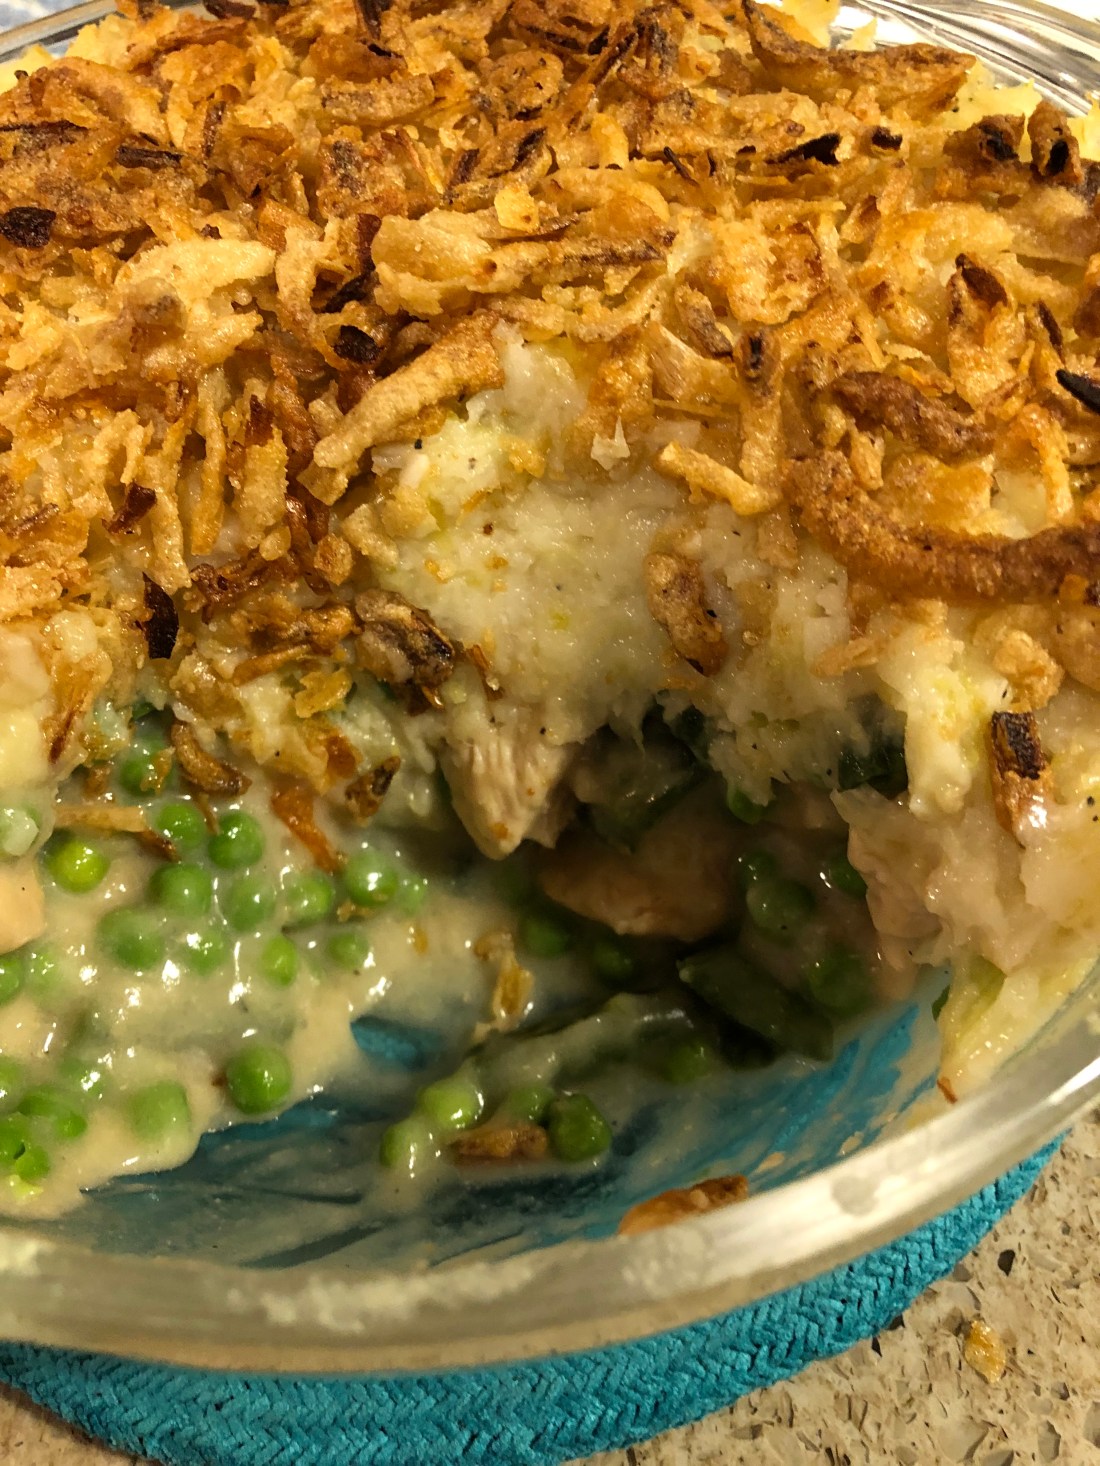
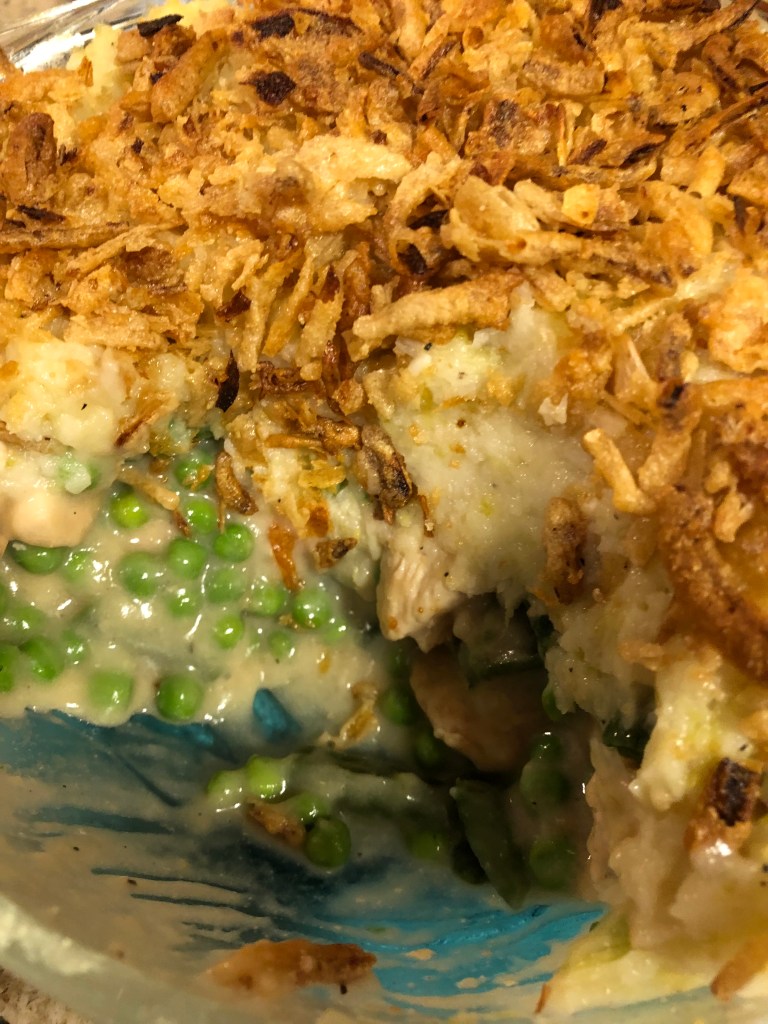
I know, you don’t have to say it! Another chicken recipe. This one can be fairly quick and easy. It’s a chicken stew with mashed potatoes (or in my case, mashed celery root and parsnips) on top with a few French-fried onions on top, baked for an hour (less if the stew is already hot). Again, like many of my recipes, feel free to use whatever vegetables you have on hand that your family prefers.
Grease or spray a casserole dish large enough to hold the stew and toppings. This will depend on the amount you need for your family, for me, I made a 4-serving size so used a 2-quart casserole dish. Preheat the oven to 375 degrees. In a skillet over medium heat, add:
2 tablespoons olive oil
When shimmering hot add:
12 ounces of chicken breast, cut into bite-size chunks
Salt and pepper to taste
Brown the chicken turning after about 2 minutes to brown on the other side(s). When chicken is fully browned, but not necessarily fully cooked, remove from the skillet and add to the skillet:
1/2 medium onion, diced
2 stalks celery, diced
1/2 cup carrot slices
1/2 cup green beans
1/2 cup peas
1 teaspoon dried thyme (or parsley, or herb of choice [I really like sage in my chicken dishes]).
Sauté, stirring frequently, until onions are transparent, reduce the heat and cover for 5 minutes or until the green beans and carrots are tender. Remove the vegetables from the pan. Whisk into the remaining fat:
2 tablespoons gluten-free all-purpose flour or enough to absorb all the fat in the pan
Cook the flour for several minutes and then add:
3/4 cup chicken stock
3/4 cup non-dairy milk (anything EXCEPT soy)
Whisk to combine with the flour and get out the lumps and then stir frequently until gravy comes to a bowl and thickens. If it’s too thick, add a little more stock or milk. If it’s too thin, make a slurry of another tablespoon of flour and a little milk and add to the gravy.
Mix in the chicken and vegetables. Top the casserole with:
2 cups mashed potato (or 2 cups celery root puree (see recipe under side dishes)
Sprinkle the top with French-fried onions or paprika. Bake in a pre-heated 375 degree oven for 30-60 minutes depending on if you bake it immediately or put it together to bake later as I did.
I love chickpea brownies and carob chip cookies but it never occurred to me to use them in a frozen “ice cream” until I saw a recipe on Pinterest. I’ve had to adapt it slightly to omit the nut butter and chocolate but it is very delicious, lusciously smooth and creamy. I added some carob powder but flavor it any way you like – some strong coffee in place of half the non-dairy milk, carob chips, or using various seed or nut butters will add various flavors. Also, using various extracts or oils could add different flavors, instead of vanilla extract, use some mint, orange, lemon, or even butterscotch flavored extracts.
In the bowl of a blender place:
1 15 ounce can chickpeas (garbanzo beans), drained
1/2 cup dates (I used chopped but if using whole dates, be sure to soak them if they’re dried so that they will break down in the blender)
1/4 cup seed butter – tahini, pumpkin seed, sunflower seed, etc.
1/3 cup protein powder (any kind or flavor)
1/4 cup carob powder
1 cup non-dairy milk
1 teaspoon vanilla extract
Blend until the dates are broken down and the mixture is smooth. If one is available, put mixture into an ice cream freezer for 30-40 minutes and then transfer to individual serving dishes to freeze or eat immediately. If an ice cream freezer isn’t available, transfer to individual serving dishes and freeze for 1-2 hours or until you want to eat it!