Spring (or summer) Rolls

When I lived in Pittsfield, Massachusetts, there was a wonderful Vietnamese restaurant that introduced me to all kinds of new flavors. One of our favorites were their spring rolls! What a delicious concoction; meat, rice noodles and vegetables wrapped in a rice paper shell and deep fried. Oh so good. Generally a spring roll contains pork or shrimp and a summer roll (the unfried version of a spring roll) contains shrimp and no noodles but bean sprouts instead. Here I’ve substituted chicken but any meat (or meat substitute) would work. And they aren’t difficult to make as long as the steps are followed.

First cook whatever part of the filling needs cooking.

To a large pot of boiling, salted water add:

8 ounces pad Thai noodles (or linguini, gluten free of course!) [Optional but traditional]

Cook until tender, about 3-5 minutes, drain, rinse with cold water and set aside to add to the cooked vegetables later. In a medium 10″ skillet over medium heat, heat:

1 tablespoon olive oil

Add:

1/2 medium onion, sliced

1 cup of thinly sliced Chinese (or Napa) cabbage

Reduce heat to medium low and cook for several minutes until the onion and cabbage wilt. In a small bowl whisk:

1 tablespoon soy substitute

1 tablespoon date sugar (or syrup)

1/2 cup rice vinegar

1 tablespoon sesame oil

Add to the skillet and stir to combine with the onion and cabbage. Add the pad Thai noodles if used. Remove the vegetables from the skillet. Either clean that skillet or using another, heat:

1 tablespoon olive oil

Add over medium heat:

16 ounces of chicken breast, julienned (thinly sliced)

Cook, turning frequently, for several minutes, 3-5, until chicken is cooked. Remove from heat.

Let the vegetables and chicken cool thoroughly. If the fillings aren’t cool enough, they will melt the rice paper wrapper. In the meantime, prepare the uncooked fillings, any or all of the following:

1 medium carrot, any color, julienned

1 English cucumber, peeled and julienned

1 cup zucchini noodles cut into 4 inch sections

1/2 cup pea pods

2-3 green scallions (green parts only), cut into 4 inch sections

1/2 cup Daikon radish (julienned)

Avocado (julienned)

2 tablespoons sesame seeds (white or black)

Fresh herbs can also be added such as mint or basil leaves

As you can see, pretty much any vegetable could work, even string beans! You’ll also need:

10-12 rice paper wrappers (found in most oriental or specialty stores (or Whole Foods)

When the fillings are all prepared and cooled, using a 12″ container (I used a large pie plate), fill with about 1″ of warm water, not hot, just lukewarm works best. One at a time, place a rice paper wrapper , into the warm water, making sure the wrapper is covered by the water. You don’t want to soak it, just wet it completely. You’ll notice when it’s wet enough because the marks on the wrapper will disappear. Place the wrapper on a clean tea towel (cotton rather than a synthetic or fleece towel) and dry. I picked up the wrapper at this point, carefully, so it didn’t stick as much to the towel after filling.

As you see from the photo, I broke one but it was still useable. Once dried, place some of the fillings in the middle of the wrapper, horizontally, then fold the bottom of the wrapper over the filling being sure it is tight at the top. Then fold in the sides of the wrapper and roll it up from the bottom to the top. The top should stick to the rest of the roll. If it doesn’t, rub a tiny amount of water on it with your finger.

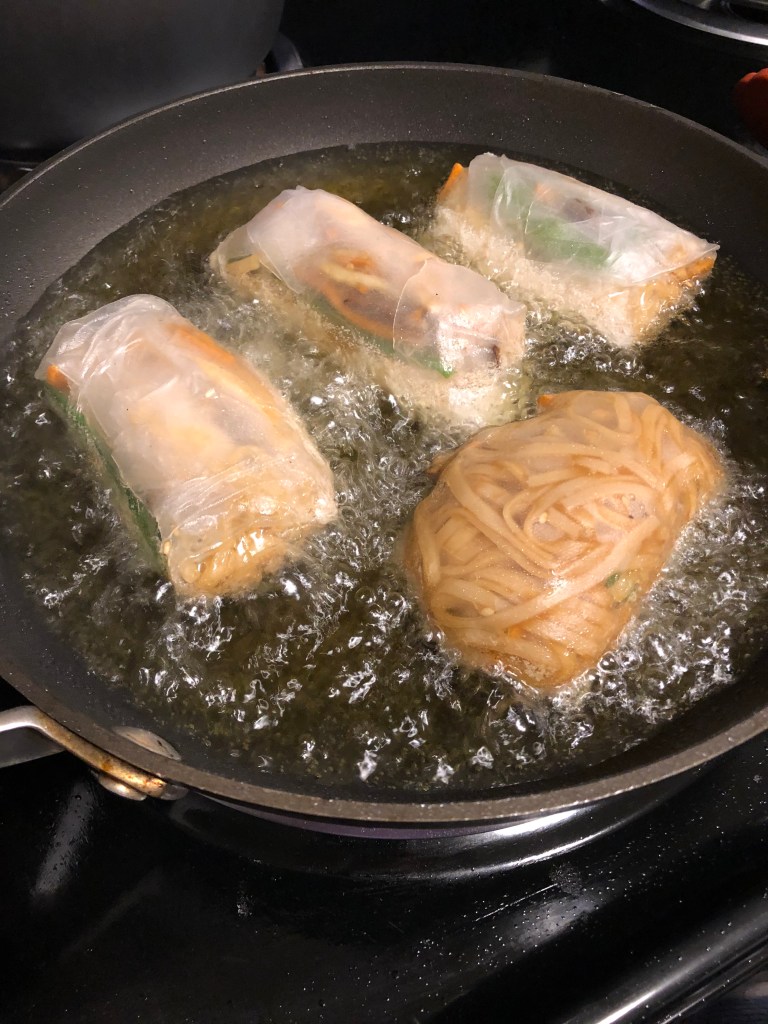
Now comes the choice – spring or summer rolls? The only difference is the frying. If spring rolls are chosen, cook all of them. I cooked half and left the others for the next day’s lunch and they totally disintegrated in the oil the next day, the rice paper didn’t hold up to being refrigerated.

If spring rolls are the choice, heat in a large, high sided skillet:

3 inches of olive and avocado oils

Heat to 350 degrees. Olive oil has a low smoke point so mixing it with the avocado (which has a higher smoke point) keeps the olive oil from burning during this process. Once the oil is to temperature, add the spring rolls being careful not to overcrowd the pan. Fry, turning once (tongs are best for this), until golden brown. Unlike most fried foods, do not place these on a paper towel as the rice wrapper will stick to it even after fried. Instead blot lightly with the paper towel after frying.

If, like me, several of your wrappers formed holes when wrapping them in the vegetables, DON’T FRY THEM! The oil will get into the roll and it will be very greasy. Use it as a summer roll instead.

Dipping sauce (or dressing) if desired. Traditionally spring rolls are served with a peanut sauce but the restaurant always served them with a spicy soy/ginger/garlic sauce. Here are several recipes for dipping sauces.

“Peanut” Dipping Sauce:

Combine in a small bowl:

1/2 cup tahini or other seed or nut butter

1 tablespoon soy substitute

2 tablespoons rice vinegar

1 teaspoon minced garlic

1 tablespoon grated fresh ginger

1-3 tablespoons hot water depending on the thickness desired

Whisk to combine all ingredients.

Spicy Dipping Sauce:

In a small bowl combine:

4 tablespoons water

2 tablespoons date sugar (or syrup)

4 tablespoons soy substitute

1/4 cup lime juice

1/2 teaspoon minced garlic

1 teaspoon freshly grated ginger

slices of red chili pepper (optional)

Sweet and Sour Dipping Sauce:

In a small bowl combine:

1 tablespoon soy substitute

1 tablespoon minced ginger

1/4 cup rice vinegar

1/4 cup date sugar (or syrup)

1 tablespoon sesame oil

“Cheesy” Crackers

One of my favorite lunches used to be tomato soup with Cheezits. That cheese cracker with the tomato soup tasted so good. This cracker isn’t a cheezit but they taste very good and have a cheese taste from the nutritional yeast. And they are very easy to make in the food processor.

Preheat oven to 350 degrees. In the food processor add:

1 cup gluten-free all purpose flour

2-3 tablespoons nutritional yeast

1/2 teaspoon baking powder

1/2 teaspoon sea salt

1/4 teaspoon paprika

1/8 teaspoon turmeric

Pulse to combine before adding:

1 tablespoon vegan butter or margarine

1 tablespoon olive oil

1 teaspoon lemon juice

Pulse until mixture is crumbly then add, 1 at a time:

5-6 tablespoons water (I needed to add all 6)

Pulse after each addition. Mixture should come together but not be sticky. This may require removing from the processor and working manually (with your hands) until combined. Place onto a sheet of parchment paper. Put a second sheet of parchment paper on top and flatten the dough. Using a rolling pin, roll out the dough to 1/8″ thickness or as thin as you can get it, the thinner the better! Mine was thicker in the middle than around the outside which meant I had to remove the outer pieces and continue baking the thicker middle so try to get the dough the same thickness.

Remove the top parchment paper and place the dough, lifting carefully by the bottom paper, onto a large cookie sheet. Using a pizza cutter or knife, cut the dough into small 1″ squares. The outside pieces can be removed and rerolled and recut to form squares.

If you prefer a saltier cracker, sprinkle some fine sea salt on top sparsely before baking. Make some holes with a fork in each square and bake for 16-18 minutes. As I previous mentioned, if necessary remove outer pieces that are thinner and continue baking the thicker squares for another 5-7 minutes. Cool on sheet before moving to a cooling rack. When completely cooled, store in airtight container.

Pan Fried Breaded Pork Chop

Since chicken and pork are my primary proteins, along with the occasional fish dish, I’m always looking for tasty recipes to give me more variety. The problem I’ve always had with pork is it gets so dry. This is a way of holding in that moisture while at the same time having a really crispy, fried chicken like, coating on the outside. The original recipe called for crushed corn flakes but many of us have problems with corn so I’ve revised it to seasoned flour but feel free to use crushed corn flakes if desired. Serves 2.

In a gallon food storage bag combine:

2 tablespoons arrowroot with

2, 1″ thick pork chops with most of the fat trimmed (make shallow cuts in the pork chops in a diamond pattern roughly 1/2″ apart to allow the arrowroot to be absorbed into the pork. By shallow I mean not more than 1/16 of an inch. This will help the coating stick as well as tenderize the pork.)

Shake to make sure that the arrowroot covers all the pork and let sit in the refrigerator for about 20-30 minutes. In a shallow dish, place:

1/4 to 1/3 cup aquafaba depending on how large the chops are

In another shallow dish combine:

2 tablespoons all purpose gluten free flour

1 tablespoon tapioca or cassava flour

1/2 teaspoon sea salt

1/4 teaspoon ground black pepper

1/4 teaspoon garlic powder

1/4 teaspoon paprika

When the pork chops are ready, remove from bag (over the sink is a good place to do this) being sure to rub any loose arrowroot from the chops. Coat each in the aquafaba and then in the seasoned flour. In a 10″ skillet, heat:

1/4 cup olive oil

When shimmering, add the pork chops being careful to place the side nearest you into the pan first. Reduce heat to medium and fry until golden brown on each side (don’t forget the narrow edges), this should take about 7 minutes. Reduce to medium low and cover for approximately 5 minutes or until the internal temperature of the pork is 145 degrees. (If you don’t have a meat thermometer, they aren’t expensive and are very useful in determining if meat is at temperature.) If you don’t have a thermometer, touch the meat with a utensil or your finger. If it has a lot of give, it’s not cooked. It should not be totally firm but close to it, just a little give to the meat will produce a juicy chop. If the coating has gotten soggy while covered, increase the heat back to medium and cook on each side for 30 seconds to one minute to crisp it back up. Remove from heat and blot on paper towels before serving – DON’T LET THE CHOPS SIT ON THE TOWELS TOO LONG OR THE OUTSIDE WILL GET SOGGY. Be sure to salt them as soon as they come out of the oil.

Chicken with Rice and Vegetables

I’ve been making rice with meat for years. It’s a convenient, easy way to stretch meat when you don’t have much of it and lots of people to feed. And a great way to use up extra vegetables because it’s an adaptable recipe where any combination of meat and vegetables works fine. The recipe feeds 6 or 4 generously.

This will be my last blog post for several weeks as I now need to concentrate on finishing my screenplay which was due today but I’m not happy with it yet so have to concentrate on that for the next few weeks.

In a Dutch oven, heat over medium high heat:

2 tablespoons olive oil

Add:

6 boneless skinless chicken thighs or breasts seasoned with salt, pepper and garlic powder (if using breasts cut into large cubes

The object is to brown the meat and build flavor as well as sear the meat to keep all the juices in it. This should take about 5 minutes, 2 1/2 minutes per side. When browned, remove the chicken pieces to a plate and add to the pot:

1 medium onion diced

6-8 stalks of celery diced

1/2 cup chopped carrots (or grated)

1 cup diced mushrooms

Sauté for several minutes until onion starts to brown. Add:

1 teaspoon minced garlic

2 tablespoons tomato paste

1/2 teaspoon ground allspice

1/8 teaspoon ground cloves

2 teaspoons to 2 tablespoons sweet or spicy paprika depending on your taste

2-3 bay leaves

1 cup frozen or fresh peas (if using fresh, add with the rice)

2 cups chicken stock (or, if possible, 1 cup of white wine and 1 cup of stock)*

1 tablespoon date syrup or date sugar

Stir to mix and add the chicken back into the pot along with any juices that are on the plate. Cover and simmer on low heat for approximately a half hour until chicken is cooked. Stir in:

1 cup rice (I used a wild rice blend but feel free to use whatever rice you prefer)

Simmer covered until rice is cooked, stirring frequently to be sure rice doesn’t stick to the bottom of the pot. This should cook out all the liquid but if not, cook uncovered until most of the liquid is gone. If the rice isn’t cooked but the liquid is all absorbed, add 1/4 cup stock and continue cooking covered until rice is done. Remove the bay leaves, taste and add additional salt if needed. Serve garnished with chives.

*If using wine, deglaze the pan with the wine before adding the stock. This will cook off the alcohol.

Orange and Maple Grilled Salmon

This marinade smells wonderful! And what’s not to smell great with fresh orange juice and maple syrup along with some fresh grated ginger. Be sure to have your butcher scale the fish so that you can cut the skin into triangle cuts before cooking without serving scales, not very edible. Makes 2 servings.

Whisk in a small bowl:

1/4 cup fresh orange juice

1 teaspoon orange zest

1 tablespoon maple syrup (or honey)

1 tablespoon olive oil

1 teaspoon minced garlic

1/2 teaspoon fresh grated ginger (or you can use 1/4 teaspoon ground ginger)

Salt and pepper, about 1/4 teaspoon sea salt and just a shake of ground pepper

Pour the marinade into a gallon food storage bag and add the fish. Let the fish sit in the marinade for at least a half hour in the refrigerator. Remove from the marinade and dry the skin side lightly on a paper towel while heating, on medium high heat, a grill pan:

1 tablespoon oil wiped into the pan

Place the salmon in the pan, skin side down. Cook on medium high for 3-6 minutes depending on how thick the salmon filets are before turning them over (the salmon will release easily from the pan when its ready to turn over) to cook on the other side over medium heat for an additional 3-6 minutes (I usually cover the pan at this point for several minutes). And because I covered the pan to make sure the fish cooks inside, I usually turn it over onto the skin side again for a minute on high to crisp up the skin again. Ready to serve.

Braised Pork Loin with Figs and Pears

This recipe takes some time since the pork loin is marinated but worth the effort and wait. The gravy is lick the plate good! Now I’m thinking I should add fruit puree to all my gravies. Yum, yum. Braising cooks food slowly so be sure that the loin is well seared (browned) before cooking so that it doesn’t lose all its juices. And since I love figs and pears, and I know they go well together, I thought how about braising them with the loin. This recipe would also work with a turkey breast or apples instead of pears.

At least 4 hours before the cooking starts, put in a gallon food storage bag:

1/4 cup seasoned vinegar or apple cider vinegar

1/4 cup water

2 tablespoons olive oil

1 teaspoon salt (or herbamare)

1/4 teaspoon ground black pepper

1 tablespoon dried thyme

6-8 dried figs

Add:

1 1/2-2 1/2 pound pork loin

Seal and let sit in the refrigerator at least 4 hours. If you are using a chicken, duck, or turkey breast, you can put this directly into the cooking vessel – either a roasting/baking dish with a cover, or the bowl of a slow cooker.

Preheat oven to 325 degrees if the loin is going in the oven. I cooked mine on the stove top in a medium size Dutch oven. Remove the pork loin (or turkey breast) from the marinade. Dry thoroughly and rub with:

1 teaspoon salt

1/4 teaspoon ground black pepper

2 teaspoons ground cumin

In a 10″ skillet or one large enough to hold the loin, heat:

2 tablespoons olive oil

Turn the oil down to medium heat and add the loin (or turkey breast). Sear (brown) on all sides. Remove the meat and add to the skillet:

1 medium onion chopped

1/2 bag of baby carrots, cut into bite size pieces

1 large or 2 small (I used one small sweet and one small white) potatoes

2 teaspoons minced garlic

Sauté the vegetables for about 5 minutes. Add:

figs from the marinade (or 6-8 other fresh or dried figs)

Add the meat back into the cooking vessel along with:

1 to 1 1/2 cups chicken or turkey stock

Cover the pot or dish and cook over low heat (simmer) until the meat reaches 145 degrees for pork or 165-170 for poultry. On the stovetop in the Dutch oven, my just under 2 pound pork loin took just over an hour. When the meat is cooked, remove the meat and vegetables and add to the stock:

1 diced medium pear (peeled or not doesn’t matter)

If the meat was cooked in the oven, pour the stock into a small saucepot before adding the pear. Turn up the heat to medium and cook, covered, until the pear is soft. Add:

A slurry made with 1/2 cup turkey or chicken stock whisked with 2 tablespoons all purpose gluten free flour

Stir until the gravy thickens and the pear pieces are integrated into the gravy, this should only take a couple of minutes. Cook over low heat for about 5 minutes so that the flour cooks completely. Slice the pork loin (or other meat) and place on a platter surrounded by the vegetables and figs. Pour some of the gravy over the pork and serve.

Easy Curried Pumpkin (or sweet potato) Soup

If you’ve been following me for any length of time, you already know how much I love curry! If I could, I would put curry in everything. Pumpkin soup has always been a favorite so I’m surprised I never thought to put curry in it. But today, here it is. And an easy, quick, very warming soup. Just perfect for these subzero days here in Minnesota. Makes 4 -6 servings.

In a high sided skillet or a large saucepan, heat over medium heat:

2 tablespoons olive oil

Add:

1/2 cup chopped onion

1 cup chopped mushrooms

Cook until onion is translucent and mushrooms are slightly browned. Add:

1-2 teaspoons madras curry powder (I used 1 1/2 and it was almost too spicy for me)

Stir and let cook on low heat until you can smell the curry, about a minute. Add:

2 tablespoons all purpose gluten-free flour

Stir in and let the flour cook for a minute. Slowly stir in:

2 1/2 cups vegetable stock (or if preferred chicken or turkey)

Cook for a minute and then add:

1 can (15 oz) pumpkin puree

1 cup non-dairy milk

1 tablespoon maple syrup

1/2 teaspoon salt

1/4 teaspoon pepper

1/4 teaspoon pumpkin pie spice (or just a sprinkle of nutmeg, cinnamon, cloves, allspice)

Combine and leave on the burner until the soup is thoroughly heated, about 2 minutes. Optional: Garnish with chopped scallions or chives.

Lemon Garlic Chicken Drumsticks

One of my favorite Italian dishes is lemon chicken. Here’s an recipe that’s easy to make and ready in less than an hour. And need I add delicious! I think this is, like many Italian foods, going to taste even better tomorrow when I eat the leftovers. Serves 4.

You’ll need:

8-10 chicken drumsticks*

Herbamare (herbed sea salt) and pepper (available at specialty grocer stores, Whole Foods or Amazon)**

1 tablespoon olive oil

2 tablespoons vegan margarine

Zest of 1 lemon and 2 tablespoons juice

3 teaspoons minced garlic

Fresh parsley for garnish

Salt and pepper the chicken and let sit on the counter for 10-15 minutes so that it won’t be ice cold when you cook it. In a 12″ skillet, heat the oil and margarine over medium high heat until margarine starts foaming. If the chicken is too wet, be sure to dry with a paper towel, remember – wet meat doesn’t brown well and will spit oil! Reduce heat to medium and sauté chicken, turning to brown on all sides, this should take 6-8 minutes. Reduce heat to medium low (I actually started out on medium low but the drumsticks were getting too brown so I reduced my heat to low), cover and let cook 20-25 minutes until the chicken is cooked. Turn the chicken every 5-7 minutes making sure to move them around in the skillet as well.

In a small bowl, mix the grated lemon zest and juice along with the garlic. When the chicken is cooked, pour this mixture over the chicken, turning the chicken to be sure the sauce coats the pieces on all sides. Take off the heat and cover, let it sit for about 5-10 minutes. Garnish and serve.

  • * Chicken breasts would also work
  • ** Substitute sea salt mixed with some thyme, marjoram, and basil (or an Italian herb blend)

Quick Salmon Cakes

My mother would have loved these! I tried it first with fresh salmon and they were too dry and fell apart. Using canned salmon worked much better. I topped mine with an easy lemon garlic mayonnaise sauce. They take less than 5 minutes to put together and about the same to cook.

In a medium size bowl, mix together:

10 ounces (2 small cans) salmon (I use the Safe Catch brand of canned fishes)

1/2 cup quinoa flakes (Don’t have these? Find them in the cereal aisle or Amazon. Or you could try using any other cereal flakes such as quick oats or gluten free bread crumbs.)

1 tablespoon gluten-free all purpose flour

2 green onions chopped (green and white parts)

1 teaspoon minced garlic

1/2 teaspoon dried parsley

1/2 teaspoon paprika

1 teaspoon lemon zest (about 1/2 lemon)

2 tablespoons lemon juice

1/2 teaspoon sea salt

1/4 teaspoon ground black pepper

1/4 teaspoon hot sauce (optional)

Stir in 1/4 cup vegan mayonnaise.

In a 10″ skillet, heat 3 tablespoons olive oil.

Saute over medium heat 2-3 minutes until brown. Flip and repeat. TIP: You might want to cover the skillet since these will spit at you from the moisture in the cakes. If you want to reduce this and get a browner cake, coat with seasoned flour before frying.

I serve mine with lemon garlic mayonnaise which I make simply by mixing Lemon Garlic Salad Dressing and vegan mayonnaise (about 2 tablespoons dressing to 1/4 cup mayonnaise).

Easy Lentil Pilaf

I can say that I generally don’t eat anything that I don’t make from scratch, mostly because there are very few pre-made or pre-packaged foods that don’t have something in them that I can’t eat (often it’s soy or sunflower lectin). So it’s not going to happen very often but — I have discovered a wonderful side dish (or main dish) that tastes great and has no allergens! As long as you can eat lentils, this is something you should try. High in protein and low in carbohydrates, lentils are a great addition to a meal. I’ve become addicted to Tolerant’s Organic Riced Red Lentil Pilafs. They’re ready in about 20 minutes, taste great and two of them, the Asian Ginger and the Spanish Style Paella, don’t have any soy in them. I know I was surprised too that the Asian Ginger is soy-free!

Being who I am, of course, I can’t just make it per package directions. So here’s what I do with these pouches of goodness. Serves 4-6.

In a 9″ skillet, add:

1-2 tablespoons olive oil

When hot, sauté:

6-8 ounces sliced mushrooms (I like shitake)

1/2 cup diced onions

When the mushrooms are browned and onions translucent, stir in:

2 cups mushroom stock (or any other stock you have on hand, chicken would work well)

1 cup frozen or fresh peas

1 teaspoon minced garlic

Bring to a boil. Add:

1 packet Tolerant Organic Riced Red Lentil Pilaf

Reduce heat to low and simmer for 9-12 minutes until the water is gone. Stir every few minutes, especially when the water is almost gone. Remove from heat, cover and let sit 4-5 minutes. Fluff with a fork and enjoy!