I cooked a pork roast last night and had about half of it left so what to do with it? Tacos are so easy to make and tasty to eat, it was a no-brainer. Whether you make soft tacos like I did or prefer the hard ones, this filling is delicious and so easy to make with a food processor.
First, in a 12″ skillet, over medium heat, add:
1 tablespoon olive oil
Heat till it’s simmering and add:
1 small onion, diced
1 small, sweet pepper (any color), diced
1 teaspoon chili powder (Optional) – I’m not crazy about chili powder so I used sriracha instead
1 teaspoon cumin
1 teaspoon smoked paprika
Stir to combine and cook until the onions are translucent and the peppers soften. Add:
3 cups shredded pork (pulse in a food processor for a few seconds until it’s the consistency you want – be sure to cut into chunks before pulsing!)*
1/2 to 2/3 cup salsa (or plain tomato sauce) – enough to moisten the meat
1/2 teaspoon salt
1/4 teaspoon ground black pepper
1/2 teaspoon garlic powder or granules
Stir to combine and heat over low heat for 2-3 minutes until pork is heated through. Makes 8-10 tacos.** Top with refried beans, sliced avocado, cheese, lettuce, salsa, etc., whatever your family likes.
*Don’t have a food processor? Heat the leftover pork roast in a 325 degree oven for about 15-20 minutes and then using two forks, shred the meat.
**There are now a number of tortilla brands available that are gluten free including corn, quinoa, cassaba, cauliflower, etc. I just love the quinoa tortillas. Be sure, if using soft tortillas, to heat them under moist paper towels in the microwave for about 30 seconds before filling.
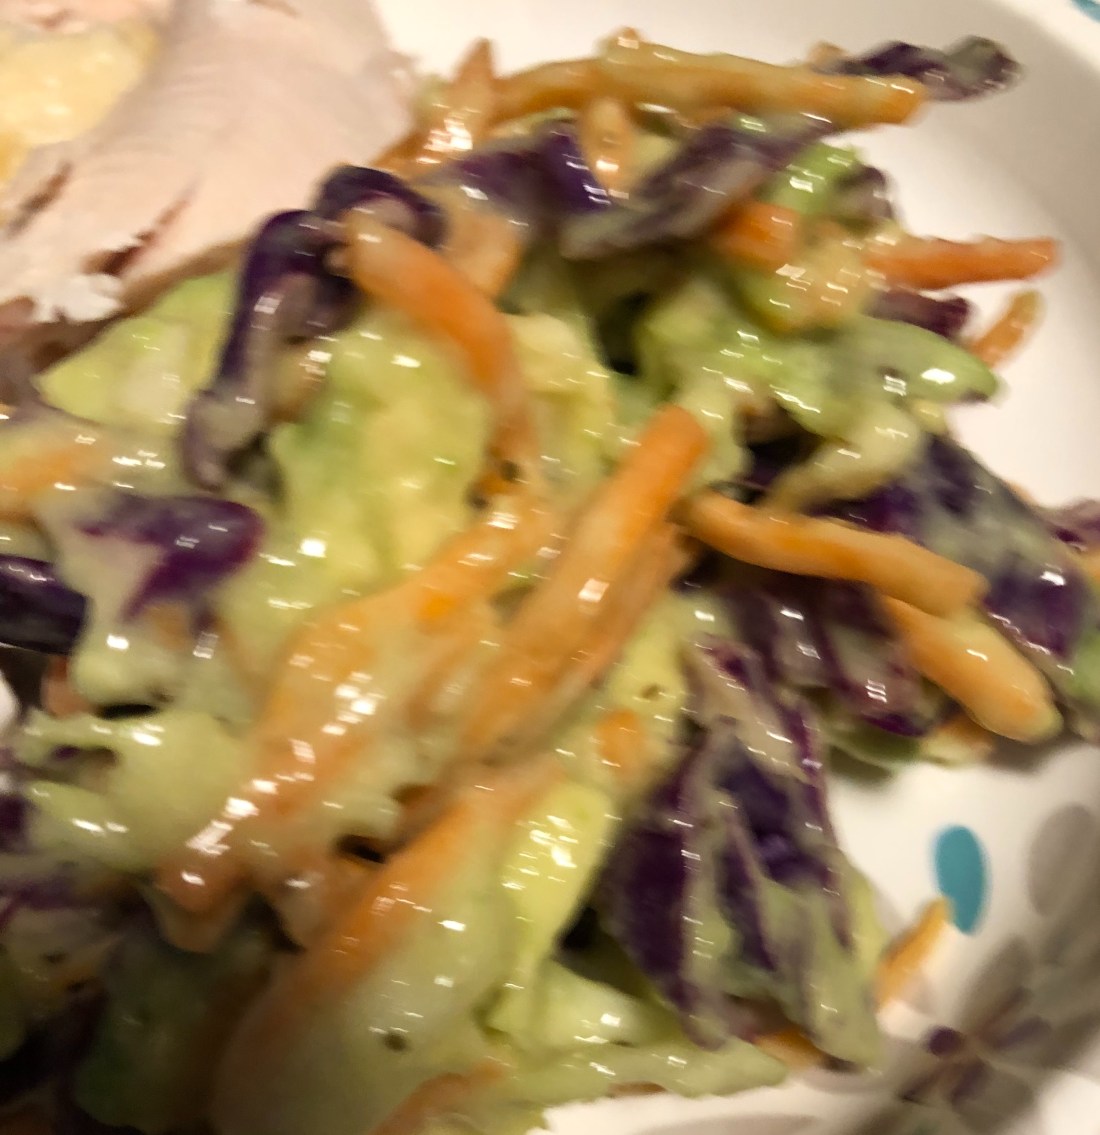
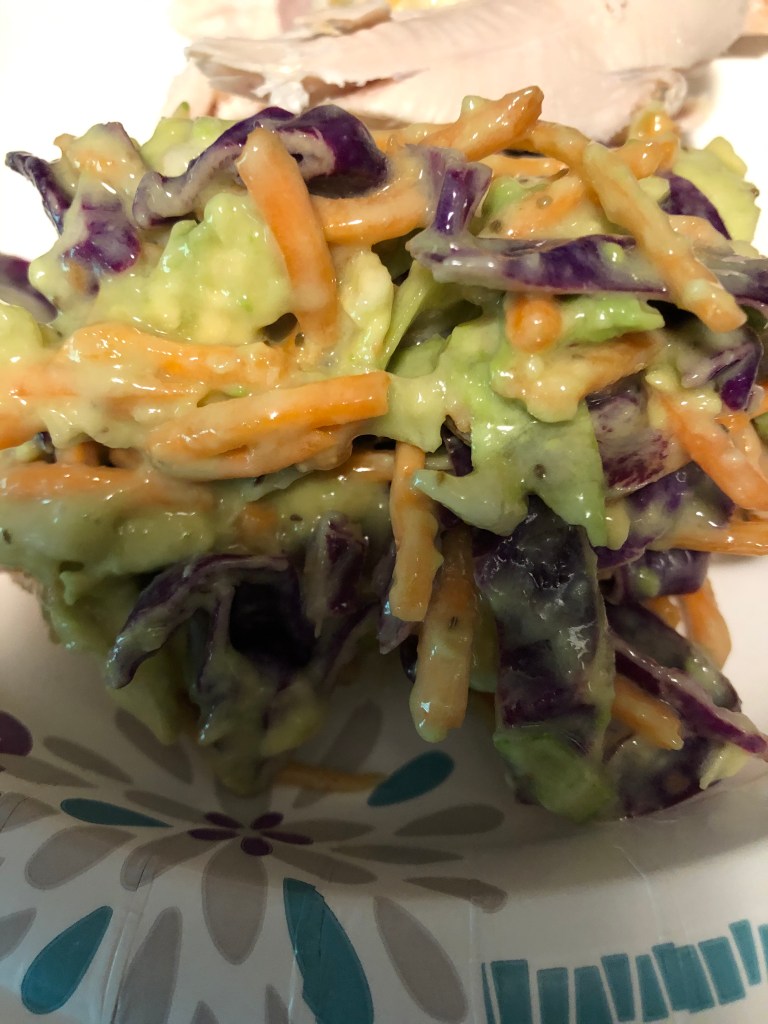
I think I’m definitely getting lazier in my old age. Or perhaps it’s just a case of now only having to cook for myself so I don’t care anymore if someone else is going to like it. Anyway, instead of buying a small cabbage that I have to prepare, along with carrots, I’ve started buying the bagged coleslaw mix at the supermarket. So easy and so tasty.
Place in a medium size mixing bowl:
contents of one bag of prepared coleslaw vegetables – cabbage, red cabbage and grated carrots
1/2 to 1 cup of additional grated carrots*
In the bowl of a food processor (or blender) combine:
1 avocado peeled and seeded
1 cup vegan mayonnaise
2 tablespoons vinegar
1 tablespoon agave nectar (or coconut nectar or honey)
1 teaspoon celery seed
Blend until smooth. If too thick, add several tablespoons water until it’s the right consistency. This will depend on the thickness of your mayonnaise since different brands can be thinner or thicker.
Combine the dressing with the coleslaw vegetables and stir until well mixed. Cover and refrigerate until ready to serve.
*TIPS: Liven up your coleslaw by adding some diced apple, pear, or jicama. I’ll also sometimes finely dice another 1/2 an avocado and add that to the mix.
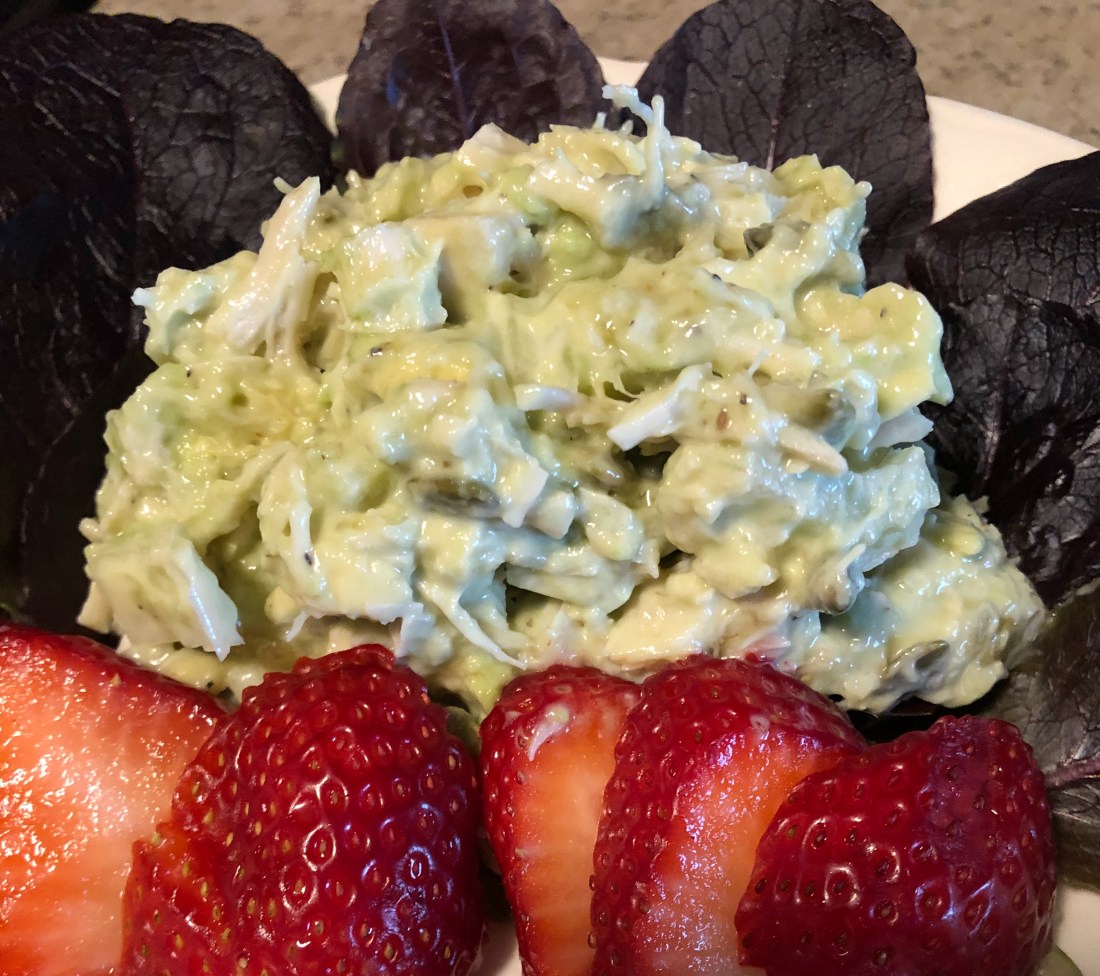
Every once in a great while I buy a rotisserie chicken at the store because, like everyone, I just don’t feel like cooking. I bought one several days ago and like so often happens, found I couldn’t eat all of it before it would spoil. In those cases, I usually dice up the chicken breasts and freeze them for later use. It’s amazing, I don’t understand why, but when cooked chicken is frozen, it makes such a better chicken salad than fresh chicken. Perhaps because it’s really cold? Anyway, try putting the diced chicken in the freezer for about an hour before making the salad and let me know if you agree with me that it has a better taste.
For the salad:
2 rotisserie chicken breasts diced
3-4 celery stalks, diced
2 tablespoons dill relish (or up to 1/4 cup depending on taste)
2 tablespoons pumpkin seeds, or diced jicama, or diced water chestnuts (just looking for more crunch)
1 avocado, diced
For the dressing:
1/2 to 3/4 cup vegan mayonnaise (depending on how much chicken there is)
1 tablespoon hot sauce
1/2 teaspoon herbamare (herbed salt)
1/4 teaspoon garlic powder
1/8 teaspoon ground black (or white) pepper
2 tablespoons honey (or agave or coconut nectar, or date syrup)
Mix all the ingredients and serve with lettuce. Garnish, if you have some, which I didn’t, with chives or scallions. Also, it’s delicious with sliced fresh strawberries or tomatoes. Makes 4 servings.
When I lived in Pittsfield, Massachusetts, there was a wonderful Vietnamese restaurant that introduced me to all kinds of new flavors. One of our favorites were their spring rolls! What a delicious concoction; meat, rice noodles and vegetables wrapped in a rice paper shell and deep fried. Oh so good. Generally a spring roll contains pork or shrimp and a summer roll (the unfried version of a spring roll) contains shrimp and no noodles but bean sprouts instead. Here I’ve substituted chicken but any meat (or meat substitute) would work. And they aren’t difficult to make as long as the steps are followed.
First cook whatever part of the filling needs cooking.
To a large pot of boiling, salted water add:
8 ounces pad Thai noodles (or linguini, gluten free of course!) [Optional but traditional]
Cook until tender, about 3-5 minutes, drain, rinse with cold water and set aside to add to the cooked vegetables later. In a medium 10″ skillet over medium heat, heat:
1 tablespoon olive oil
Add:
1/2 medium onion, sliced
1 cup of thinly sliced Chinese (or Napa) cabbage
Reduce heat to medium low and cook for several minutes until the onion and cabbage wilt. In a small bowl whisk:
1 tablespoon soy substitute
1 tablespoon date sugar (or syrup)
1/2 cup rice vinegar
1 tablespoon sesame oil
Add to the skillet and stir to combine with the onion and cabbage. Add the pad Thai noodles if used. Remove the vegetables from the skillet. Either clean that skillet or using another, heat:
1 tablespoon olive oil
Add over medium heat:
16 ounces of chicken breast, julienned (thinly sliced)
Cook, turning frequently, for several minutes, 3-5, until chicken is cooked. Remove from heat.
Let the vegetables and chicken cool thoroughly. If the fillings aren’t cool enough, they will melt the rice paper wrapper. In the meantime, prepare the uncooked fillings, any or all of the following:
1 medium carrot, any color, julienned
1 English cucumber, peeled and julienned
1 cup zucchini noodles cut into 4 inch sections
1/2 cup pea pods
2-3 green scallions (green parts only), cut into 4 inch sections
1/2 cup Daikon radish (julienned)
Avocado (julienned)
2 tablespoons sesame seeds (white or black)
Fresh herbs can also be added such as mint or basil leaves
As you can see, pretty much any vegetable could work, even string beans! You’ll also need:
10-12 rice paper wrappers (found in most oriental or specialty stores (or Whole Foods)
When the fillings are all prepared and cooled, using a 12″ container (I used a large pie plate), fill with about 1″ of warm water, not hot, just lukewarm works best. One at a time, place a rice paper wrapper , into the warm water, making sure the wrapper is covered by the water. You don’t want to soak it, just wet it completely. You’ll notice when it’s wet enough because the marks on the wrapper will disappear. Place the wrapper on a clean tea towel (cotton rather than a synthetic or fleece towel) and dry. I picked up the wrapper at this point, carefully, so it didn’t stick as much to the towel after filling.
As you see from the photo, I broke one but it was still useable. Once dried, place some of the fillings in the middle of the wrapper, horizontally, then fold the bottom of the wrapper over the filling being sure it is tight at the top. Then fold in the sides of the wrapper and roll it up from the bottom to the top. The top should stick to the rest of the roll. If it doesn’t, rub a tiny amount of water on it with your finger.
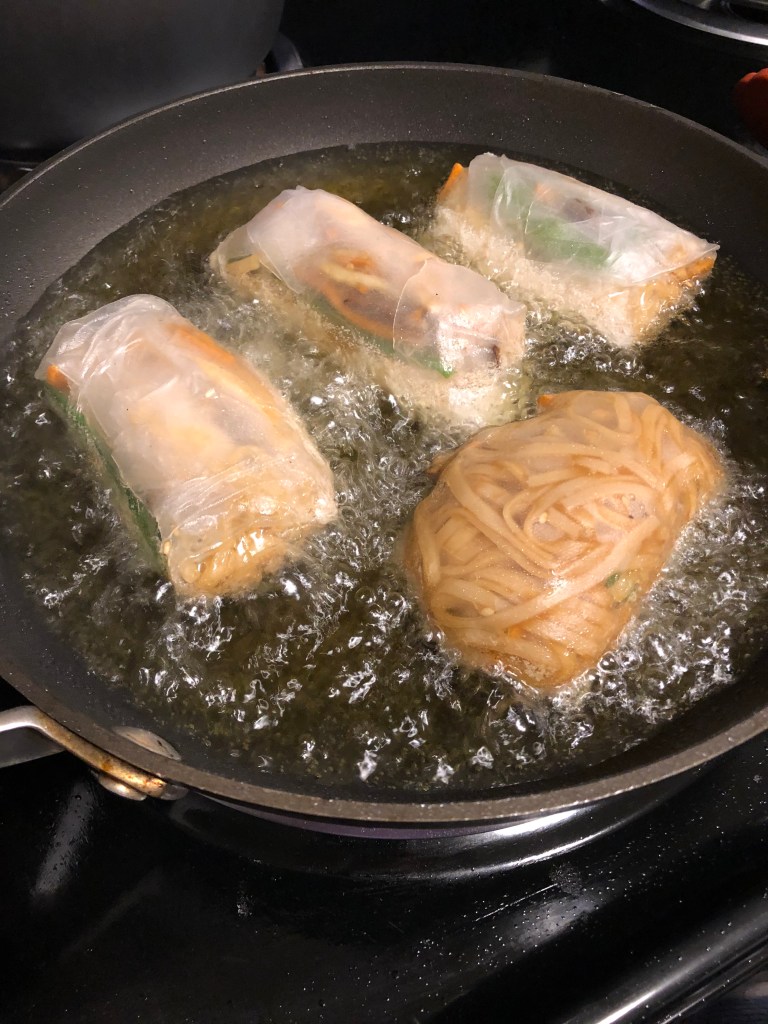
Now comes the choice – spring or summer rolls? The only difference is the frying. If spring rolls are chosen, cook all of them. I cooked half and left the others for the next day’s lunch and they totally disintegrated in the oil the next day, the rice paper didn’t hold up to being refrigerated.
If spring rolls are the choice, heat in a large, high sided skillet:
3 inches of olive and avocado oils
Heat to 350 degrees. Olive oil has a low smoke point so mixing it with the avocado (which has a higher smoke point) keeps the olive oil from burning during this process. Once the oil is to temperature, add the spring rolls being careful not to overcrowd the pan. Fry, turning once (tongs are best for this), until golden brown. Unlike most fried foods, do not place these on a paper towel as the rice wrapper will stick to it even after fried. Instead blot lightly with the paper towel after frying.
If, like me, several of your wrappers formed holes when wrapping them in the vegetables, DON’T FRY THEM! The oil will get into the roll and it will be very greasy. Use it as a summer roll instead.
Dipping sauce (or dressing) if desired. Traditionally spring rolls are served with a peanut sauce but the restaurant always served them with a spicy soy/ginger/garlic sauce. Here are several recipes for dipping sauces.
“Peanut” Dipping Sauce:
Combine in a small bowl:
1/2 cup tahini or other seed or nut butter
1 tablespoon soy substitute
2 tablespoons rice vinegar
1 teaspoon minced garlic
1 tablespoon grated fresh ginger
1-3 tablespoons hot water depending on the thickness desired
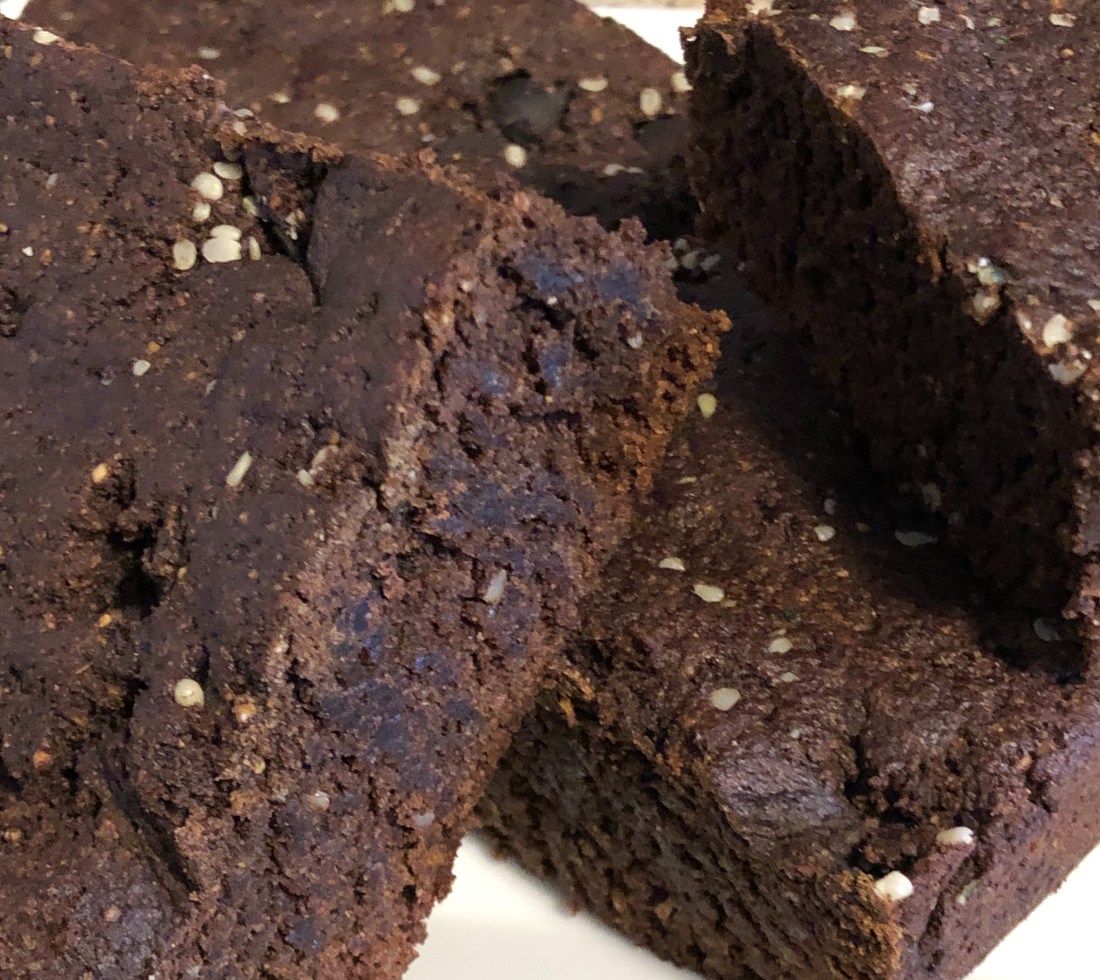
Oh my goodness! This is one of the richest, most delectable brownies I’ve ever eaten. It’s the third brownie recipe on my blog and I think the third one was the charm! Such a decadent mouthful, there’s just nothing to compare with a really fudgy brownie. This one fits the bill and is so easy to make. In fact, it takes longer to assemble the ingredients and scoop it out of the food processor into the baking dish than it does to make them!
Preheat oven to 350 degrees. Spray a 9×9″ baking dish with non-stick spray (I use the Chosen Foods 100% Avocado Oil spray). Add to the bowl of a food processor:
Pulp from 1/2 a small avocado or about 1/3 cup avocado pulp
3/4 cup date sugar
1/3 cup agave nectar
2 teaspoons vanilla extract
1/4 cup avocado oil or other light tasting oil
1 tablespoon ground flaxseed
1/3 cup unsweetened non-dairy milk
2 teaspoon instant coffee
Blend until combined. Add:
3/4 cup gluten-free all purpose flour
1/2 cup oat flour
3/4 cup carob powder
1 tablespoon psyllium husk flakes
1/2 teaspoon baking powder
1/4 teaspoon baking soda
1/4 teaspoon sea salt
By hand, mix in:
1/4-1/2 cup unsweetened carob chips, chocolate chips if you can use them, chopped walnuts (again if you can use them), or 2 tablespoons hemp hulls OPTIONAL
Scoop out of the food processor bowl and spread out evenly in the baking dish. I found it easiest to scoop it all out first and then using a large wet spoon to spread the mixture evenly in the baking dish. It is very thick!
Bake only 20 minutes turning once at 10 minutes. If using a smaller baking dish, bake for 25 minutes. DO NOT OVERBAKE OR YOU’LL HAVE DRY CAKE BROWNIES! Cool for at least an hour before cutting. In fact, it works well to cool for a half hour and then refrigerate them. They need to be cold before cutting into nine (or more) pieces.
This is a great dressing for any salad you want to put it on. If you want it creamy, add some vegan mayonnaise to the recipe. Yum, yum!
In a food processor put:
1 ripe avocado, skinned and pitted
1/4 cup dried parsley, or 1/2 cup fresh parsley (you can add more if you like parsley; not one of my favorite herbs so I didn’t use much)
2 tablespoons avocado oil
2 tablespoons lime juice (or lemon juice if you prefer)
2 tablespoons ground pumpkin seeds
2 teaspoons ground coriander
1 tablespoon vinegar
Salt and pepper to taste
Water to get to dressing consistency, 1/4-1 cup (my dressing came out fairly thick and I used 1/2 cup of water)
Blend until creamy and all ingredients are combined. Here, again, I used some roasted whole coriander seeds that I pulsed in my spice grinder so they were not fully ground and the pumpkin seeds were also only partially ground. This added some crunchy texture to the dressing.
If you love nachos like I do, you’ll like this recipe. I spent 12 years living in the Phoenix area and our favorites places to eat were the Mexican restaurants. Now, with my dairy, gluten and corn allergies, I don’t get to eat nachos very often. I found using this tortilla recipe, that the nachos stay sturdier; with regular flour or corn chips, they can get very soggy after the cheese sauce is added. These did get a little soft but they still held up and everything didn’t spill off when they were picked up, even the ones on the bottom. This recipe makes 3 tortillas or about enough a large plate of nachos. As an appetizer, enough for 6-8 people but as a meal, probably only enough for 1-2.
First make the tortillas. Combine in a quart bowl:
1/2 cup garbanzo bean flour (or another dense flour such as hemp)
1/8 teaspoon salt
1/8 teaspoon ground pepper
dash (or two) of cumin or chili powder (optional)
3/4 cup cool water
Whisk until all ingredients are combined and mixture is smooth. Heat an 8″ skillet (non-stick) over medium heat. When hot pour about 1/3 of the mixture into the skillet and, like a crepe, move pan to let the mixture cover the entire bottom of the pan. Cook until small bubbles cover most of the tortilla (this will only take 2-4 minutes) and then turn over and cook for another 1-2 minutes. Repeat for the next two tortillas. Let cool slightly before cutting into eighths.
Meanwhile get the rest of the nacho ingredients started. Combine in a small sauce pan:
1 cup shredded non-dairy cheese (I really like the Daiya Classic Combo cheese for this)
non-dairy milk of choice just until it almost covers the cheese (about 2/3 of a cup)
Cook over low heat until cheese is completely melted and incorporated into the milk. Whisk every few minutes.
If you like ground meat on your nachos, cook a quarter to a half pound of ground meat, seasoned with salt, pepper, and chili powder (optional).
Heat 1/4 to 1/2 cup of refried beans in a small skillet with a little oil (or if you want, a minute in the microwave).
You can use store-bought guacamole or make some. I use a very simple guacamole recipe:
Combine in a food processor:
the meat from 2 avocados
1/2 cup prepared salsa
juice of 1 lime
Blend until smooth. I prefer a smooth guacamole but I know some people like it chunky so if a chunky one is preferred, pulse until desired consistency. Add 1/4 cup pomegranate arils if you like a little crunch in your guacamole (and they add a nice flavor as well).
These tortillas absorb oil like crazy so I didn’t deep fry them. Instead, I used my air fryer and placed them in a single layer, air fried them for about 10 minutes or until crispy.
Then it time to make the nachos. Start with a layer of chips, cover with meat and/or refried beans, top with cheese sauce and guacamole. Repeat until chips are all used. Top with some diced tomatoes and scallions.
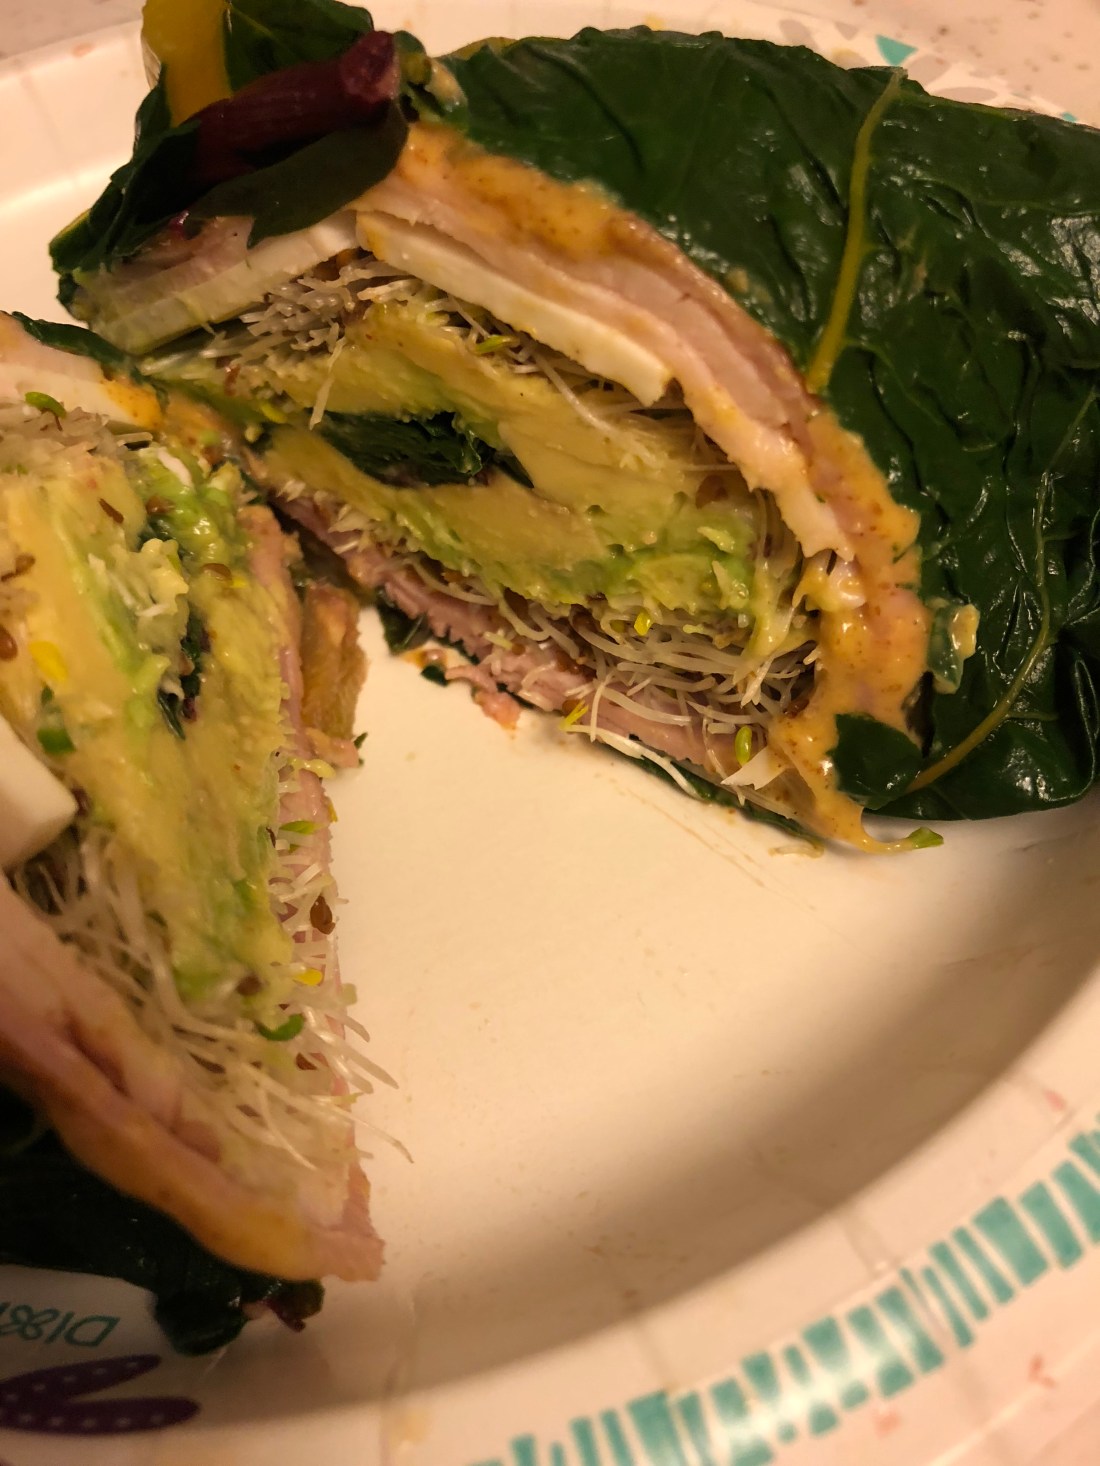
A friend challenged me last week to find a way to produce a wrap for her lunch that didn’t use a tortilla. Of course, my first thought was a lettuce wrap that I’ve been making for years. But she wanted something new and different. The swiss chard can be prepared ahead of time and stored in an airtight container for several days.
Put a large (dutch oven type) pot on the stove about half full of water. Bring to a bowl. Meanwhile, clean:
1 bunch of swiss chard (green or rainbow) – collard greens could also be used
Cut out the toughest parts of the stems which will leave a V-shaped leaf. When the water comes to a bowl, place the chard leaves in the water for 60 seconds (I did this individually so that they wouldn’t break and would cook evenly but that’s not completely necessary; the last few I did altogether and they were fine).
Remove and place in a bowl of cold water for just a few minutes. Drain and pat dry with a paper towel.
To make a wrap, cut the Vs into two pieces. Stagger several pieces (4-5) on top of one another to strengthen the wrap and make a solid wrapper. Spread with honey mustard sauce:
1 tablespoon mustard
1/2 teaspoon raw honey
Whisk until blended. Place the wrap meats and tomato across and the sprouts and avocado lengthwise so that there’s some of each in every bite. I used:
2 slices organic, low sodium turkey breast
2 slices organic honey baked ham
2 slices non-dairy provolone cheese
1/2 cup alfalfa sprouts
4 slices of tomato
1/2 a medium avocado sliced
Fold in the longer edges of the chard wrap (if possible) and then fold the shorter ends to each other. Cut in half and serve.
Alternatives:
Make this entirely with vegetables using sprouts, shredded lettuces, wedges of carrot, celery, or cucumber laid in the short direction, add cheese if desired
I am a brownie lover; its the only baked good where I’ll actually eat the batter as well as the baked goods. The only technical thing with brownies is not overcooking them and this is the one thing you really have to watch out for with gluten-free brownies. I baked mine 22 minutes and they were dry instead of fudgy. Still very rich and decadent but I’ll probably make hemp cream sundaes out of them instead of eating them plain. So watch the clock closely when you make these.
Grease an 8×8″ baking dish. Pre-heat your oven to 350 degrees.
In a medium size bowl mix:
3/4 cup avocado oil
1 1/2 teaspoon monk fruit powder
2 teaspoons vanilla
1/2 cup aquafaba
When they are well mixed, add:
1 cup buckwheat flour
3/4 cup carob powder (you can use cocoa if you want)
1/4 teaspoon salt
1/2 cup protein powder
3/4 cup club soda
Beat just until mixed; don’t overbeat. You can also add 1/2 cup of carob chips (or chocolate if you can have it) and some hemp hulls (or nuts if you can have them). Batter will be very thick. Spread evenly in your baking dish and bake for 15-20 minutes or until a toothpick comes out with some crumbs but not raw batter. Cool and cut into 9-12 pieces.
As all my allergies progressed, one of the things that most bothered me was a sensitivity to leafy green vegetables. No more salad, what was I going to do! Then I discovered that I could eat red leaf lettuces, what a relief. Now I have a salad almost daily and here’s one of my favorites. I really like various textures in my salads so I add crunchy ingredients as well as softer ones. Green Goddess dressing usually has walnuts in it but since I’m allergic to nuts, I used pumpkin seeds instead. You could substitute sunflower seeds.
You’ll need for the salad (for 2 entries or 4-6 side salads):
1 head of red Romaine, cleaned and broken into bite-size pieces
1 cucumber sliced
2-3 small tomatoes
2 wedges of jicama, diced
2 stalks of celery, diced
several scallions or some red onion diced, optional
8 ounces of cooked chicken, diced
1/4 to 1/2 cup of dried cranberries (I used the kind sweetened with fruit juice and unsulphered)
For the dressing, in a food processor put:
1 ripe avocado, skinned and pitted
1/4 cup dried parsley, or 1/2 cup fresh parsley (you can add more if you like parsley; not one of my favorite herbs so I didn’t use much)
2 tablespoons avocado oil
2 tablespoons lime juice (or lemon juice if you prefer)
2 tablespoons ground pumpkin seeds
2 teaspoons ground coriander
1 tablespoon vinegar
Salt and pepper to taste
Water to get to dressing consistency, 1/4-1 cup (my dressing came out fairly thick and I used 1/2 cup of water)
Blend until creamy and all ingredients are combined. Here, again, I used some roasted whole coriander seeds that I pulsed in my spice grinder so they were not fully ground and the pumpkin seeds were also only partially ground. This added some crunchy texture to the dressing.