I’m always looking for new recipes for fish. This one is very tasty and very easy to make. It reminded me of fried fish but is baked in the oven. That’s because of the high fat content in the mayonnaise. Feel free to use any fish, adjusting the proportions to fit the size of your fish portions. I used tilapia but the original recipe used halibut so it works for pretty much any fish. Simple and quick to make. Serves 4.
Preheat oven to 400 degrees. In a small bowl mix:
3/4 cup mayonnaise*
1/3 cup gluten-free bread crumbs
2 tablespoons dried parsley (or 1/4 cup fresh chopped)
1/2 teaspoon dried thyme and basil (or 1 teaspoon of each fresh, chopped)
1 tablespoon lemon juice
1 tablespoon sesame seeds
Salt and pepper to taste
Whisk to combine. In a non-stick baking dish** (again size depends on type of fish you use, mine was a 9×12), arrange:
1 pound of fish filets (with the tilapia, that’s four large pieces)
Spread the mixture equally over each piece of fish, covering the top completely. Bake in preheated oven 20-40 minutes depending on the thickness of the fish (the tilapia is quite thin and only took 20 minutes). Serve with lemon wedges or tartar sauce.
*If you’re allergic to eggs like me, there are now several brands of vegan mayonnaise available which are delicious and work well in this recipe.
**There’s enough fat in the mayonnaise so greasing the pan isn’t necessary.
Every July 4th my mother would make what she called simply, salmon salad. It was a mayonnaise based pasta salad with canned salmon, crab and baby shrimp. I made one and put it on this site last year or the year before with a vinaigrette base. So now that I’ve found a vegan mayonnaise I can eat that doesn’t contain eggs or soybean oil, I decided this year to update this salad because it’s one of my very favorites. My mother always served blueberry muffins with it but I figure who needs all those added carbs! so I just serve the salad with the addition of more vegetables than just the onion and celery my mom used. Hope you enjoy this as much as I do. By the way, feel free to use a 16 ounce can of salmon, cleaned if you don’t have access to the fresh!
Bring an 8 quart pot of water to the boil, salt the water generously and add:
4 ounces gluten-free shells (you can use elbows or any other shape but my mom always used shells)*
When the pasta is about 2 minutes from being cooked add:
1-2 cups frozen peas (unless you have wonderful fresh peas!)
When the pasta is cooked, drain into a large colander and rinse with cold water until cool. I will often fill the pot I cooked the pasta in with cold water (it takes several times before the pot cools off) and then place the colander in it after I’ve sprayed the heck out of the pasta with cold water. I leave it in there for only about 5 minutes before it’s cool enough to add to the mixing bowl. While the pasta boils (or the water), heat an 8″ skillet over medium high heat with:
1 teaspoon olive oil
Add skin side down:
8 ounce (or so) salmon filet
Cook the salmon for 3-5 minutes on the skin side and then turn. Note, if it doesn’t come right off the skillet, it’s not ready to turn. Cook on the meat side for 2-3 minutes and then flip again to the skin side. Cover and reduce heat to medium low and continue cooking for another 5-10 minutes depending on the thickness of your salmon steak. Remove from heat, uncover and move the salmon to a plate to cool. When cool, flake with a fork and add to the vegetable mixture.
In a large mixing bowl (I actually use a 2 gallon plastic container), combine:
3-5 scallions, sliced on the diagonal
5-6 stalks of celery diced
1 medium, peeled and diced (and I also seed mine) cucumber
8 ounces of crab meat
8 ounces of baby shrimp (if you can eat them, I can’t so I leave them out)
In a smaller bowl combine:
1 1/2 cups vegan mayonnaise
2 tablespoons dill pickle relish
1 tablespoon honey
1 tablespoon dried parsley
1 tablespoon lemon juice
NOTE: I had a half bag of snow peas left over from the Moo Goo Guy Pan so I destringed them, cut them in half (or thirds if really long) and added them with the peas to the boil – delicious! Some diced jicama or water chestnuts would also go very nicely in this salad.
Whisk to combine and then pour over the vegetables after adding the pasta, peas, and fish in the mixing bowl. Stir to combine and then cool in the refrigerator for about an hour to let all the flavors meld. I like to serve it over some lettuce or as I did now, pea shoots. Serves 4-6.
*Whole Foods makes wonderful organic chickpea shells. Only 37 grams of carbs per serving which is quite good for pasta, along with 21 grams of protein. And note, we only use 2 servings instead of 4 so it cuts down on the total carbs per serving even more.
We’re continuing the Chinese revisionist recipes. One of my mother’s and my favorite Chinese dishes is Moo Goo Guy Pan – a mixture of chicken and vegetables in a light sauce. Usually made bok choy, water chestnuts and mushrooms along with snow peas, this dish is a satisfying meal that covers all the nutritional bases. Other than cutting up all the vegetables and chicken, it goes together quite easily. I actually cut up everything the night before I wanted to make this, storing the vegetables in a container in the refrigerator and the chicken in a gallon food storage bag with the corn (or tapioca) starch. It was then very simple to prepare the next day.
Vegetables (feel free to substitute other vegetables your family likes, asparagus would work nicely):
1/2 medium onion, sliced
6 ounces sliced mushrooms, any variety will work
4-6 ounces snow peas with the strings removed
4-5 baby or 1 large bok choy
8 ounces sliced water chestnuts (the canned kind works fine)
Heat 1 tablespoon olive oil in either a 12 inch high sided skillet or a wok over medium high heat. Add the prepared vegetables and cook, stirring for 2-3 minutes until slightly softened. Remove them from the heat and set aside in a separate bowl.
Chicken:
2 medium sized chicken breasts thinly sliced (works best if the breasts are partially frozen)
2 tablespoons corn or tapioca starch
Toss the chicken slices in the starch and let sit for at least 30 minutes. Heat another tablespoon of olive oil, over medium heat, in the same skillet and add the sliced chicken. Brown on one side for 2-3 minutes and then flip and brown on the other sides. If they stick, you’re turning them too soon. And don’t worry, making the sauce in the pan will release those brown sticky pieces from the bottom of the pan. Total, this should only take about 5 minutes if you’ve sliced them thin enough.
While the chicken cooks, prepare the sauce:
2 tablespoons rice vinegar
2 tablespoons agave nectar
1/2 cup chicken stock
1/2 to 1 tablespoon sesame oil (depending on your taste, this is a very strong flavor)
1-2 tablespoons fish sauce (again depending on your taste, very salty flavor)
1 1/2 tablespoons corn or tapioca starch
1 teaspoon minced garlic
Whisk to combine before adding to the cooked chicken in the skillet. Stir constantly until sauce thickens, scraping the bits off the bottom of the pan. Stir in the reserved vegetables. Cover and let sit for 2-3 minutes which will reheat the vegetables. Serve with slivered scallion greens and rice. Makes 4 servings.
I’d intended to make pork with eggplant but . . . I used all the eggplant in the eggplant with garlic sauce yesterday! So instead here’s pork and vegetables. As in many of my recipes, feel free to substitute the vegetables for whatever ones your family prefers, eggplant would be great. Makes 4 generous servings.
Ingredients for sauce:
1/2 tablespoon olive oil
3 tablespoons minced garlic
1 tablespoon minced (or grated) fresh ginger (adjust to your family’s taste)
1 small can diced chilis (I used mild but whatever heat level your family enjoys is fine)
1/2 cup soy sauce substitute (see recipe under sauces and condiments)
1 teaspoon fish sauce
1 teaspoon sesame oil
1 teaspoon corn or tapioca starch (or arrowroot) dissolved in 2 teaspoons water
Ingredients for the pork and vegetables:
2 tablespoons olive oil
16 ounces pork, diced
2 tablespoons corn or tapioca starch
2-3 baby bok choy, cleaned and chopped
1 medium onion sliced thinly
1/2 grated carrots (or 2 large carrots cut on the bias)
1 medium yellow pepper, seeded and cubed
1 small can sliced water chestnuts
First, put the pork cubes into a gallon food storage bag with the 2 tablespoons of corn or tapioca starch. Shake to coat the cubes, making sure all the pork gets some starch, and set aside for 15-20 minutes (I’ve left it overnight and it worked fine).
In a large skillet, heat over medium high heat:
2 tablespoons olive oil
When hot, add the pork cubes and fry, turning frequently to brown on all sides, about 5 minutes. Remove cubes from the pan and set aside covered (they will continue cooking). Add the vegetables to the pan and cook over medium heat until they start to soften but still have some crunch, about 3-5 minutes. Remove from heat and add to the pork.
In a small saucepan or skillet, heat the 1/2 tablespoon oil then add the garlic, ginger, chilis (drained) over medium heat. After about 1-2 minutes, add the soy sauce substitute, fish sauce and sesame oil. Cook until it comes to a boil, about 1 minute and then add the slurry of corn/tapioca starch and water. Stir to combine and continue stirring until thickened, should be almost immediately. Remove from heat and pour over the vegetables and pork. Stir to combine and plate, garnishing with sliced scallions and sesame seeds. Serve with brown rice (or white rice if preferred).
I know, another eggplant recipe! I can’t help myself, it’s so good right now. My local grocery has such fresh ones on hand, I just have to buy them. This recipe traditionally should be made with Japanese eggplants but they are hard to find. I used to get them at the farmers’ market when I lived in Massachusetts, haven’t found them here in Minneapolis as yet. So I used the common oval eggplants. Look for ones that are narrower, they’ll have fewer seeds and be a little less bitter. Also make sure when purchasing eggplants, that the stems are still green and the eggplant is firm to the touch. And always buy the ones with the inward flower end rather than ones with an outward end, they will also be less bitter.
Because this recipe was made using 2 oval eggplants rather than the Japanese, the proportions will be different if you happen to find the long, skinny kind. So double the eggplants needed if you strike it lucky and are able to use the Japanese. They also won’t need to be peeled!
First, peel and cut into bite size pieces:
2 oval eggplants, medium sized (about 6 cups of meat altogether before salting)
Place them in a large bowl and sprinkle with:
1 tablespoon rice vinegar
2 tablespoons sea salt
Mix thoroughly and set aside for a minimum of 30 minutes, longer is better. After they have sat, rinse thoroughly with water to remove the salt and then dry as thoroughly as possible with paper towels (or a clean kitchen towel). It’s not possible to remove all the water from eggplant since the meat acts like a sponge with any moisture. When dry, toss with:
1 tablespoon corn starch (or tapioca starch)
Mix thoroughly and then repeat with a second tablespoon of starch.
Heat in a large skillet (or griddle if you have one):
1/4 cup olive oil
When shimmering add the eggplant and cook on medium high heat for about 2-3 minutes until browned then turn to brown the other side, cooking for an additional 2-3 minutes. Remove pieces as they are browned and set aside. When all the pieces are well browned, and crunchy, and the skillet is empty, make the sauce.
In a medium skillet heat over medium:
1 tablespoon olive oil
When hot add:
1 tablespoon minced ginger
2 tablespoons minced garlic
1/4 cup chopped white scallions (slice the greens for garnish)
1 teaspoon minced green chilis
Cook for a minute, being careful not to burn the garlic. Add:
1/2 cup soy sauce substitute (see recipe under sauces and condiments)
1/4 cup water
Stirto distribute and let cook for a minute or two while making a slurry with:
1/4 cup water
1/2 teaspoon corn or tapioca starch (or arrowroot)
Add slurry to the skillet, stirring constantly until sauce is thick. Stir in the eggplant chunks. Remove to a serving plate and garnish with the greens from the scallions and some white sesame seeds. Makes 4 servings.
TIP: Add some diced chicken, beef, pork, tofu, etc., to make this a complete meal.
My mother loved moussaka. When I made it for her, I used ground lamb, ricotta cheese, eggs, and homemade pasta sauce. Things and times have changed so here’s one that’s dairy, gluten and egg free and uses jarred (or homemade if you have the time and desire) sauce. Just in case, I’m including my recipe for pasta sauce.
First, start the tomato sauce if making homemade by heating in a small Dutch oven:
1 tablespoon olive oil
Add to it when hot:
1 diced medium onion
1 diced sweet pepper, any color
1/2 cup sliced carrots (or grated)
6 ounces shitake mushrooms
Stir to combine, lower heat to medium and cook until the onions and mushrooms are sweating and onion is translucent. Add:
1-2 teaspoons minced garlic
32 ounces small diced tomatoes
16 ounces tomato puree
1 teaspoon mixed Italian dried herbs (basil, marjoram, thyme)
1/2 teaspoon salt
1/4 teaspoon ground black pepper
Cook over medium low heat for about 1 1/2 to 2 hours, stirring occasionally. This gets rid of much of the water in the tomatoes so the sauce can thicken. If it boils too vigorously, reduce the heat to low. When reduced by about 1/3, add:
1 tablespoon tomato paste
1 tablespoon agave nectar
Use an immersion blender to cream most of the vegetables, leaving a few whole. I do this because then the eggplant slices sit better in the sauce but it is optional. In a large skillet, heat:
1 tablespoon olive oil
When hot add:
1 pound bulk Italian sausage (or if you want this vegan, diced tofu)**
Cook the sausage through and then drain off the fat and add to the tomato sauce, stirring to combine. Set aside. If using jarred sauce, this will take more than 1 large jar.
While the sauce is cooking, peel and thinly slice:
1 large eggplant
Place the slices on a large, sided baking sheet in a single layer and salt generously. Once salted, another layer of eggplant can be added on the top of the first, again salting generously. Place a slightly smaller baking sheet on top of the eggplant and then weight it down with large cans. Let sit at least 30 minutes, 60 is preferable.
After sitting, wash each eggplant slice to remove the salt and whatever liquid was expelled from the slices. Dry between paper towels. Heat in a large skillet (12 inch) or flat griddle:
1 teaspoon olive oil (just to coat the bottom of the pan)
When hot, add eggplant slices until the bottom is covered but the slices have room to move. Let brown for a minute or two and then turn and brown the second side. Repeat until all the slices are browned.
Still while the sauce is cooking, add to a large saucepan:
1/2 cup olive oil
Begin heating over medium high heat. Add:
3/4 cup gluten-free flour
1/2 teaspoon salt
1/4 teaspoon pepper
1/2 teaspoon allspice (or nutmeg)
Whisk to combine. Cook over medium low heat for 2-3 minutes to cook the flour then add, 1 cup at a time:
3 cups oat milk (or any other non-dairy milk except soy)
Whisk each portion of milk into the flour and cook, whisking every minute or so, until the white sauce is thickened. It should be the consistency of a puddingor mashed potatoes.
Preheat oven to 350 degrees. Spray the bottom and sides of a 9×13″ baking pan with non-stick spray. Line the bottom of the pan with slices of eggplant.* Add a layer of the meat sauce and repeat ending with a layer of eggplant (3 layers of eggplant and 2 layers of sauce). There may be a little meat sauce left over. Slowly pour the white sauce on top of the last layer of eggplant (I didn’t quite have enough eggplant to cover the entire top but it still worked okay). The white sauce on mine was only about 1/2 inch thick but if your pan is deep enough, use all the white sauce, it’s that yummy on the top! Sprinkle the top with:
1-2 cups grated parmesan cheese
Place baking pan on a large baking sheet because if it’s full, it will bubble over and put in the oven. Bake for 30-45 minutes or until the middle is bubbling. Let cool for about 15-20 minutes before slicing.
*Don’t think you have enough eggplant? Peel and thinly slice 1-2 medium to large Russet potatoes and place those on the bottom layer of the moussaka, using the eggplant for just other 2 layers.
**I used sweet Italian sausage but feel free to use any ground meat.
One of my (and my grandson’s) favorite vegetables is eggplant. I’d stuffed zucchini but never an eggplant but this turned out very luscious, a classic combination of an onion, garlic, sweet pepper and tomato base with rice. It’s a great side dish or add some protein, like sweet Italian sausage, and make it a main dish.*
Serves 2 (or double to serve 4). Preheat oven to 350 degrees.
Wash and cut in half:
One medium to large eggplant
Score the middle, being careful not to cut through the skin, leaving about a half inch of meat around the edges. Use a spoon to scoop out the meat to leave a “boat”. Salt and pepper to taste, sprinkle with 1-2 teaspoons of olive oil. Place in a greased baking dish and bake for roughly 30-40 minutes until the meat is softened and slightly browned.
While the boats are cooking, heat in a large skillet:
1 tablespoon olive oil
Add:
1/2 cup diced onion
1/2 cup diced sweet pepper (any color you like)
2 teaspoons minced garlic
Eggplant meat, chopped
Sauté over medium heat until the onion is translucent and the pepper is softened. Add:
8 ounces finely diced tomatoes (half a can)
2 cups cooked brown rice
3 tablespoons of fresh basil, chiffonade
1 tablespoon avocado oil
Salt and pepper to taste
Stir to combine and cook until heated through before removing from heat.
When the eggplant boats are ready, stuff them with the filling, sprinkle with:
2 tablespoons grated non-dairy parmesan cheese
Return to the oven and bake for an additional 20 minutes before increasing the oven heat to broil. Broil until the cheese is slightly browned, about 5 minutes. Serve.
*To make it a main dish, reduce the rice to 1 cup and add 1 cup ground Italian sausage.
TIP: This is an Italian stuffed eggplant. For a more Moroccan style, leave out the basil and cheese and instead add:
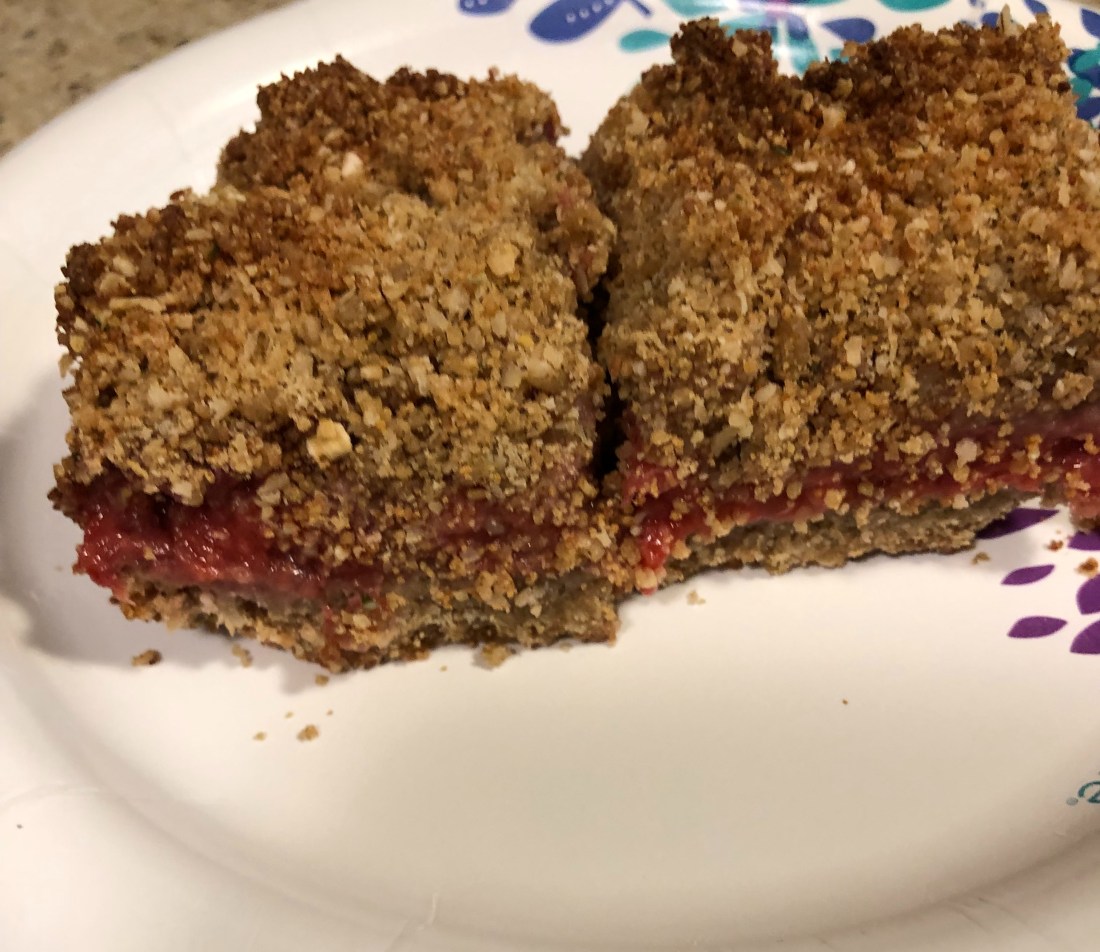
Well, after my fall, I’m recovering nicely and can finally stand on my bad leg for more than 10-15 minutes without it starting to throb. So, of course, the first thing I had to do was COOK! I haven’t cooked anything in almost 2 weeks and I was going crazy! I know I put up a recipe for raspberry bars a few months ago but I saw this one and it’s a lot healthier without all the fat or quite as many carbs as the other recipe. Hope you enjoy it as much I do.
Preheat oven to 375 degrees. Prepare an 8×8 baking pan by spraying with non-stick cooking spray and then lining with parchment paper (spraying the pan allows the paper to stick and makes pressing the crust layer into the pan much easier, especially since the paper should be one solid piece because we’ll use it to lift the finished product out of the pan to slice).
For the crust, in the bowl of a food processor combine:
1 1/4 cup rolled oats
3/4 cup millet flour (or sorghum flour)
1/2 cup date sugar
1/2 teaspoon cinnamon
Make a well in the middle of the dry ingredients before adding:
1/4 cup honey (or agave or coconut nectar)
1/2 cup seed or nut butter (I used pumpkin seed butter but tahini, almond, etc., would work)
1/4 cup ground seeds or nuts (or hemp hulls) **OPTIONAL
Pulse to combine. If mixture is too dry, add a couple of tablespoons of water. We want a mixture that sticks to itself, at least a little bit when squeezed together. Press 2/3 of the mixture into the bottom of the prepared pan. In a medium bowl mix:
2 cups fresh or frozen raspberries*
2 tablespoons lemon juice (about half a lemon)
2 tablespoons date sugar
2 teaspoons corn starch (or arrowroot)
Stir to combine. Spread over the crust covering it completely and try to make the raspberry filling as even as possible. Top with the remaining 1/3 of the crust mixture. Bake for 30-35 minutes or until top is golden brown. It’s very important to cool the bars completely before cutting. I cooled mine on the counter for several hours and then put it in the refrigerator for 4-5 hours.
*While I used raspberries, any fruit can be used for the filling – blueberries, strawberries, blackberries, apples, pears, peaches, etc. If using fresh fruit, reduce the corn starch (or arrowroot) to 1 teaspoon.
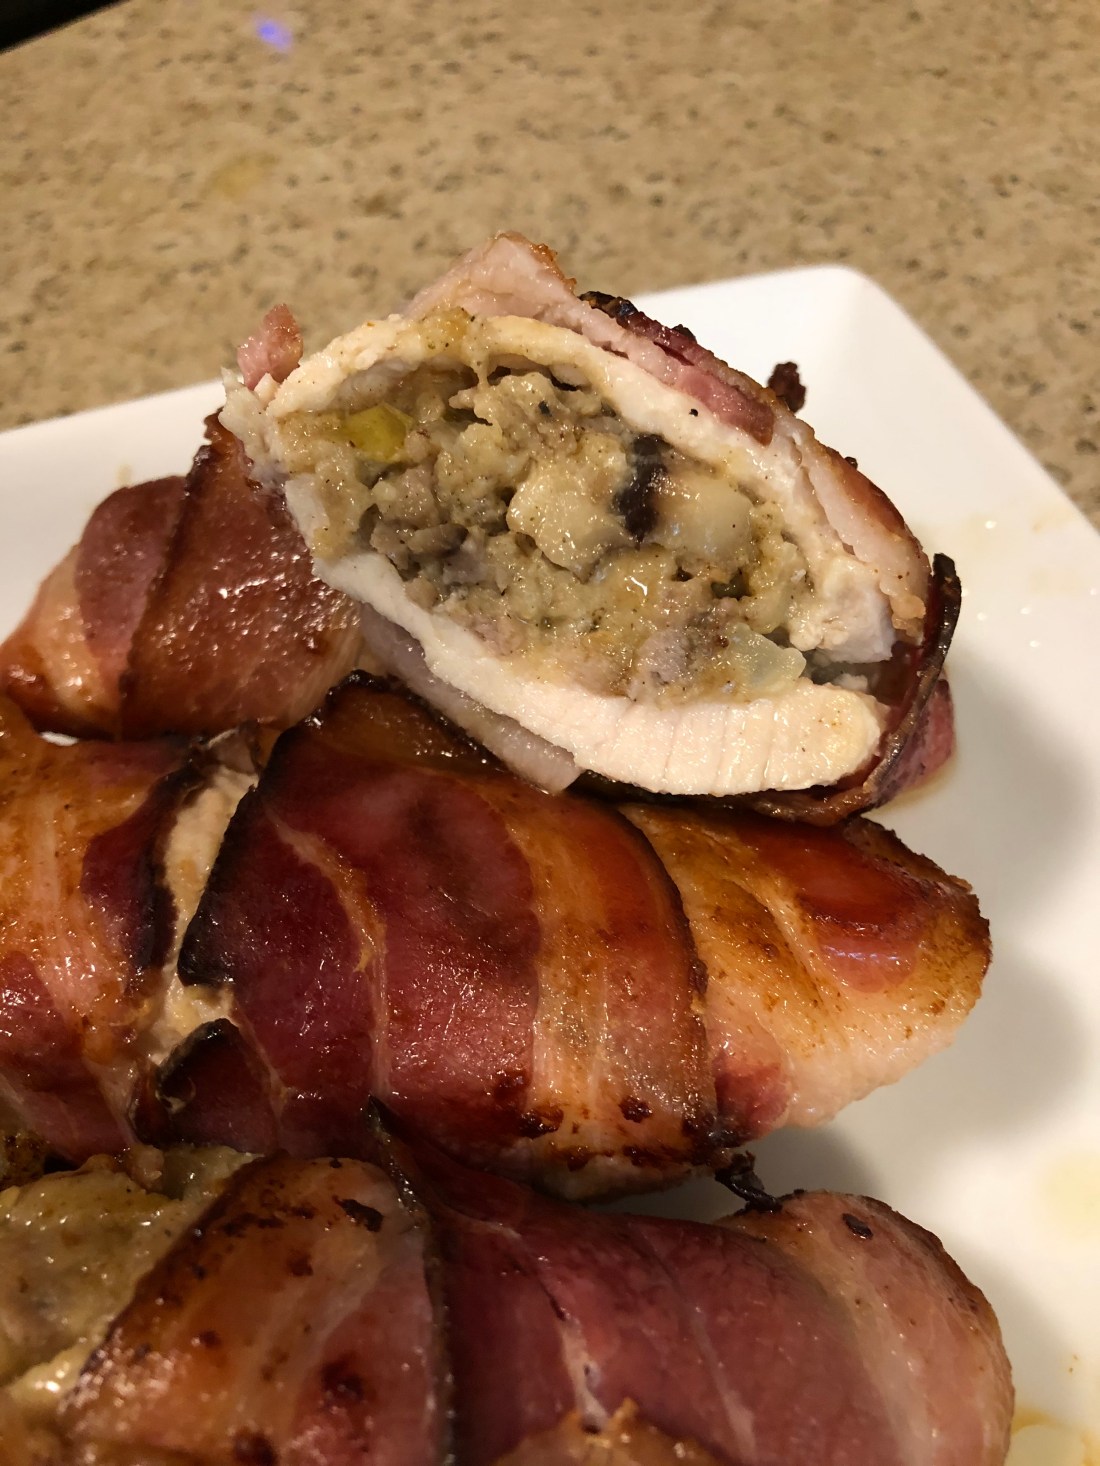
I found some turkey breast filets at the store the other day and wondered how to cook them without drying them out. Turkey breast filets can be either too thick or too thin; these were very thin. I used to make a turkey “napoleon” for my husband and I wondered if it would work as a roll. It not only worked, but they turned out delicious. The stuffing can be made ahead and is enough to stuff 6-8 turkey filets depending on their size. Of course, any stuffing recipe will work but I made my sausage and mushroom stuffing, adding half a pear for a little sweetness and it turned out succulent. The stuffing is the most time consuming part of this process.
Serves 3-4.
To make the stuffing, over medium a 10″ skillet, heat:
2 tablespoons olive oil
When hot, add:
1/2 medium onion, finely diced
2 small stalks celery, finely diced
1/2 medium pear, minced
3 ounces mushrooms, finely diced
Stir and reduce heat to medium low. Cover the vegetables for about 5 minutes until they are tender. While they cook, break up 2 slices of bread (I used the quick oat bread recipe on this blog). If using a different bread, be sure to crumble into small pieces. When the vegetables are soft, add them along with the oil to the bread crumbs, mix thoroughly. To the skillet add:
4 ounces sausage, any kind your family likes
Cook thoroughly, breaking it up as it cooks into a “minced” meat consistency (like hamburger). This should only take a couple of minutes. Add to the stuffing mix along with:
Salt and pepper to taste
1/2 to 1 teaspoon of ground sage
If your turkey filets are square, you’ve hit the jackpot! Mine were triangular. Add about 1/3 cup of the stuffing on the longer side of the filet and pull the smaller side over it. I used bacon to wrap and hold the roll but I would suggest using porchetta instead because the bacon had too strong a flavor and almost overpowered the turkey roll.
Once rolled and wrapped, secured with toothpicks if necessary, place in a 10″ skillet with a little oil so that the bacon doesn’t stick. Cook over medium heat for approximately 2-3 minutes per side, getting all four sides.
While the turkey rolls are cooking, heat 2 tablespoons olive oil in another 10″ skillet. When hot add:
3 ounces of mushrooms
1/2 medium pear, minced
Cook for a 2-4 minutes, salt and pepper to taste and add:
2 tablespoons all purpose gluten-free flour
Stir to combine so that all the oil is floured and cook over medium low heat for 1-2 minutes to cook the flour. Add:
1 1/2 to 2 cups turkey (or chicken) stock
Stir to combine and stir constantly until thickened into a gravy.
Serve the turkey rolls over mashed potatoes (or rice), adding gravy to each of the servings. Enjoy!
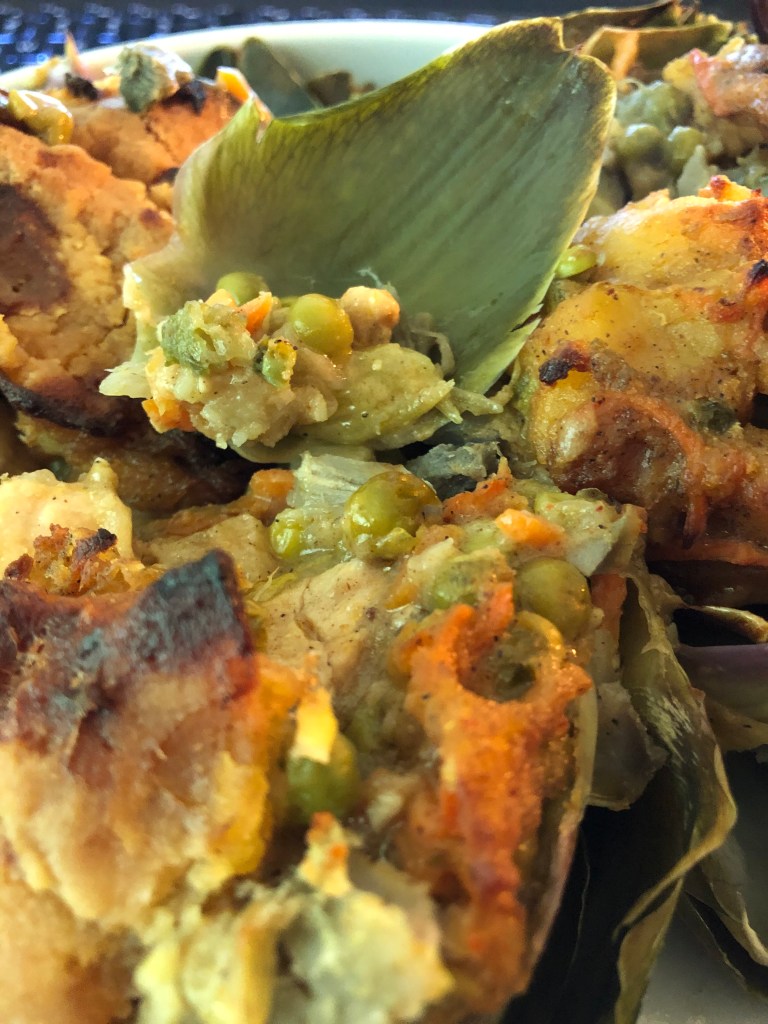
Artichokes are one of my favorite vegetables that I don’t eat every often. This time of year, the fresh artichokes are really delicious and wonderfully large, very stuffable. And the stuffing part isn’t set in stone – I usually use a chicken stew but I made one of my curried vegetable pies yesterday and thought, when I saw a beautiful big artichoke in the store this morning, that the leftovers would be great stuffing for that artichoke! So this one is vegan but any type of stew, preferably a creamed stew, will work as filling.
Serves 4. Prepare 2 large artichokes:
Using a vegetable peeler, shave the stem and cut off the very bottom, like cutting off the bottom of a carrot or onion. The stem of the artichoke is quite edible, tastes just like the heart. Then cut the stem off at the base of the artichoke so that it will sit flat in the pot. Some people cut off the top half of the artichoke but I don’t bother, a few spines on the ends don’t bother me but feel free. Place the artichokes and stems in a steamer over water and cook until the leave are falling away from the center. Remove from the steamer and let cool (trust me you don’t want to do the next step when the artichokes are boiling hot!).
Preheat oven to 400 degrees. When the artichokes are cooled, fold back the leaves and remove the tiny center leaves to reveal the choke. Using a spoon, remove the choke trying not to break the outer leaves from the middle (but it’s okay if this happens, just lean the sections of the artichoke on the outside of the baking dish or against each other). It’s best to use a greased baking dish that is about the size of the artichoke, so for the 2 artichokes, 2 dishes are needed.
Dice the tender parts of the stems and add to the filling. For 2 jumbo artichokes, use about 4 cups of stew. SEE: Creamy Chicken Stew with Asparagus (leaving out the asparagus of course), Curried Vegetable Pie, Chicken or Turkey Pot Pie, etc. Top with seasoned bread crumbs – 1/4 cup gluten-free bread crumbs tossed with olive oil (or melted vegan butter or avocado oil) and herbs. Or if like me you have leftover curried vegetable pie, use the remaining crust as the topping (or cut out rounds of pie crust).
Bake in a 400 degree oven for about a half hour if the stew is cold, less if it’s already hot. And if topped with a raw pie crust, bake for about 40 minutes.