Carob Mint Hemp Milk (dairy-free, gluten-free, egg-free, vegan)

One of the things I’ve missed the most over the years is ice cream.  I take a water aerobics class at the Y and when we do the “stir the pot” exercise, the instructor always asks people what their favorite flavor of ice cream is and she stopped asking me the third time I said I was allergic to dairy.  But now I have an answer be it the Carob Avocado cream from a couple of weeks ago, or this new one I just made.  Hope you enjoy it as much as I do.

In your blender, blend:

  • 1 ripe avocado, this provides the fat so that you don’t end up with an “icy” cream
  • 1/4 cup chopped dates
  • 1 cup pear or apple sauce
  • 2 tablespoons of carob OR leave this out and add chips when the cream is frozen, OR if you can, you could add cocoa or melted semi-sweet chocolate
  • 2 large scoops protein powder
  • 2 cups hemp milk*
  • 1/2 teaspoon mint oil or extract

*I used hemp but coconut or soy milk would work just as well.  Rice milk doesn’t freeze well as it tends to make an icy mixture rather than a cream.

Blend until smooth.  Pour into your ice cream freezer or into ice cube trays to freeze.

TIP:  If the avocado gives too much of a flavor or you don’t care for avocado, add some avocado oil to the blender.  The oil has very little taste and will give you a creamy texture.

BLAT (Bacon, Lettuce, Avocado and Tomato)Burger (dairy-free, gluten-free)

This is one of my favorites.   I eat one of these sandwiches for lunch nearly every week.  Easy to make and delicious.  The creaminess of the avocado with the acidity of the tomato and crunch of the bacon and lettuce makes it well worth the calories.  I served mine with a side of 4 Bean Salad.

You’ll need:

  • Gluten-free bread or roll
  • 3 slices of tomato
  • 2-3 pieces of lettuce
  • 2-3 slices of cooked bacon (I use the turkey bacon)
  • 1 burger patty (mine is turkey which I make thin so it cooks very quickly but I have to be very careful not to overcook it)
  • 1 slice of non-dairy cheese (if you want a cheeseburger)
  • ketchup or mayo depending on your taste

While the burger and bacon are cooking, toast the bread if you want or warm the roll.  I start with the avocado, then the tomato slices, then the lettuce, bacon, and finally the burger.  I put the ketchup or mayo on the second slice of bread and there you have it.  Very easy, yet so tasty.

Chili (dairy-free, gluten-free, egg-free)

My husband loves chili but it isn’t one of my favorite dishes.  I’ve experimented over the years with different chili recipes to please him and here’s the one we decided pleases both of us.  I like to eat mine over some soba noodles and garnish it with avocadoes but he’d rather eat his the traditional way.  Its a very easy recipe to make the way your family likes chili — swap out the meat, type of peppers, or even the type of beans, or even increase the spices.

Here’s what you’ll need:

  • 2 tablespoons olive oil
  • 1 teaspoon ground cumin
  • 2 tablespoons paprika
  • 1/4 to 1/2 teaspoon chipotle chili pepper
  • 1 cup chopped onion
  • 4 garlic cloves diced
  • 1 pound ground turkey (or if you prefer, hamburger, ground chicken, ground pork, etc.)
  • 1 can diced chili peppers (I used the mild but you can use whatever your family likes)*
  • 1 tablespoon of fresh oregano
  • 1/4 cup tomato paste (or 1 small can)
  • 2 cups stock (chicken, turkey, or beef depending on what meat you use)
  • 1 tablespoon vinegar
  • 1 teaspoon pomegranate molasses
  • 1 teaspoon sea salt
  • 3 cinnamon sticks
  • 1 (15 ounce) can pinto, or great northern, or kidney, or black beans, whichever you prefer
  • Bag of non-dairy grated cheese or for individual servings, slices
  • 1 diced avocado

*I wanted to use poblano chilis but the can I saw had added sugar so I went with my old standby of mild chili peppers.  Feel free to use fresh peppers and add the diced peppers with the onions and garlic.

In a large, deep skillet, or Dutch oven, heat oil over high heat.  Add spices (cumin, paprika, and chili powder) to release the oils.  Add onions and garlic and cook for a minute reducing heat to medium.  Add the meat and brown.  Pour in the stock and add the chili peppers, oregano, tomato paste, vinegar, molasses, salt and cinnamon sticks.  Bring to a boil, cover and reduce heat.  Simmer for 40-60 minutes stirring occasionally.  Remove cinnamon sticks and discard.  Stir in the drained beans and simmer for 5 minutes.  Serve topped with cheese and the diced avocado.

Plantain Crust Pizza (dairy-free, gluten-free, egg-free, vegan depending on what toppings you use)

If you like pizza but have been hesitating about eating it because of the crust, here’s an alternative if you like plantains.  The greener the plantains, the weaker the plantain taste and the crunchier the crust will be when baked.   And put whatever toppings on it you like, just as you would with any pizza.  I chose turkey Italian sausage, onions, mushrooms, and the dairy-free cheese I like.

First, you need to peel your green plantains.  Here’s how to do it:

  • Make sure the plantains are warm; don’t try to peel them if you’ve had them in the refrigerator.
  • Cut off the ends
  • Slit along a ridge the length of the plantain, being careful to only cut the peel
  • Make a cut around the plantain in the middle or cut it in half for ease of peeling
  • Slide the knife edge under the edge of the peel to loosen
  • Remove peel side to side rather than lengthwise, it will come off in sections and you may need to cut the edge of each ridge to loose it

What you’ll need:

  • 3 large green plantains*
  • 1/4 cup water
  • 1/4 cup olive oil
  • 4 cloves garlic
  • 3/4 teaspoons of sea salt
  • 1/2 teaspoon baking soda

*If your plantains are more than 8 inches long, you may need to increase the water and oil slightly.

Preheat oven to 450 degrees.  In food processor, add plantains cut into pieces, water, olive oil and garlic.  Blend until smooth and then add the sea salt and baking soda.  Blend until combined.  On a parchment paper lined baking sheet, pour out the plantain mixture and spread evenly into a circle leaving a slight ridge along the outside to stop toppings from escaping.  Reduce oven temperature to 400 degree and bake 30-35 minutes until thoroughly cooked and golden brown.  Remove the pizza crust.  It will feel soft.

Put the oven temperature back to 450 degrees (this is so the bottom side of the crust will get crispy).  Add the pizza sauce and toppings.  Return to the oven for another 15-20 minutes until toppings are hot and the cheese has melted.

Apple Blueberry Muffins (dairy-free, gluten-free, egg-free, soy-free, vegan)

Blueberry muffins are a summer family tradition in my family that I’ve had to forgo for many years now.   I can remember in my youth, the whole family going to the Meader farm to pick blueberries after supper and then we’d go to the lake for a swim to cool off.  The next day, along with freezing most of the berries, my mother would make blueberry muffins to go with a cold salad (like the salmon salad on this blog) for supper that night.  It would probably also be accompanied by some sliced tomatoes.  This is a simple, quick recipe that makes light and moist muffins.  The tapioca flour gives the outside a nice crunch.

Preheat oven to 375 degree and grease  6 large or 12 small muffin tins.

In a large bowl combine:

  • 1 3/4 cups brown rice flour
  • 1/4 cup tapioca flour
  • 1 teaspoon stevia
  • 4 teaspoons baking powder
  • 1 teaspoon baking soda
  • 1 cup non-dairy milk of choice, unflavored
  • 1 cup of chunky applesauce, unsweetened (or pear sauce to make pear & blueberry muffins)
  • 1 cup fresh blueberries dredged in 2 tablespoons brown rice flour
  • 1 tablespoon rice vinegar

Mix until all the ingredients are well combined; gluten-free baked goods often need a little more mixing than their gluten counterparts.  The mixture should bubble up while you’re mixing it when the vinegar hits the baking soda.  If its too thick (should be the consistency of mashed potatoes), add a little more milk by tablespoons.

Spoon into the greased muffin tins making sure all the muffins have equal amounts of batter.  Bake for 20-25 minutes until a toothpick inserted in the middle comes out clean.  Best enjoyed warm.

Sweet Potato and Tahini Soup (dairy-free, gluten-free, vegan)

I made this with sweet potato but pumpkin or pureed butternut squash would work just as well.  The original recipe also called for 1/4 cup of chopped cilantro but since I really don’t like that herb, I used diced scallions and pomegranate arils instead.  The spice in the recipe is also to taste; I love garum masala but if you don’t, try some ground ginger or grated fresh ginger instead.  The tahini gives this soup a very creamy texture.  Makes 4 servings.

Heat a 2-quart saucepan and add:

  • 1 tablespoon olive oil
  • 1 diced small scallion
  • 1 diced garlic clove

Cook for only a minute over medium heat and then add:

  • 2 cups cooked sweet potato
  • 2 cups vegetable stock (you can also use chicken stock if you prefer)
  • 1/4 teaspoon stevia OR 1 tablespoon agave or coconut nectar
  • 1 teaspoon garum masala OR 1 teaspoon grated or ground ginger
  • Crushed red pepper to taste (1/4 to 1/2 teaspoon)

Bring to a boil, stirring occasionally and reduce heat to low.  Stir in:

  • 1/4 cup tahini (you could also use a nut butter)
  • 2 tablespoons rice vinegar

Puree in blender or with immersion blender.  Garnish with diced scallion and pomegranate arils.

Bok Choy with onions and garlic

Easy, quick, and a household favorite.  Cook the bok choy to whatever doneness you like, either crunchy or well done.  Goes very well with any meat.

For 2 people:

  • 2-3 bunches baby bok choy
  • 1/2 medium onion, diced,  I use red but you can use any kind you like
  • 1 clove garlic diced
  • 1 tablespoon olive oil in the bottom of a large fry pan

Heat your fry pan over medium heat, add the oil and the vegetables.  I also like to salt and pepper to taste along with some of my dried hear mixture.  Stir and let simmer over medium heat for several minutes.  If you like it crunchy, its done.  If you want it cooked a little more, cover and let simmer for about 5 minutes.  Serve with any meat.

Grilled Duck Breast with cherry plum sauce

What a wonderful thing a duck breast is — however unforgiving!  Just a few seconds and you’ve overcooked it.  Your duck breast should be cooked to medium (although my brother likes his medium rare).  Remember when you’re grilling it that it will continue to cook a little while you let it rest after removing it from the heat.  One breast per person is a serving.

For 2 people:

  • 2 duck breasts, removed from package and dry on a paper towel.  If they are bloody, I usually rinse them under cold water before drying on a paper towel.  Score the fat cap (I do one cut lengthwise and then several cuts across each breast).  Salt and pepper to taste — remember that the salt will help render the fat so salt that side a little more liberally.

Heat a grill pan, or your outside barbecue grill, over a high heat.  Once it is very hot, add your duck breast(s) fat side down and reduce heat to medium.  Cook for 5 minutes on the fat side and then turn over for a minute to sear the meat side.  Turn it again to the fat side, cover and cook for another 4-5 minutes.  Remove cover and let cook another 2-5 minutes depending on doneness.  The breast should give slightly when cooked to medium.  The more give, the rarer the meat.  Remove from pan and let rest 3-5 minutes before slicing.

While the duck is cooking, dice one red or purple plum and put in a small saucepan with a 1/4 cup of water.  Add 6-8 pitted cherries (I actually had some dried bing cherries in the cupboard that I used).  Cover and cook on medium low heat for 8-12 minutes until the plums are soft enough to mash.  The skin will melt into the sauce.  If you prefer, blackberries would also go very well with the plums and the duck.

Duck goes really well with lots of sides.  I usually serve mine with the celery root and parsnip mash along with some sautéed bok choy, green beans with garlic sauce, maybe even some of our fresh tomato slices or a small tossed salad.

Sauteed Squash

One of my favorite vegetables during the summer are the yellow and zucchini squash.  Since I was a teenager, I’ve enjoyed them the best by simply sautéing the slices with some onion and garlic in a little oil (back then I used butter but that’s not possible any longer!).  Very easy and quick dish to make.  Serves 2.

Slice, as thin as you can, except the garlic:

  • 1/2 medium onion
  • 2 small zucchini squash
  • 2 small yellow summer squash
  • 1 garlic clove (diced)

TIP:  Always cut up your onion and garlic first and let sit for 5-10 minutes to release the flavors before cooking.

In a medium saute pan, heat 1 tablespoon oil.  When the oil is hot, add the onion and squash with the garlic on the top.  I like to salt it so that the squash releases its natural liquids.  I also add some dashes of my favorite dried herb mixture.  Stir to mix in the salt and herbs and then saute on medium high until the onion and squash start to become translucent then turn down the heat to medium low, cover the pan and cook until the squash is cooked, 3-5 minutes.  Remove lid, increase the heat to brown slightly.

Gluten-Free Fried Chicken (dairy-free, gluten-free, egg-free, soy-free)

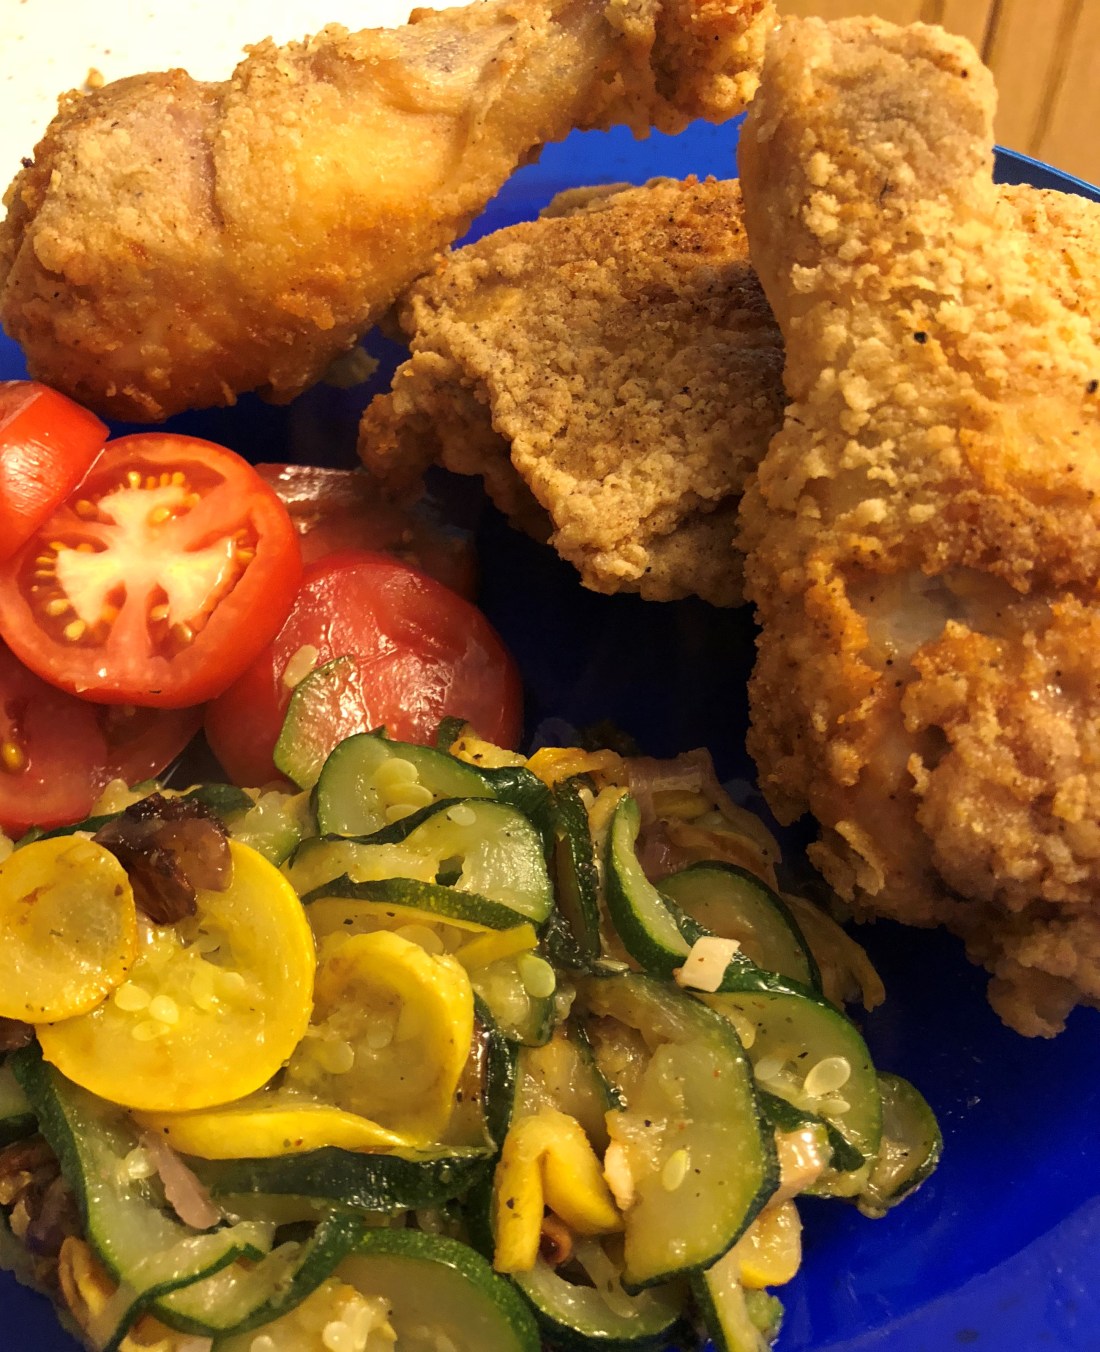
Who doesn’t like fried chicken (except perhaps vegans).  Its one of those comfort foods that I don’t make for my family very often but every once in a while we have a craving for it and of course, being allergic to gluten, dairy, and eggs, we can’t just go buy some fried chicken, never mind not knowing what its been fried in.  But its really easy to make at home,  and takes a half hour to 45 minutes depending on the size of your chicken pieces, plus some prep time.  I like to serve it with some sliced tomatoes from our garden along with sautéed squash (see recipe under side dishes).

You’ll need, for 4 servings:

  • 3-4 pounds of chicken pieces depending on how much your family eats; I used thighs and legs since that’s what my husband prefers but breasts work as well, trim off the excess fat and skin — for my husband and I, I used 3 legs and 2 thighs and we had 1 leg left over
  • Non-dairy milk to cover
  • 1 tablespoon of vinegar
  • 2 food storage bags
  • Flour mixture (see below)
  • at least 1 deep fry pan and maybe two if you have more then will loosely fit into one pan, electric if you have one OR a fry thermometer
  • Oil for approximately 2 inches in each pan (I used my olive oil)
  • Meat thermometer

About 2-4 hours before you plan to cook the chicken, place it in a gallon food storage bag covered with your choice of milk plus a tablespoon of vinegar.  Let marinate in the refrigerator.

In a deep fry pan, or if you have one, an electric skillet, heat sufficient oil to go about 1/3 to 1/2 way up the chicken pieces.  Heat to 375 degrees.  While the oil is heating, remove the chicken pieces from the milk marinate and wash (I don’t particularly like the taste of vinegar in my fried chicken so I wash off the milk mixture but you don’t have to).

In another gallon food storage bag, put:

  • 1/2 cup Bob’s Red Mill 1for1 GF flour (or your favorite GF flour blend)
  • 1/4 cup brown rice flour
  • 2 tablespoons of tapioca flour
  • 2 tablespoons of sorghum flour
  • Salt, pepper, and herb mixture to taste

Drop the chicken pieces into the flour mixture and shake well.  You’ll probably want to do just 3-4 pieces at a time.  When the oil is up to temperature, add the chicken and fry for 10 minutes, turning once at 5 minutes.  Turn again at 10 minutes and cover the fry pan for 15-20 minutes to cook the chicken through.  Remove the cover and cook another 5 minutes or so to crisp up.  Chicken is cooked when a thermometer registers 165 degrees internally so have a meat thermometer handy.  Remove to paper towels to drain the excess fat (if your fat has consistently been at 375 degrees, the chicken shouldn’t have a lot of excess fat).  Be sure to season your chicken pieces as soon as they come out of the pan.  Do not leave on the paper towels but remove to a serving platter.