Creamed Salmon with Pasta Casserole

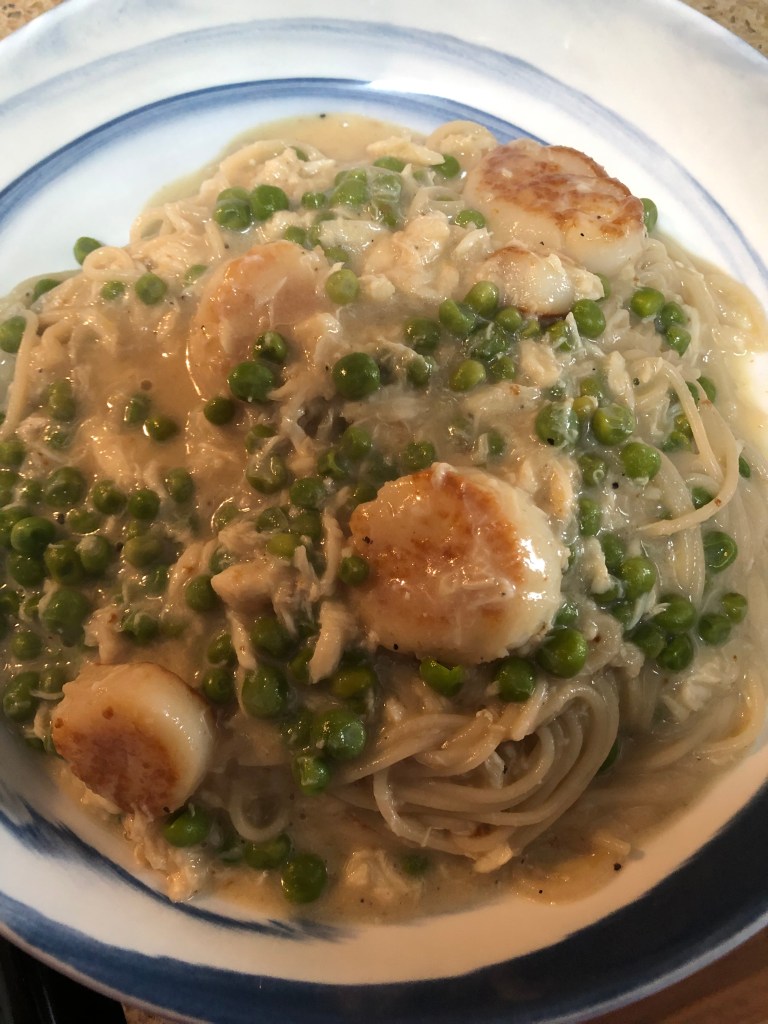
It’s one of those day when the snow is falling and I don’t want to go anywhere. Unfortunately, I neglected to get anything out to cook so what do I do now? Well, I had a can of salmon in the pantry so I pulled it out and mixed up this casserole. I added peas but asparagus or any other vegetable you like would also work.

Spray a small casserole dish with non-stick spray and preheat the oven to 350 degrees. Fill a large (4-6 quart) pot with water and bring it to a boil to cook the pasta. In a separate 1-2 quart pot, heat over medium high:

1/2 cup oil or melted margarine

Whisk in:

1/2 cup (more or less) all-purpose, gluten-free flour (I find I use several tablespoons more flour than fat)

Cook the roue for 2-3 minutes to cook out the flour before whisking in:

1 3/4 cups non-dairy milk (anything EXCEPT soy)

1/2 teaspoon garlic powder

1 teaspoon salt

1/4 teaspoon ground black pepper

1 tablespoon freshly grated lemon rind

1 tablespoon brown mustard

Reduce heat to medium. If the water is boiling add:

2-3 servings dry pasta (I used the Thai Brown Rice noodles)

1/2 to 1 cup peas

Cook according to package directions. Continue whisking the sauce until it thickens, more milk may be necessary to get the right consistency (thick enough to stick to the pasta but not gloppy!), reduce heat to simmer and add:

16 ounces of salmon (freshly cooked or canned, skin removed)

When cooked and drained, stir in the pasta and peas. Pour mixture into the prepared baking dish and bake for 20-30 minutes until bubbling and slightly browned on the top.

Asian Pear Scones

I’ve only had scones a couple of times and found them to be very dry and crumbly. So I was hesitant to try this recipe but I had a very large Asian pear that would make three servings of fruit, way to much to eat at one time. So this recipe offered me a nice alternative. And, oh my, what a delicious, fluffy, scone! The pear added flavor along with the allspice I used. Asian pears are less juicy and much crisper than other pears like Bosc or Bartlett, they have more of an apple consistency. If you don’t have any Asian pears on hand (they can be difficult to find unless they’re in season which is the late fall), use a very firm pear so that it isn’t too juicy. If you have a riper pear, don’t add as much liquid which would mean none since there’s only a 1/4 cup of non-dairy milk in this recipe.

First, preheat oven to 375 degrees. Line a medium to large baking sheet with parchment paper. Then make a flax egg by combining:

1 tablespoon ground flax

3 tablespoons warm water

Whisk to combine and set aside for several minutes until it forms a gel. While that’s happening, grate:

1 very large Asian pear (or two smaller pears), washed, cored, and peeled – want about 1 cup of grated pear

In the bowl of a food processor (or if you don’t have one, into a medium bowl), combine:

1 1/2 cups all-purpose gluten-free flour

1/2 teaspoon guar gum

1/4 teaspoon salt

2 teaspoons baking powder

1/3 cup fine date sugar

1 teaspoon spice – cinnamon, allspice, nutmeg, cardamom, etc.

1/3 cup Spectrum shortening (or vegan butter) – without a food processor, use a pastry fork to cut the shortening into the dry ingredients

Pulse until the shortening is combined with the dry mixture. Add:

1 cup grated pear

1/4 cup non-dairy milk

flax gel from above

Pulse until all ingredients are combined. Remove from machine and using a large serving spoon, spoon onto the prepared baking sheet (makes six) and let sit on the counter for 5-10 minutes before baking for 15-20 minutes. Store in an airtight container on the counter for up to 3 days or in the refrigerator for up to a week. They can be frozen as well.

Seafood Capellini with Lemon Sauce

Bought some beautiful scallops the other day and wondered what I could do with them. I also had a jar of crabmeat in the refrigerator and since I’ve been carving some seafood pasta, I decided to try something a little different. Generally, one can’t mix lemon juice with dairy since it curdles the milk. However, we don’t use dairy milk but plant-based milks so that doesn’t apply here. Basically, I made a white sauce with oat milk, grated in the rind of one lemon and stirred in the lemon juice, added the seafood and voila! Feel free to use whatever pasta and seafood your family enjoys.

First, put on a pot of water to boil for the pasta. Cook pasta according to box instructions. Also in a small pot, boil (or steam):

1 cup frozen green peas

Next, in a medium saute pan, heat over medium high:

1/4 cup olive oil

When the oil is very hot add:

8-10 sea scallops (dried thoroughly)

Reduce heat to medium and saute on each side for approximately 1-2 minutes depending on the thickness of the scallops. Remove from the heat, reduce heat to medium low and stir in:

1/4 to 1/3 cup gluten-free all-purpose flour

Stir to combine the two, the flour should absorb all the oil. Stir while it cooks for 1-2 minutes. Add:

Grated rind of one lemon

Juice of 1 lemon

1 1/2 cups non-dairy milk (NOT soy)

Salt and pepper to taste

Whisk to combine and continue whisking over low medium heat until the mixture thickens. Stir in the seared scallops and whatever other seafood your family likes. Add cooked pasta and strained peas. Serve immediately.

Air Frier Turkey Tenderloins

With all my food allergies, protein is difficult sometimes. And since I live alone, most meats except for individual things like pork chops or chicken pieces are always too much for one meal. So when I find turkey tenderloins, I always buy several packages and freeze the tenderloins individually. And then look for new and different ways to cook them. If you have an air fryer, this is so easy and quick. Otherwise, it could be cooked in the oven but it’ll just take a little longer. Of course, the essential thing about tenderloins, whatever type of animal they come from is not overcooking them and drying them out. This air fryer method worked very well for that. And, of course, this rub works on any protein, not just animal. And try mixing it up with different herbs and spices.

Preheat air fryer at 400 degrees for about 5 minutes.

Spray the air fryer basket with non-stick spray.

In a small bowl, combine:

1 teaspoon paprika

1 teaspoon garlic granules (or powder)

1/2 teaspoon dried thyme

1/2 teaspoon sea salt

1/4 teaspoon ground black pepper

1 teaspoon dried sage

1/2 teaspoon onion powder

Using paper towels, dry:

2 turkey tenderloins

Once dry, rub with:

1-2 tablespoons olive oil

Then sprinkle the rub mixture over the tenderloins being sure to coat both sides. Using dry hands, rub the herb mixture into the tenderloins. Place in the air fryer basket and cook for 12-15 minutes. Turn and repeat. Check turkey temperature (should be at 165 degrees) before removing. Let rest about 5 minutes before slicing.

Oatmeal Cookies

My husband’s favorite cookie was oatmeal with raisins. I’m allergic to grapes so raisins are out for me. Instead I rehydrated some dried cranberries and used those instead. But chocolate or carob chips would work just as well. Easy to make, this is a very thick batter which doesn’t spread and has just a slight rise in the oven so don’t worry about spreading them too far apart on the cookie sheet. Depending on how large you make them, I got 16 from the mixture, you’ll make 15-24 cookies. I also shaped them into disks so they started out flat.

Preheat oven to 350 degrees and line two medium cookie sheets with parchment paper. In a small bowl, mix together:

1 tablespoon ground flaxseed

3 tablespoons warm water

Whisk to combine and let sit for approximately 5 minutes to form a flax gel. In a medium mixing bowl combine:

1/2 cup avocado oil (or other mild flavored oil)

3/4 cup fine date sugar

Whisk to combine before adding:

flax gel

1 teaspoon vanilla extract

1/4 cup non-dairy milk (any kind)

Mix until smooth. Add:

3/4 cup all-purpose gluten-free flour

1/4 cup protein powder

1/2 teaspoon allspice*

1/4 teaspoon ground cloves

1/2 teaspoon baking soda

1/2 teaspoon salt

1/2 to 1 cup rehydrated raisins, cranberries or chips (chocolate or carob)

Mix until combined. Dough is very thick and shapeable but still a little sticky. Scoop into balls, approximately 2 tablespoons each, flatten and place on prepared sheets. Bake for about 12-14 minutes until firm. Let cool on sheets for a few minutes before transferring to a cooling rack. Store in air-tight bags or containers for about 4 days or freeze for up to three months. If freezing, place wax or parchment paper between layers of cookies.

*Or of course cinnamon if you can use it.

Herbed Baked Chicken Breasts

This is a tasty, easy and quick recipe. Feel free to change up the herbs you use so that you get the flavors your family prefers. I like thyme and marjoram so those are the two I used but the paprika and garlic powder are staples for this recipe. It only takes a couple of minutes to get the herb rub together and cut the breasts in half (lengthwise) so total, this recipe takes less than a half hour before ready to eat.

First, preheat oven to 425 degrees. Line a baking sheet with parchment paper. Dry off:

2 chicken breasts, about 6-8 ounces each

Using a long knife, hold a breast upright against the palm of your hand and cut in half to produce two approximately equal portions of chicken breast. Repeat with the second breast. Next place the breasts on the prepared baking sheet and sprinkle with:

1-2 tablespoons olive oil.

Rub to coat the breast pieces evenly. Wash your hands. Next, in a small bowl combine:

1 teaspoon paprika

1 teaspoon dried thyme

1/2 teaspoon dried marjoram

1/2 teaspoon garlic powder

1 tablespoon date sugar (or coconut sugar)

3/4 teaspoon sea salt

1/2 teaspoon ground black pepper

Sprinkle the herb mix on one breast at a time and rub to coat. Repeat until all pieces are covered on both sides. I sprinkled all the breasts at once so by the time I got to the third one, the herb rub was a paste instead of dry. That’s why I suggest you sprinkle the rub on one piece at a time! Bake for 15-20 minutes, or until internal temperature reaches 165 degrees. The time needed will depend on the thickness of the breast pieces. My pieces were about a 1/2″ thick and took around 16 minutes. Don’t overcook or the breasts will be dry. Be sure to let the meat rest for about 5 minutes before cutting. Serves two generously.

Asian Glazed Sea Bass with Bok Choy

My favorite fish is Chilian sea bass. I don’t have it often obviously because it’s also about the most expensive fish. But it was on sale this week so I had to buy some and of course, then I had to find a new way to cook it. I’d also bought some Bok choy so this recipe popped out at me when I did a search. Hope you enjoy it as much as I did. It’s pretty quick and easy, just be careful making the glaze since it should be brushable, not gloppy.

First, preheat oven to 400 degrees. Line a baking sheet with parchment paper. Next, clean:

4-6 baby Bok choy (remove ends, wash thoroughly and dry)

Place the Bok choy on the baking sheet. Heat over medium high heat in a 10″ oven-safe skillet:

1 tablespoon olive oil

When the oil is shimmering add:

2 sea bass fillets, about 6 ounces each (be sure to scale the fish, wash and dry the fillets, remove the bones if desired)

Sear in the oil for about 6-8 minutes until skin easily separates from the pan. Flip over to flesh side and place in the oven for approximately 12-15 minutes until almost cooked (flesh flakes easily when cooked). Sprinkle the Bok choy pieces with:

2 tablespoons olive oil

1/2 teaspoon sea salt

1/4 teaspoon ground black pepper

Add to the oven and roast for about 15-18 minutes. While the bass and Bok choy cook, make the glaze. In a small saucepan add:

1/2 cup soy sauce substitute

1 tablespoon rice vinegar

2 tablespoons honey (or maple, agave or date syrup)

1/2 teaspoon sea salt

1 tablespoon sesame seeds

1/2 tablespoon arrowroot mixed with 1 tablespoon water (a slurry)

Cook until just thickened. Don’t overcook! Set aside until the fish is just about cooked. Remove the fish and Bok choy from the oven. Brush each with a generous amount of the glaze and return to the oven for another 3-4 minutes. Serve immediately. Garnish with the greens from the scallions.

TIP: I had some glaze left over and the next day cooked some green beans (saute in a little olive oil until tender). When thy were cooked, I poured over the 1/4 cup of remaining gaze. Oh succulent and full of umami!

Watermelon Seed Butter

Don’t call me crazy yet – hear me out. I mean, I always thought who eats watermelon seeds? They’re the nasty things you bite into by accident when eating watermelon. However, I ordered, by mistake, some watermelon kernels a while ago. Put them in my pantry and forgot about them until recently when I had to clean out the pantry because I couldn’t fit anything else in there. I started throwing them out for the birds and some fell on the counter. I ate them and was shocked! They taste great, almost like a mix of peanut and cashew, except they aren’t as high in fat as most nuts. Needless to say, the birds aren’t going to get anymore.

Here’s a breakdown of what 1 ounce of watermelon kernels contains: 8 grams protein; 13.4 grams fat; 4.34 grams carbohydrates; 15.3 mg calcium; 2 mg iron; 146 mg magnesium; 214 mg phosphorus; and 184 mg potassium. They’re low in calories, high in fiber and essential fatty acids.

And like the pumpkin seeds I love, they grind up well into a butter. I think I’m going to try some of those cashew butter recipes for things like cheese that didn’t work well with my pumpkin seed butter. I’ll let you know how that goes.

In the bowl of a food processor combine:

1 pound of watermelon kernels (Yupik is the brand I used but there are quite a few available online)

Begin blending until they are mostly crumbly before adding:

2-3 tablespoons avocado oil (amount depends on how creamy you want the butter)

If the mixture becomes too thin from the oil, add more kernels. I ended up adding 1 1/2 pounds to my food processor. When the butter is the desired texture (I like mine a little crunchy), add:

pinch to 1/4 teaspoon sea salt

Blend to combine before scooping the butter into air-tight jars. Refrigerate (or freeze). Use like you would any nut butter. My 1 1/2 pounds of kernels produced 4 cups of butter.

Honey Garlic Chicken Wings

I’ve posted other wings recipes. This one is slightly different because it mixes a little tomato paste into the soy sauce substitute base along with some pureed garlic (find it in grocery store next to minced garlic in the Ethnic Foods aisle; Emperor’s Kitchen has an organic one). It also omits any coating, other than spices, on the wings themselves so no extra carbs from flour or breadcrumbs. Added to the delicious flavor and the fact that they take only a couple of minutes to prepare and a half hour to 40 minutes to bake, they can’t be beat!

In a gallon food storage bag combine:

up to 3 pounds split chicken wings

1 teaspoon paprika (sweet or smoked, whichever your family prefers)

1 teaspoon onion powder (NOT salt)

1/2 teaspoon sea salt

1/8 teaspoon ground black pepper)

Press the air from the bag before sealing, seal the bag and then massage the spices into the wings. In a small bowl mix together:

1/4 cup soy sauce substitute (see recipe under sauces)

2 tablespoons honey

1 tablespoon tomato paste

1/2 teaspoon sesame oil*

1 teaspoon pureed garlic

1/8 teaspoon Garlic Chili Sauce (OPTIONAL)

Add half to two-thirds of the sauce to the bag and shake to coat all the wings. Place on a baking sheet lined with parchment paper (be sure there’s room between each wing) and bake at 400 degrees for 15-20 minutes. Remove and brush with the remaining sauce and turn the wings over so that they brown on both sides. Bake for another 15-20 minutes (depending on size, larger may need a few more minutes) and serve. Garnish with sesame seeds, sliced scallions or chopped parsley.

*TIP: This can be omitted for totally oil free wings. Pour your 1/2 teaspoon of sesame oil into the tablespoon (or quarter cup measure) that you’ll use for the honey and swish it around to coat. This will let the honey slip right out.

You can find the recipe for my Cole slaw under Soups and Salads.

Asparagus with Prosciutto

I love asparagus but don’t eat it often because my doctor forbids it. But this is such an easy and delicious recipe that I just had to have some. If you like salty, you’ll love this dish. And it’s so simple to make! Takes about 10 minutes. Serves 2-4.

First, clean your asparagus, wash the spears and break off the tough ends. If the cladodes* are large, remove them by plucking them off or peeling the spears. In a 12″ skillet heat over medium heat:

1 tablespoon oil

When it shimmers, add:

1 pound prepared asparagus

Sprinkle the asparagus with:

1/4 teaspoon sea salt**

1/8 teaspoon ground black pepper

1/8 – 1/4 teaspoon garlic granules (or add 1 teaspoon minced fresh garlic)

Stir the asparagus to distribute the seasonings and let cook for 1-2 minutes until tender but still firm and doesn’t fall down when you pick it up with the tongs. Remove from the pan onto a plate and place in a warm oven while you cook the prosciutto. Into the same skillet, add:

5 slices prosciutto, cut into pieces (or cook whole and cut afterwards)

If cooking the prosciutto whole, be sure to separate the pieces. Most pre-packaged prosciutto contains about 5 pieces. Cook until browned and most of the fat is rendered. Remove from the pan. If you didn’t cut it before cooking, chop now. BE CAREFUL – IT CAN BURN VERY QUICKLY AS I CAN ATTEST! Top the asparagus with the prosciutto and serve.

*These are the triangular, tough things on the asparagus spears. They are especially tough when the asparagus is larger than the pencil size.

** If you haven’t heard about the danger of using sea salt, read the article: Himalayan Salt vs. Sea Salt on YouTube.