Here’s another great recipe adapted from the Chicken Bible. Because of salt restrictions, I left out the chopped olives and brandy also isn’t allowed in my diet so that’s gone as well but I’ll list them as optional if you want to add them to your dish. It was quite tasty and fairly easy to make. Be sure to use an oven safe pan or after making the sauce, transfer the sauce and then the chicken to an oven proof dish.
Preheat oven to 400 degrees. Peel and chop:
1 medium onion, diced fairly small
Using paper towels, dry:
4 medium size bone-in chicken breasts or 2 breasts and 4 thighs
After drying sprinkle with:
1/2 teaspoon salt (I used herbamare)
1/4 teaspoon ground black pepper
Heat over medium high, in a skillet large enough to cook the chicken without cramping:
1 tablespoon oil
Add the seasoned chicken pieces, skin side down and leave them alone for at least 5 minutes to brown the skin and get it crispy. Then turn and cooked for 2-3 minutes on the other side. Remove from the pan, drain all but 1 tablespoon oil from the skillet and add:
the diced onion
Cook over medium heat for 2-3 minutes until softened before adding:
2 teaspoons minced garlic
10 ounces sliced shitake mushrooms
Cook over medium heat until the mushrooms start to soften and give off their liquid before stirring in:
2 teaspoon hot sauce (or more if your family likes it spicier OR 1/4 teaspoon crushed red pepper flakes)
6 Kalamata olives, chopped fine (Optional)
Stir to incorporate before placing the chicken pieces on top of the sauce mixture. Bake for 35-40 minutes or until the breasts reach 160 degrees and the thighs register 170 degrees. Remove from oven and move the chicken to a serving platter. Add to the sauce:
2 tablespoons avocado oil
Whisk to combine and then spoon the sauce around the chicken and serve. Serves 4.
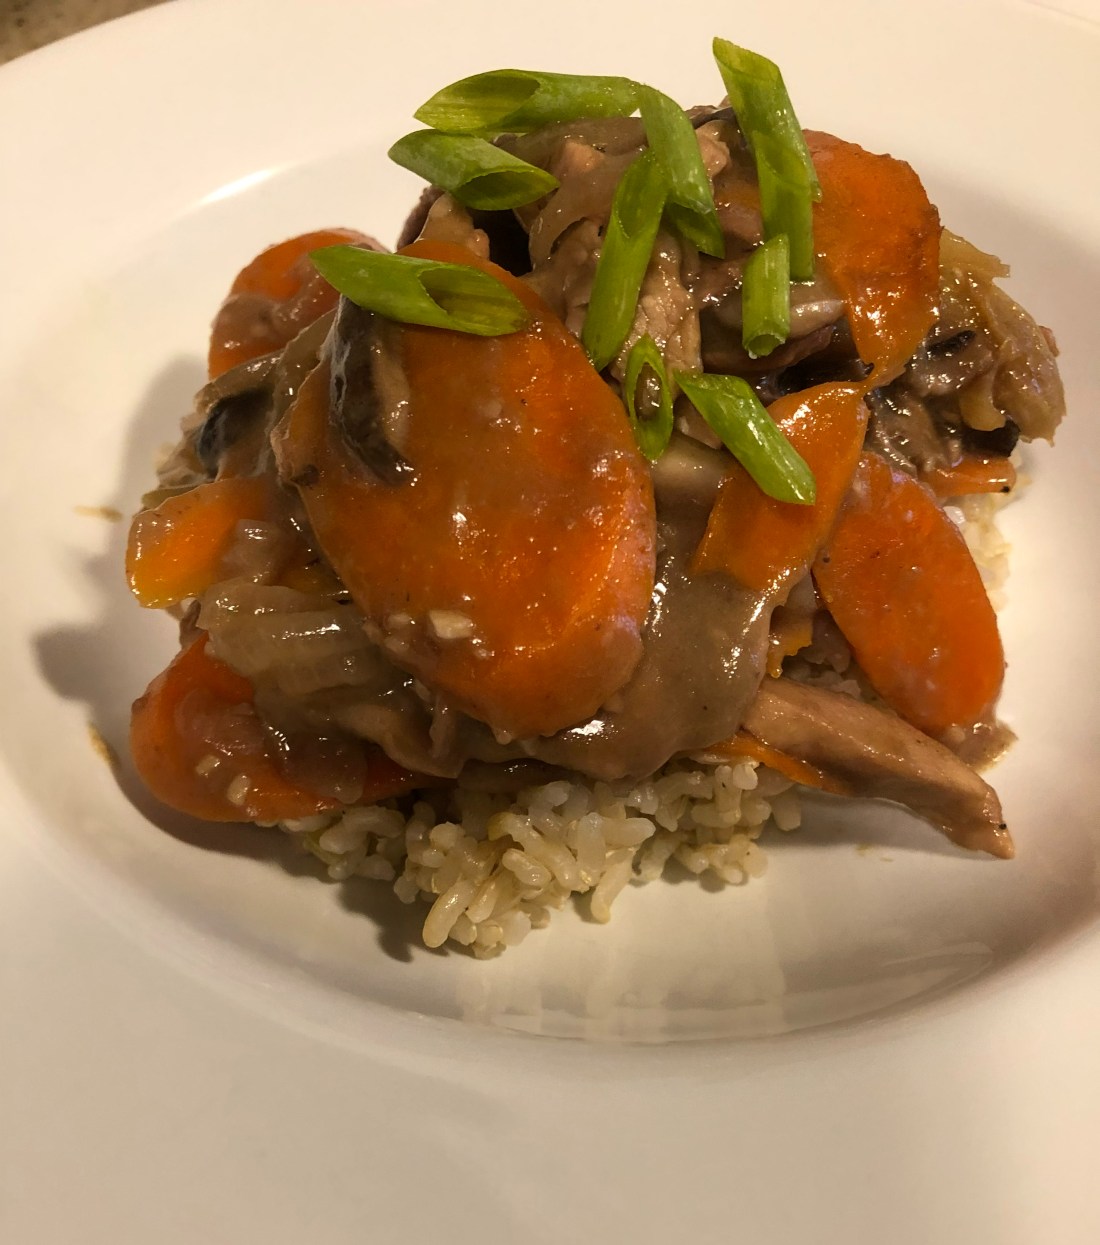
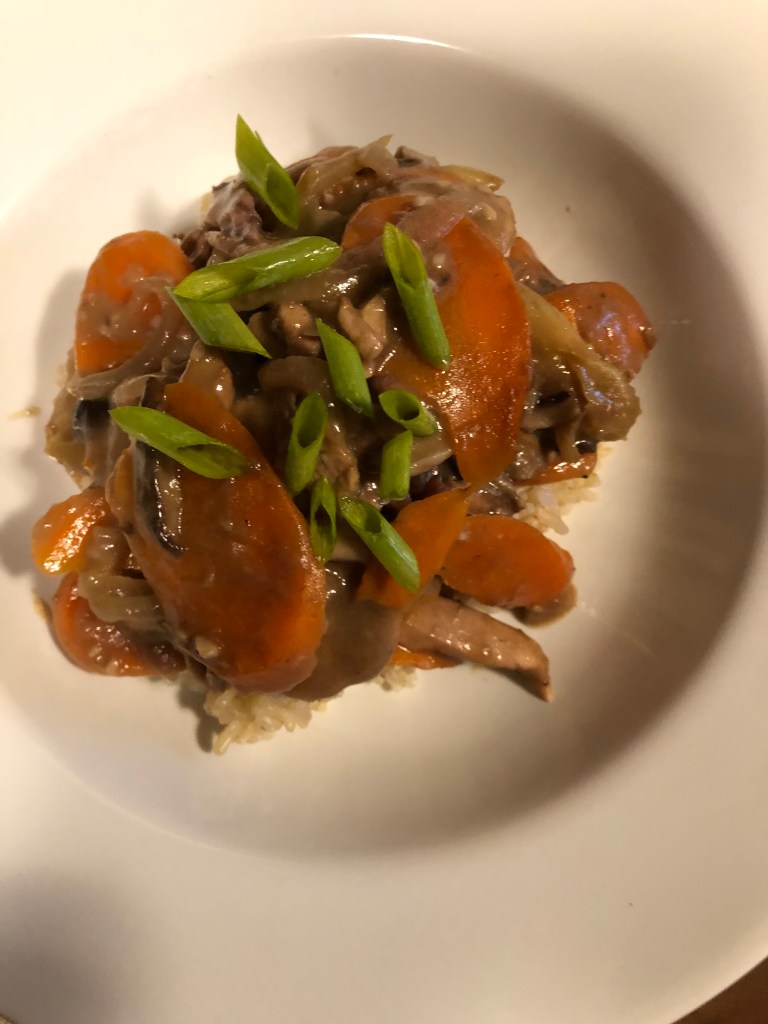
Had a little of the soy substitute sauce left over from the recipe a couple of days ago so thought I’d make some choy mein. But there wasn’t quite enough sauce for that and I’d gotten a jar of plum jam out of the freezer and added some of that and oh my goodness, how mouth-watering is this! Like adding a little pear or apple to a pork or chicken gravy, adding a little plum to this Chinese sauce turned out luscious. Don’t have any plum jam around the house? Stew up 2 plums (skin too if organic) along with about 2 tablespoons of date syrup and then puree it and you’ve got plum jam!
Just like with most Chinese recipes, the first step is always to cut everything up!
Peel:
1 small to medium onion, slice in half thin slices
1 large o 2 smaller carrots, slice on the diagonal
2 garlic cloves, minced
Trim:
2 whole stalks or 4 stalks from the celery heart (about a cup altogether), slice diagonally
6 ounces of shitake mushrooms, sliced
Put the vegetables in a bowl and set aside until ready to cook. Trim the fat and slice:
2 skinless, boneless chicken breasts*
Place the slices in a food storage bag and add:
2 tablespoons soy sauce substitute (see recipe under sauces)
2 tablespoons rice vinegar
1 tablespoon cornstarch or arrowroot
1/4 to 1/3 cup plum jam
Seal and refrigerate 15-30 minutes until ready to cook. When ready to cook, heat over medium heat in a 12″ skillet:
1 tablespoon olive oil
Add the vegetables and cook, stirring frequently, for 1-2 minutes. Cover and lower heat to medium low and cook for 5-7 minutes, stirring often, until carrots are tender. Remove the vegetables to their bowl, turn the heat back to medium and add to the skillet:
the marinated chicken and marinade
Cook stirring constantly until the chicken is cooked through, about 2-3 minutes. Reduce heat to low and add the vegetables back to the skillet along with:
1 cup chicken or vegetable stock
Stir to combine and continue stirring until sauce thickens, about 1 minute. Serve with brown rice or rice noodles.
*Want a vegan entrée? Substitute firm tofu or your favorite plant-based protein.
Here’s another recipe adapted from the Chicken Bible. It’s somewhat spicy due to the abundance of freshly grated ginger as well as just a 1/4 teaspoon Vietnamese chili sauce.* The original recipe called for 1/4 teaspoon of red pepper flakes so use those if you can’t find a chili sauce that works for your family. I also cut back slightly on the amount of freshly grated ginger – the original recipe called for 1 tablespoon but I used only about 1 teaspoon and it was sufficient for my tastes. This is a recipe that may sound difficult and complex but if you follow the steps, it’s really quite easy to make and oh so worth the effort – just as good as any dish in your favorite Chinese restaurant.
First, cut up everything:
1 pound bok choy (I used three medium sized baby), cut off the stems and cut into bitesize pieces and then separately chop the greens and put them in a separate bowl
2 small sweet red peppers, cut in thin slices
1 pound boneless skinless chicken breasts, sliced as thinly as possible (if the breasts are partially frozen, they will slice much easier although the hand holding the meat will get quite chilly!)
1 garlic clove minced
about 1″ of fresh ginger peeled and grated to produce roughly 1-2 teaspoons
2-3 scallions, slice at an angle, add the white parts to the bok choy stems and peppers and set the greens aside in a medium bowl
Next, mix together in a medium bowl:
1 tablespoon soy sauce substitute
2 teaspoons rice vinegar
1 teaspoon date syrup
1 teaspoon fish sauce
1 tablespoon sesame oil
1 teaspoon cornstarch (or arrowroot)
Whisk together and add the sliced chicken. Mix to ensure all the chicken is coated with the marinade. Refrigerate until needed.
Third, put on a pot of water to boil:
6 quarts water in a large pot
When the water comes to a bowl, add:
1 teaspoon sea salt
9 ounces of noodles (I used brown rice pad Thai noodles)
Cook for only 3 minutes until el dente (or the amount of time on the package of your noodles). Drain and add to the bowl with the green scallion slices. Mix to combine. In a 12″ non-stick skillet, heat over medium high heat:
2 tablespoons olive oil
Add the noodle/scallion mixture and spread out in the pan. Use a strong spatula (or I used a bacon flattener) to flatten the noodle mixture in the pan (see photo below). Cook 5-7 minutes until browned and then using a large spatula, flip and brown again on the second side 5-7 minutes. Remove to an oven proof plate and stick in a 200 degree oven to keep warm.
Now, in a small bowl mix together:
2 tablespoons olive oil
the minced garlic
the grated ginger
In another small bowl make the sauce by combining:
1/3 cup chicken or vegetable stock
2 tablespoons soy sauce substitute
1 tablespoon rice vinegar
1/2 tablespoon date syrup
1/4 teaspoon chili sauce or red pepper flakes (or hot sauce!)
1 teaspoon cornstarch (or arrowroot)
Stir to combine. Set aside until needed. Pour into the empty skillet and heat:
2 teaspoons olive oil
Add:
sliced chicken (and marinade)
Cook over medium high heat, stirring constantly and turning frequently until the meat is cooked, about 2 minutes. Remove to a dish and set aside. Into the same skillet heat over medium heat:
the olive oil mixture with the garlic and ginger
When hot, add:
the bok choy stems
red pepper slices
scallion whites
Cook over medium high heat stirring frequently until they just begin to soften, about 3 minutes. Add:
the bok choy greens
Cook just until the greens begin to wilt, add the cooked chicken along with any juice in the dish. Whisk the sauce mixture to be sure it’s still combined and pour over the chicken in the skillet. Stir continuously until the sauce thickens about 30 seconds and the chicken is reheated. Remove the noodle cake from the oven and cut into wedges. Serves 2.
*I had a lot of difficulty finding a chili sauce that didn’t contain either sugar or soy. I finally located one (at the 4th store I checked!) – Tuong Ot Toi Viet-Nam Chili Garlic Sauce. It’s VERY hot so the amount used should be to the level of your taste buds. I don’t mind spicy but super hot is not to my liking therefore the recipe calls for just 1/4 teaspoon.
I’ve talked about how much I love Chinese food and here’s another luscious, mouth watering, easy to make dish. It’s a little spicy with the chili paste (or hot sauce) and grated fresh ginger but not too spicy but feel free to leave those out if you don’t want it spicy. And be sure to check before purchasing oriental chili paste because most of them (all the ones I looked at in the store) contain wheat flour and therefore gluten. Serves 2-4 depending on serving size and the vegetables you add.
First prepare the chicken:
12 to 16 ounces boneless chicken breasts and/or thighs
Remove skin and whatever fat and silver skin you see. Cut into bite-size chunks and place in a gallon food storage bag. Add:
1/3 to 1/2 cup corn starch (or arrowroot)
Close the bag and toss the meat around to make sure it’s entirely covered by the starch. Place in the refrigerator for 15-30 minutes.
In a small saucepan combine:
2 tablespoons soy sauce substitute (see recipe under sauces)
1 1/2 tablespoons ketchup (sugar free)*
1/2 teaspoon chili paste (or hot sauce which is what I used)
Whisk to make a slurry and then pour it into the saucepan. Heat the sauce over medium heat, whisking often until it starts to heat up and you see a few bubbles from a slow boil then whisk constantly until the sauce is thickened. Remove from heat and add:
2 tablespoons TOASTED sesame seeds (you can buy them that way)
Stir in the sesame seeds and set the sauce aside. Over medium heat, heat a 12″ skillet with:
1 tablespoon olive oil
When shimmering hot, add the cubed chicken. Using a spatula or wooden spoon, spread out the meat so it’s in a single layer in the pan and cook, stirring often, for 5-7 minutes until the meat is cooked through (time will depend on how large the cubes are). Once the chicken is cooked, pour in the sauce and mix to combine. Cover and remove from heat.
For vegetables, whatever your family likes will work. I used 1/2 cup of shredded carrots and 1/2 cup of frozen peas which I zapped in the microwave for 2 minutes before adding to the chicken mixture. But broccoli, bok choy, snow peas, celery, onions, water chestnuts, green beans, will work just be sure to cook them before adding to the sesame chicken. Or if you prefer, leave out the vegetables and serve a vegetable dish on the side. I served this over brown rice but again, Thai noodles or linguini would also work.
*For those of you unfamiliar with the product, Organicville makes a ketchup containing agave nectar instead of sugar. No one I’ve ever served it to knew it wasn’t “real” ketchup.
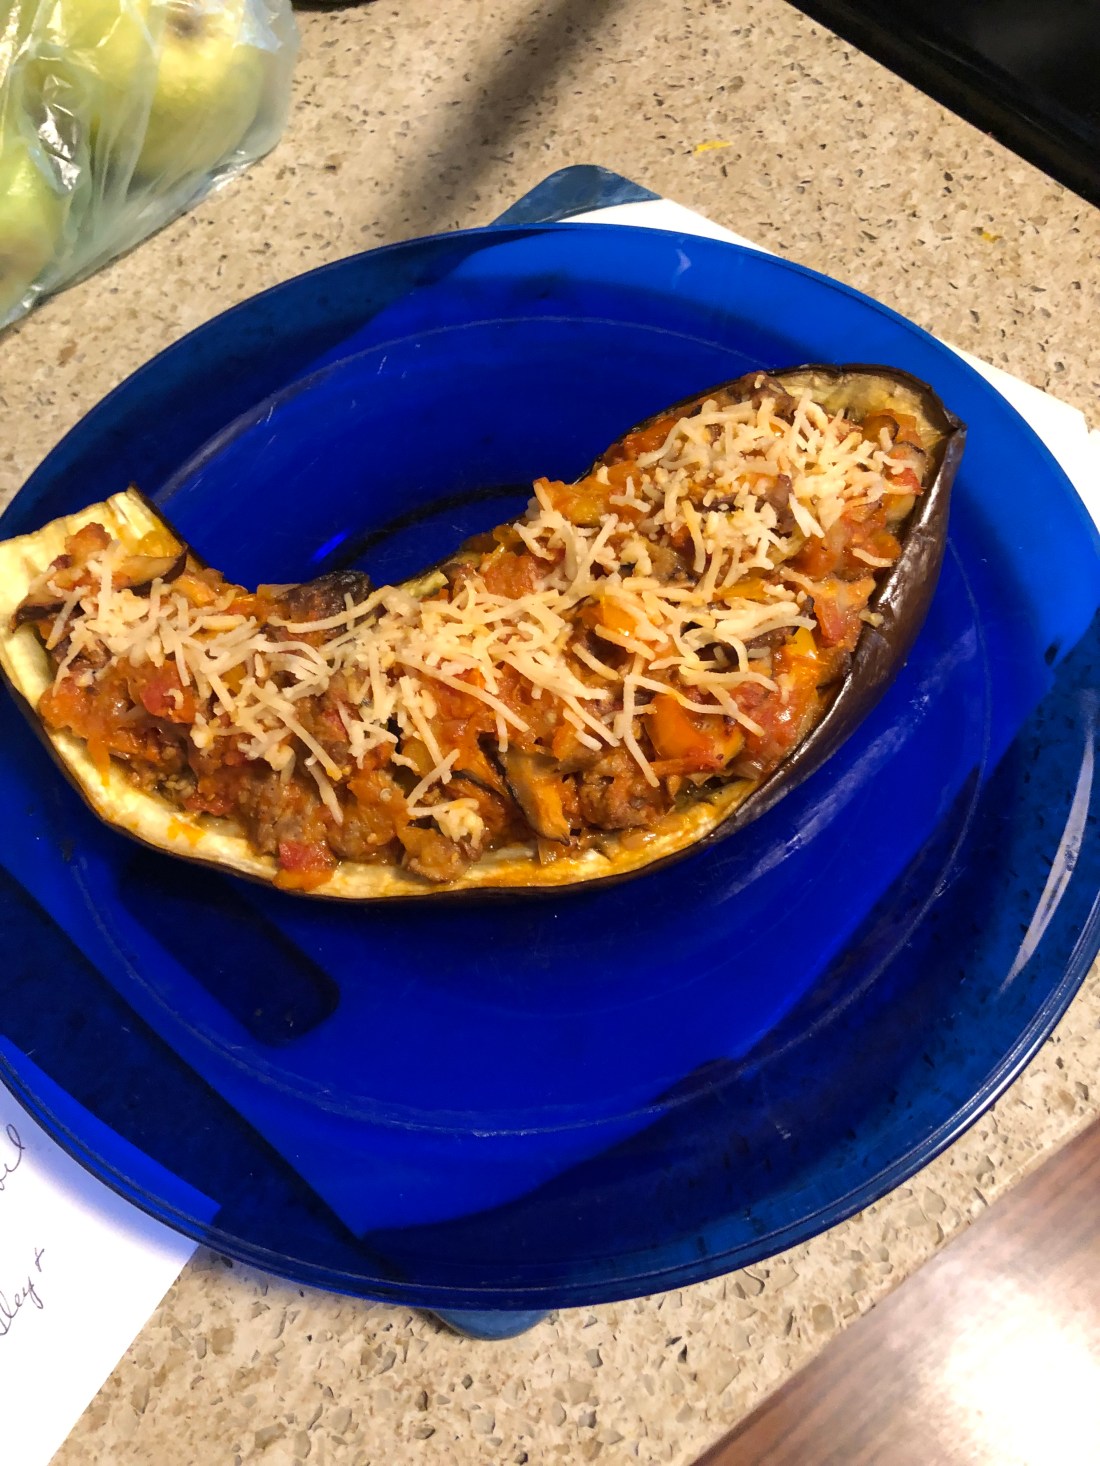
Here’s another recipe for stuffed eggplant which would also work great for zucchini. Those of you who’ve followed me for awhile know how much I love eggplant! This recipe doesn’t use any starchy foods – no rice, pasta, bread crumbs, etc. Instead, it adds some cooked spaghetti squash to the stuffing! Delicious, very rich tasting. I didn’t but a dash of allspice (or nutmeg) would add even more depth to these flavors.
First, preheat oven to 350 degrees. Cut in half:
1 small spaghetti squash
2 large eggplants (longer works better than rounder)
These will both take approximately the same amount of time to cook since the spaghetti squash doesn’t want to be overcooked or the strands turn to mush. Remove the seeds from the squash. Rub the halves of the squash and the eggplant with:
4-6 tablespoons olive oil total for all six pieces
Cut x’s in the eggplant and stab with a fork on the skin side (be sure to use Italian eggplant for these not Oriental ones). Place the squash skin side up and the eggplant skin side down on a large cookie sheet and bake for approximately 30-45 minutes until the squash is tender when stabbed with a knife and the eggplant is starting to turn translucent in the middle. If the eggplants are very round they will take longer to cook through.
Leave both squash and eggplant to cool a little while the filling is cooked. In an 10-12 inch skillet, heat over medium heat:
1 tablespoon oil
When its shimmering (hot), add:
2 sweet Italian sausage removed from the casing (or hot if your family prefers them) [OPTIONAL]
Stir and cook the sausage until it’s almost cooked through before adding:
1 medium onion peeled and diced
1 medium sweet pepper diced
1/2 cup shredded carrots
2 teaspoons minced garlic
6 ounces of sliced shitake mushrooms
Cover and simmer over medium low heat until the vegetables are softened. Remove cover and add:
1 to 1 1/2 cups marinara sauce [see recipe under sauces or use jarred]
Cover again and leave over low heat. Use a fork to remove the flesh from the spaghetti squash, going from stem to bud end lengthwise not across the squash. It should come off in strands that look like spaghetti unless it’s overcooked. It will still work just won’t look like spaghetti in the filling. Also use a sharp spoon to detach the center flesh of the eggplant, cut it into pieces. Be sure to leave about a 1/4 inch of eggplant in the skins. Add the removed eggplant to the filling along with:
2 cups of the spaghetti squash (should be about equal to both halves of the squash depending on size)
Mix the squash and eggplant into the filling in the skillet. Place the eggplant halves on a baking sheet and fill generously with the filling. Sprinkle with:
1/4 to 1/2 cup non-dairy cheese (I used Parmesan but any cheese your family likes will work)
Return to the oven and bake for 20-25 minutes. Serves 4 to 6 depending on the size of the eggplant.
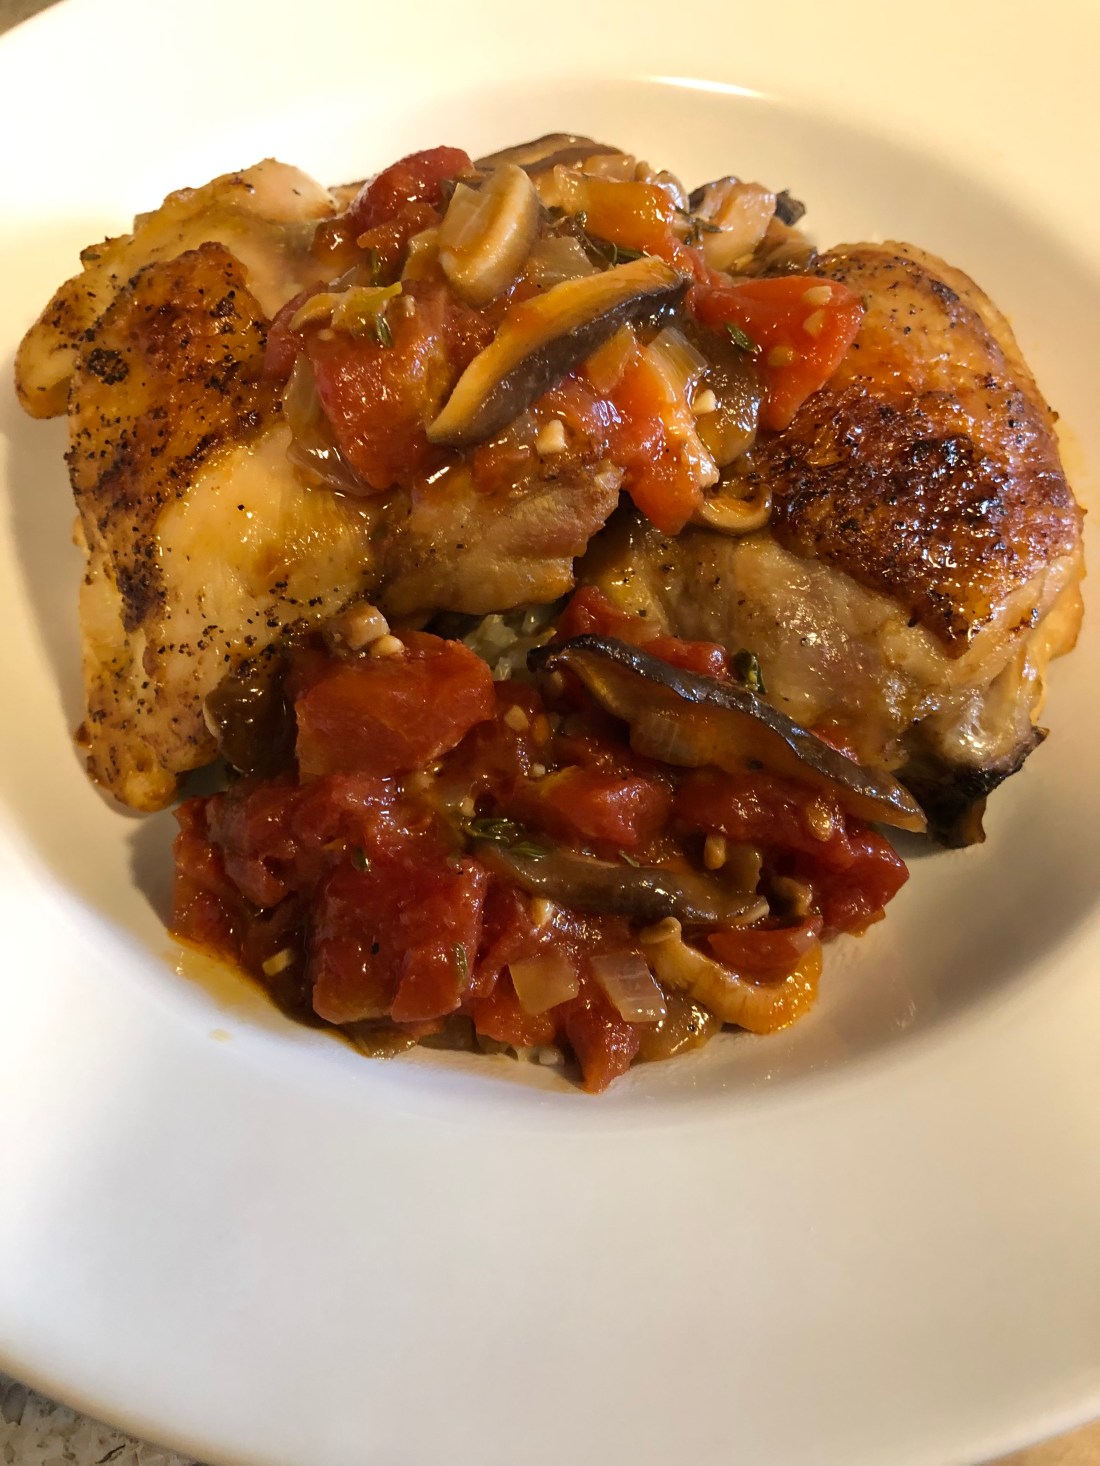
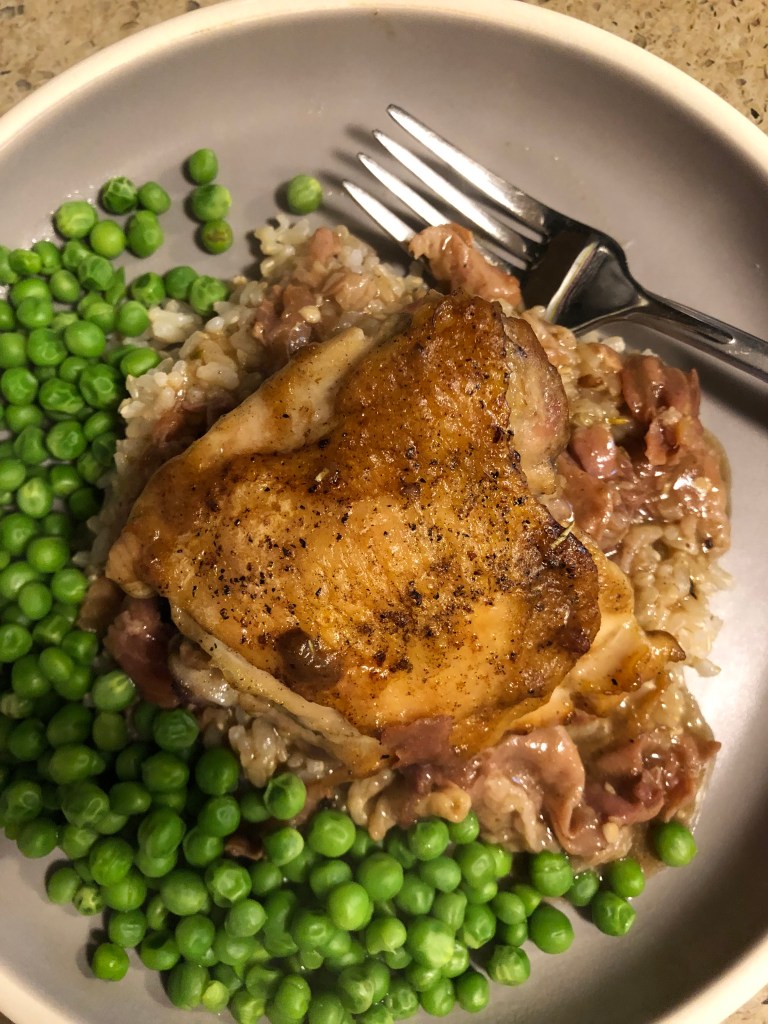
When I first saw the listing for Chicken Canzanese in the chicken bible, I thought it was a Chinese dish but turns out it’s a very old Italian recipe. I’ve resized and revamped it for those of us with allergies. It originally made eight servings so I’ve reduced it to 4. I’ve also changed the white wine in the original to chicken stock plus a touch of rice vinegar and honey. Since I’m used to using dried herbs rather than fresh, I’ve also reflected that change in this recipe. I hope you enjoy it as much as I did!
Preheat oven to 325 degrees. In an ovenproof skillet (about 10-12 inches), heat over medium high heat:
1 teaspoon olive oil
Add:
1 ounce prosciutto cut into 1/4 inch cubes*
Cook, stirring frequently, until just starting to brown. Add:
3 teaspoons chopped garlic
Cook, stirring often, until garlic just starts to brown. Transfer the prosciutto and garlic to a small bowl. Dry with paper towels:
4-5 chicken thighs, skin on
Dust them with pepper to taste (no salt is necessary in this recipe because of the salt in the prosciutto. Replace the skillet on the heat and add:
1 teaspoon olive oil
the 4-5 chicken thighs, skin side down
Cook until well browned on the first side (about 5 minutes) then turn over and brown on the meat side, reducing heat to medium (about 5 more minutes). Transfer the chicken to a plate. Drain all but 2 tablespoon of the oil from the skillet (the chicken will release quite a bit of fat). Add to the skillet over medium heat:
2 tablespoon all purpose gluten-free flour
Whisk to combine and let the flour cook for about 30 seconds while whisking before adding:
2 cups of chicken stock
drizzle of rice vinegar (about 1/4 teaspoon)
drizzle of honey (about 1/2 teaspoon)
1/4 to 1/2 teaspoon dried rosemary (depending on your taste)
1/2 teaspoon dried sage
dash (1/8 teaspoon) ground cloves (or add 2 whole cloves – just remember to remove them before serving)
2 bay leaves
1/4 teaspoon red pepper flakes (optional depending on your taste)
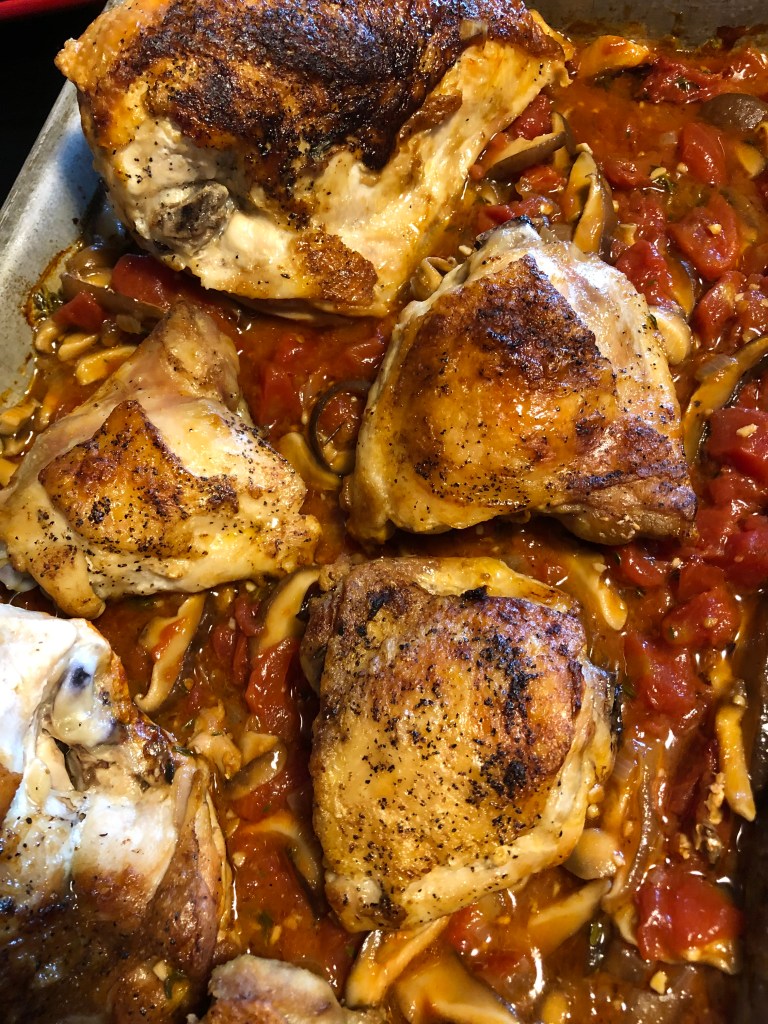
Whisk to combine and cook until slightly thickened. Add the prosciutto, garlic, and chicken (skin side up) to the skillet, nestling the chicken into the sauce. Bake in preheated oven for about 1 to 1 1/2 hours. After about 15 minutes check and see if the sauce is bubbling; if it is reduce oven temperature to 300 and cook until chicken is tender. Sauce should have thickened but if it’s still thin, remove the chicken from the sauce (move to a plate and cover) and cook the sauce on the stovetop for a few minutes until reduced to approximately 1 1/2 cups. Remove from the heat and whisk in:
1 tablespoon vegan margarine
1 tablespoon lemon juice and 1/4 teaspoon lemon zest
Stir to combine and then pour the sauce around the chicken. Remove the bay leaves (and whole cloves if used) before serving. Serve over rice, mashed potatoes, or polenta.
*Prosciutto can become tough if fried when very thinly sliced so it’s recommended that a 1/4″ piece be used to cut “chunks” for this recipe. However, my deli wasn’t able to provide a “slab” of prosciutto because of shortages now due to the pandemic so I used the thinly sliced prepackaged prosciutto instead. Seemed to work alright but I simply chopped it into larger pieces than 1/4″.
It’s very difficult to find a gluten-free pizza crust recipe that doesn’t include at least one egg. This one is yeasted so if you have trouble with getting yeast to work, not an uncommon problem, just make sure your yeast is: 1) still viable – there should be a date on the package; 2) that your water isn’t too hot or too cold – like with a baby’s bottle, the water should be just slightly warmer than a neutral feel on your inside wrist or about 105 degrees; 3) never put the salt in with the yeast, always add it to the flour; and 4) yeast needs food to grow so add the sweetener to the yeast to help it develop.
Those types in place, here’s the recipe. Takes awhile because of letting the yeast do it’s thing but it’s a very easy recipe to make.
First, in a 8-10 cup bowl combine:
1 1/2 cups gluten-free flour (I used the 1to1 but any will work fine)
1 tablespoon date sugar
1 teaspoon guar gum (or xanthan gum)
1 teaspoon baking powder
1/2 teaspoon salt
Mix to combine. In a 2-3 cup bowl mix together:
1 1/2 teaspoons yeast (this is one packet)
1 cup warm water (see above)
1 teaspoon date sugar
1/2 cup of the flour mixture above
Use a whisk to combine until there are no lumps or very small lumps left. Set aside and let the yeast work for 15-30 minutes, it should double in size. If it doesn’t start bubbling within the first few minutes, either the yeast isn’t any good or the water was too cold or too hot. Start again in this case.
After the yeast has doubled in size add:
1 tablespoon olive oil
Then pour the wet yeast mixture into the flour mixture and stir (wooden spoon best) until all the flour is absorbed. Try not to mix too much once the mixture is combined and smooth or the dough may become tough. Form the dough into a ball, or as close to a ball as possible – if the mixture is too wet and sticky, wet or oil a spatula to form into a ball. Cover with a clean kitchen towel or plastic wrap and let sit for about 1 hour or until the ball is about double in size.
Preheat oven to 450 degrees. Grease a 10-12″ pizza pan (or a rectangular baking sheet) with:
2 tablespoons olive oil
Depending on the size and shape of the pizza desired, either scrape the entire ball of dough into the pan or cut into sections to make smaller pizzas. Personally, since I live alone, I quarter the dough and shape it into 4 personal size pizzas on a large baking sheet. Spread it on the pizza pan or shape it using wet or greased hands. I spread the olive oil on the baking pan with my hand and then have a greased hand to spread the dough out and shape it as I like.
Bake the dough for 10-12 minutes or until it just starts to brown. Remove from oven and either cover with toppings and bake for an additional 20-25 minutes at 425 degrees (baking time depends a lot on the thickness of the crust), or cool and freeze the prepared pizza crusts for later use. I made 4 small personal sized pizza but I added the toppings to all of them, baked them and then froze the extra 3 fully made to heat up at a later date.
TIP: Gluten-free baked goods take longer to bake than “normal” baked goods so don’t be afraid to let the pizza dough cook for longer if it isn’t browned on the bottom. My crusts were quite thin so the 20 minutes was sufficient.
Mostly I eat chicken but occasionally I’ve have some pork and I find it difficult to find creative ways to cook it, a plain pork chop can be so boring. Here’s one I adjusted from one I found online. I added the endive which goes great with both the pork chop and the pear sauce.
First, make a batch of pear sauce (see recipe under sauces) except instead of adding the ginger, add 1/2 teaspoon of cinnamon and 1/4 teaspoon of allspice (per cup of pear sauce/about 1 pear).Additionally, add about 1 tablespoon of date syrup (or 2 teaspoons of honey or agave nectar).
In a 10″ skillet, heat over medium high:
1 tablespoon olive oil
Blot dry:
2 1″ thick pork chops (or a little thinner or thicker if preferred just adjust the cooking time)
Season with salt, pepper, and garlic powder (granulated works best). Add to the hot oil and sear on each side (about 1-2 minutes per side) then reduce heat to medium low and cook, uncovered, for about 5-6 minutes per side or until the pork is firm to the touch. Set aside and let sit off the heat for approximately 10 minutes to rest.
While the pork rests, heat in 12″ skillet over medium heat:
1 tablespoon olive oil
Add:
1/2 medium sweet onion, dice
6-8 medium to large endive (slice off the lower stem end and then quarter)
Season with salt, pepper, and garlic powder then cook stirring occasionally so that the onion doesn’t burn. After about 3-4 minutes, reduce heat to medium low and cover so that the lower cores of the endive soften and continue cooking for another 3-4 minutes or until the endive cores are softened.
If you’ve premade the pear sauce as I did, heat in a small pot until hot. Pour half the mixture (about 1/2 cup) over each pork chop. Serves 2.
I’m reposting this recipe that I original developed in 2020 because I have some additional tips for you about it that I thought made it so much more scrumptious. Many of us can’t (and shouldn’t) eat corn. I know because I’m one. But I grew up eating corn and I do so love it. Especially when it’s corn season, like it is right now. I happened to get to the market this morning right after they’d put out a fresh batch of local corn.
If you don’t know when corn is fresh, here’s what to look for: check that the tassels are still moist or at least still have some green to them and are not turned completely brown and that the stem end is still green. If the stem end is brown, the corn is old and will have lost much of it’s flavor. Also don’t husk the corn until you’re ready to put it in the pot! A definite no no. And always steam corn, it should never be boiled.
My mother was a great admirer of Craig Claiborne, the food critic for the New York Times in the 1970s. When he published a cookbook, she had to have it. About a week later, she found a recipe in it for corn in which he said corn should be boiled. She slammed the book shut, said the man was an idiot and never read anything else he ever wrote.
Having grown up on a farm where my father wouldn’t eat corn unless he went out and picked it, husked it and brought it to my mother who had the steamer all set to cook it. And the bushels of corn that we’d blanch and cut off the cobs in September to freeze for the winter. My, it was a two-day affair.
So please, another tip, never reheat or cook corn in water. If you have frozen corn off the cob, it should be simmered in milk (such as oat milk) and some fat (of course my mother always used butter!). Corn has a milky base, not a watery one so cooking it in milk enhances the flavor.
So, today, even though I knew better, I added corn to this recipe. And of my goodness, it was so delicious and I suffered so desperately all afternoon after I ate it but the enjoyment and flavor was worth the few bad hours afterwards. Here’s the amended recipe, feel free to omit the corn if you can’t eat it.
You’ll need:
4 chicken thighs (I tried using a breast and it was tough)
1 cup salsa – use whatever salsa your family prefers, mild, medium, hot or spicy, doesn’t matter
Approximately 3/4 cup of freshly cooked corn cut from the cob (I used only 1 ear)
1 teaspoon honey
1 teaspoon garam masala or coriander
1/2 teaspoon hot sauce [optional]
1/2 teaspoon salt or herbamare
Spray a 9×9″ pan with cooking spray. Mix the salsa, honey and spices together (I use a small whisk) and put a thin layer on the bottom of the pan. Arrange the thighs on top and then spread the remaining salsa mix on each thigh. Bake at 350 degrees for approximately 30-45 minutes depending on the thickness of the chicken thighs.
It’s that easy! You can serve it with brown rice to sop up all the wonderful flavors of the salsa.
PS: I gave the rest of the corn to my grandson so I wouldn’t be tempted to eat it myself!
Any white fish will work with this recipe – cod, flounder, sole, swordfish or even sea bass (my very favorite fish!). The most difficult part of the whole recipe is roasting the garlic and that’s really very easy in the oven. If you’re not familiar with the process, here are the instructions:
Heat oven to 400 degrees. Peel most of the paper off the outside of the head of garlic being careful to leave the head intact. If a faster process is desired, the cloves can be separated and baked individually, it takes about half the baking time of doing a whole head. With kitchen scissors, trim about 1/4 inch off the top of the head, or each individual clove. Drizzle with 1 or 2 teaspoons olive oil per head. Wrap in parchment paper and bake for about 30-40 minutes depending on the size of the heads (or 15-20 if doing individual cloves). Cool then press the bottom of each clove to squeeze out the garlic. Stores in the refrigerator for 2 weeks or in the freezer for 3 months. Be sure to open windows or turn on the stove vent because the kitchen, and whole house if you have a small house, will be filled with the aroma of roasted garlic.
For each pound of fish, preheat oven to 350 degrees, prepare a baking dish large enough to accommodate the fish without crowding. Spray with non-stick cooking spray or coat with olive oil. Dry the fish with paper towels, salt and pepper to taste and arrange in the dish. Bake, depending on thickness, 15-35 minutes, until fish is flaky but still moist. Fish turns quite white in color when it’s cooked.
Want to make it vegan? Use firm tofu in place of the fish but fry it in a skillet instead of baking.
Make the lemon garlic sauce. In a small bowl, mix together:
Set aside and prepare the bok choy. In a large 12″ skillet, heat over medium:
1 teaspoon olive oil, then add:
1 small onion diced
6-8 baby bok choy, cleaned and cut in half or quarters
1 teaspoon minced garlic (or some of the roasted garlic)
Cook, stirring for the first few minutes, then reduce heat to medium low and cook 5-7 minutes until the onion and bok choy are softened.
Place the sautéed bok choy in the bottom of a serving dish, add a serving of the fish. Spoon about 2 teaspoons of sauce over each fish, garnish with scallions, chives or dill (chopped). Serves 4.
*Don’t have any vegan mayonnaise? See my recipe under sauces for egg-free mayonnaise.