Honey Ginger Sesame Noodles

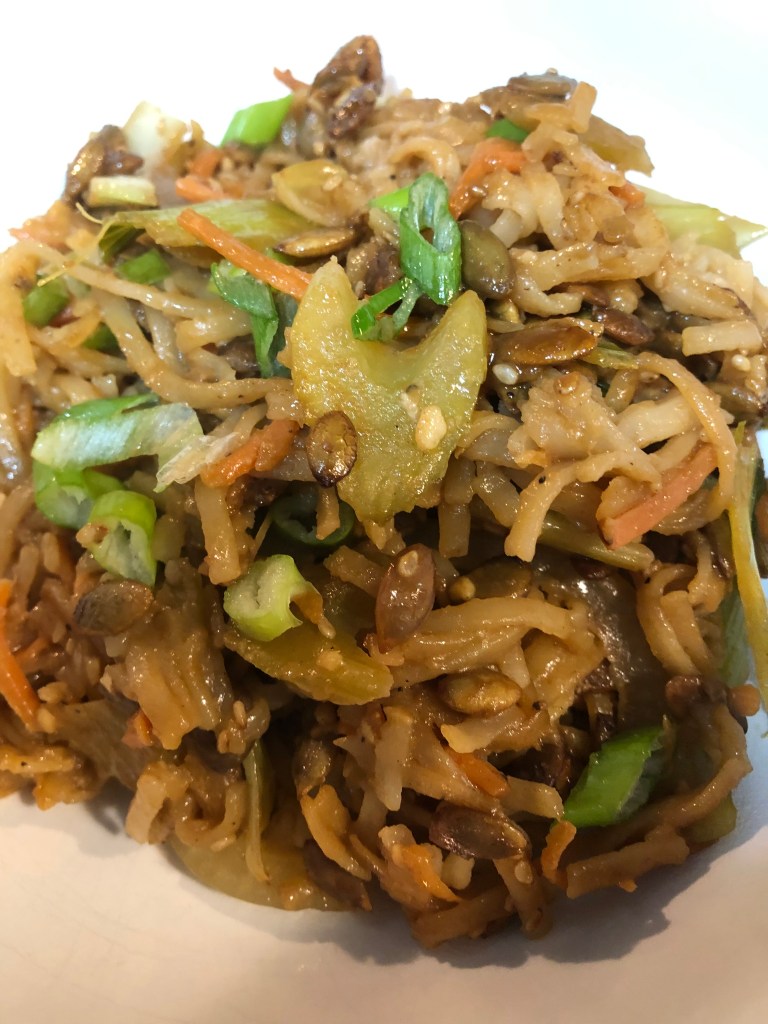
This umami filled dish of noodles takes some preparation in slicing the vegetables but otherwise is very easy to put together. The seeds or nuts add a little protein so if additional protein is desired, some fried tofu, chicken, beef, or pork can be added. And the vegetables can be changed to fit your family’s likes and what you have on-hand. Mushrooms, bell pepper, bean sprouts all would work well.

First, preheat oven to 400 degrees. Line a small baking pan with parchment and sprinkle with:

1/2 cup raw seeds such as pepitas or sunflower, or nuts if you can have them (peanuts, cashews, almonds, etc.)

Bake for 5 minutes and then toss with:

2 teaspoons sriracha

1 tablespoon soy sauce substitute

2 teaspoons honey

2 tablespoons sesame seeds

Bake for an additional 5 minutes. Remove and set aside. Following package directions, cook:

6-8 ounces rice noodles

When cooked, drain, rinse and set aside. In a 12″ skillet with high sides, over medium high heat:

1 tablespoon olive oil

1 tablespoon sesame oil

When the oils are hot, add:

1/2 large (or medium) onion, thinly sliced

3-4 stalks celery, sliced on an angle

3/4 cup chopped or shredded carrots

2-3 baby bok choy, sliced, including greens

Stir to combine and cook approximately 5 minutes until tender but not mushy. Add:

1-2 teaspoons minced garlic

1 small can diced or sliced water chestnuts

1 tablespoon freshly grated ginger

Cook an additional minute or two. In a small bowl combine:

1/2 cup soy sauce substitute

2 tablespoons honey

2 tablespoons rice vinegar

1 tablespoon tahini (or seed butter like sunflower or pumpkin)

1 tablespoon molasses

1/4 teaspoon ground black pepper

Whisk to incorporate ingredients and then add to pan of vegetables. Let the vegetables simmer with the sauce for several minutes, 2-3 before tossing in the noodles and, if more heat is desired, add:

1 teaspoon garlic chili sauce

Separate into four serving dishes and top with the seed mixture and:

2 scallions, greens only, sliced

Top with sliced, sauteed meat if desired and enjoy!

Easy Seafood Stew (or Bisque)

I enjoy many types of seafood – from various white fish to multiple shellfish. I happened to have a small piece of swordfish, not enough for a meal, as well as some canned clams and bay scallops on hand, bought a small fresh jar of lump crabmeat and made a seafood stew. Leave out the vegetables and it’ll be a bisque instead. Fairly easy to make and doesn’t take very long either. Feel free to vary the fish ingredients to your family’s taste. I wanted to use a lobster tail but couldn’t find one here in Minnesota. Delicious!

In a medium (4 quart) saucepan, heat over medium high heat:

1 tablespoon olive oil

When it’s shimmering add:

1/2 medium onion, diced

4-5 celery stalks, diced

2 cups kale, cleaned, stalks removed and leaves chopped*

Stir to combine, reduce heat to medium low and cook for approximately 6-8 minutes or until kale is softened. Remove to a bowl. Add to the saucepan, increasing heat to medium high:

1/2 pound bay scallops

1/2 pound white meat fish (I used swordfish but any white fish – cod, halibut, etc. works), cut into small chunks, about the size of the scallops

1/4 pound small shrimp (optional for those who can eat shrimp)

Stir and saute for 3-4 minutes until fish is cooked and then add:

1 tablespoon olive oil

2-3 tablespoons gluten-free, all-purpose flour

2 teaspoons Old Bay seasoning (optional)

Stir to combine and let simmer for a minute before whisking in:

2 cups non-dairy milk (anything except soy which won’t thicken)

Continue to whisk until milk heats and mixture thickens. Add:

1 small can minced clams (including the liquid)

4 ounces of fresh crabmeat (I checked out the canned, much less expensive but it also included loads of salt as well as sugar)

the cooked vegetables

1 small to medium potato, diced and cooked (whatever potato your family likes)

Salt and pepper to taste. Reduce heat to low and simmer for several minutes to allow the fish and vegetables to heat through. If desired, garnish with chopped green onions or chives. Serves 4.

*If you don’t like kale, adding some frozen peas would be just as delicious.

To make the stew into a bisque, simply delete the vegetables.

Chicken and Rice with Caramelized Onions and Cranberries

This recipe is quite involved and takes some time but it’s not a difficult dish to make. And to be sure, every minute spent on this is well worth the effort! The herbs and spices used amp up the flavor profile and adding some freshly grated lemon zest and lemon juice at the end takes it over the edge! Rather than adding the lemon juice at the end, some sliced lemons on the side would also work.

First, peel, cut in half and then thinly slice:

2-3 medium-sized sweet onions

If you don’t have sweet onions, add 1 teaspoon date sugar when you cook them. Let them sit while heating a medium-sized Dutch oven over medium heat with:

2 tablespoons olive oil

When the oil is shimmering add:

1 1/2 to 2 pounds bone-in chicken thighs or boneless, skinless chicken breasts

that are seasoned with:

1/2 teaspoon sea salt

1/4 teaspoon pepper

If using skin-on, bone-in thighs, cook skin side down. Loosely arrange chicken in pan (may take more than one batch). Brown on all sides, about 6-8 minutes. Remove to a plate. Drain all but 2 tablespoons oil from the pan before adding the onion slices. Reduce heat to medium low and cook, stirring frequently until well caramelized (browned). If not using sweet onions, here’s where to add the:

1 teaspoon date sugar

It can take 25-30 minutes to caramelize the onions because they need to cook slowly so that they don’t burn, we want them browned – caramelized, not burned. Once the onions are ready, add to the pot:

4 garlic cloves, minced (about 4 teaspoons minced garlic)

2 teaspoons freshly grated ginger (or 1/2 teaspoon dried ginger)

1 teaspoon fresh thyme (or 1/4 teaspoon dried thyme)

1/2 teaspoon ground coriander (or cardamom, nutmeg, or allspice)

1/2 teaspoon ground cumin

1/8 teaspoon saffron threads, crushed

Sauté for about 30 seconds until the herbs and spices are fragrant before adding:

6 ounces sliced mushrooms (Optional, peas would also work)

2 cups chicken stock or bone broth

the browned chicken pieces and any juices on the plate

If using skin-on thighs, be sure the browned side is up. Cover and let simmer for 20 minutes. Add to the pot:

1 1/2 cups uncooked rice*

1/3 cup dried fruit (I used cranberries but raisins or dried cherries would also work)

Stir in the rice and fruit, bring to a boil, reduce heat to low, cover and cook for another 30 minutes or until rice is tender and chicken is cooked. Most of the liquid should be gone from the pot so be careful not to burn the dish. Remove the chicken from the pot, moving the pot off the heat and re-cover so that it stays hot. Remove skin if using skin-on chicken and let sit for 8-10 minutes before slicing the meat (and removing the bones if using bone-in chicken). Add the chicken back into the pot along with:

1/2 teaspoon lemon zest

1 tablespoon juice

3 tablespoons fresh cilantro or parsley (Optional)

Stir to combine. Reheat until the chicken is heated through and serve. Serves 4-6.

*I used pre-cooked brown rice in my dish so I cooked the chicken 30 minutes before adding the frozen rice and then cooked it only an additional 10 minutes.

Since I don’t care for cilantro and don’t think much of parsley either, I sprinkled some green onions on top of my dish.

Easy Karaage (Japanese Fried Chicken)

The Chicken Bible strikes again! I had a package of boneless, skinless chicken thighs and wondered, what am I going to do with these? So out came the Chicken Bible and this recipe struck my fancy. I love fried foods but don’t make them often because of the mess, all that fat and because they are especially unhealthy for diabetes. Nothing shoots up glucose levels more than fried foods. We’ve all got to indulge in something sinful now and again so I thought I’d give it a try. Turned out very easy to make, the only part I didn’t like was, of course, cleaning up after frying. If you have a deep frier use it instead of a skillet on the stovetop! Makes 2-3 servings.

First, make the marinade by combining in a medium bowl:

1/4 cup soy sauce substitute

2 tablespoons rice vinegar

1 tablespoon freshly grated ginger

1 tablespoon minced garlic

2 teaspoons date syrup

1/4 teaspoon sea salt

Whisk to combine before adding:

1 1/4 to 1 1/2 pounds (6-8) boneless, skinless chicken thighs, fat trimmed off and cut into 1″ wide strips*

Stir to combine chicken with the marinade. Let sit on the counter for about 30 minutes. While the chicken marinates, prepare the pans needed as well as the dredge. So, line two medium baking sheets with parchment paper, set one aside and place a drying rack on top of the second and place 2-3 layers of paper towels on top of the drying rack. Set aside. In a pie plate or large soup plate, place:

1 cup tapioca starch (cassaba flour, corn starch if you can have it, potato starch, or arrowroot would also wok)

1/2 teaspoon sea salt

1/4 teaspoon pepper

Whisk to combine and set aside until chicken is ready. When the chicken is done marinating, using tongs, pull out all the chicken from the marinade, letting any excess drip back into the bowl and place it in the tapioca starch mixture. Using your hands, coat each piece individually and place on the first baking sheet (the one with just the parchment paper), being sure to knock off any excess starch. Repeat until all the pieces are coated. Set aside the marinade for later use.

Next, in a 12″ skillet with high sides or a small Dutch oven, heat 2-3 inches of:

Oil (I used a mixture of olive and avocado but feel free to use your normal oil)

Be sure to also use a thermometer so that you can heat the oil to 375 degrees and keep it between 350 and 375 while cooking the chicken. While the oil heats, look over the chicken. If there is still patches of white starch, using a cooking brush (or spoon) brush with the marinade to moisten.

When the oil is to temperature, using the tongs, place individual pieces of chicken into the oil from back to front (place them in the oil away from you then towards you). Don’t overcrowd the oil. It took three batches to cook all my chicken. Cook about 4-6 minutes depending on thickness, turning over once. Place on the second baking sheet (the one with the paper towels) using either the tongs or a slotted spoon. Salt lightly as you remove them from the oil. Serve the chicken with lemon wedges – don’t squeeze the lemon on them until you serve them or they’ll get soggy! I served mine with some air fried zucchini squash slices – delicious. See recipe under side dishes.

*With the thigh skin side up (that’s the side that has the film over it), long side towards you, slice crosswise into 1″ strips. You should get about 4 slices per thigh. Don’t worry if some come out in triangles, cubes, etc., since some pieces will come off the main parts of the thighs.

More brown food! Can’t seem to get away from it.

Pear Donuts (or fritters)

Here’s a quick and easy recipe for either a fried fritter or baked donut with fruit. I used pears but apples, peaches, plums, or any berry would work just as well. Simply substitute the other fruit in place of the diced pear and use a coulee of the same fruit in place of the pear sauce. For most people that would be apple since applesauce is readily available although it’s fairly simple to make fruit sauces, or coulees, from other fruits. Simply wash, core, and slice the stone fruits (no need to peel), place in a pot with a couple of tablespoons of water and cook until the fruit is soft, then puree. With the berries, it’s even easier because all you have to do is wash the fruit like blackberries or strawberries, and then cook them down (with a little water) before pureeing. Brown food again!

In a medium-size bowl add:

1 1/2 cups all-purpose, gluten-free flour

1 teaspoon guar gum

2 teaspoons baking powder

1/4 cup date sugar

1/2 teaspoon salt

1 teaspoon ground ginger (or grated fresh ginger)*

Stir to combine. Add:

1/2 cup non-dairy milk, such as oat or soy

1 tablespoon vinegar

1/2 cup pear sauce (or other fruit coulee)

Stir just until the dry ingredients are combined with the wet. Don’t overmix. In a 4-quart sauce pan or heavy, high-sided fry-pan, add:

2″ of oil (I used a combination of olive and avocado)

Heat to 375 degrees (use a cooking thermometer). For fritters, scoop out about 1/3 cup of the dough, form into a ball and flatten (use wet hands for this) before dropping into the hot fat. Cook 3-4 minutes per side (for a dough circle about 1/2″ thick). Should be golden brown. Only cook one or two circles at a time in the pot, more in the frypan.

For baked donuts, grease two 6-donut baking pans and spoon in dough. Bake at 425 degrees about 12-15 minutes or until the donut bounces back when touched. Cool slightly before unmolding.

Serve plain or with a glaze.

Turkey and Zucchini Burgers

I don’t think I’ve ever had a moister, tenderer turkey burger! These are very quick and easy with a food processor and more than worth the little effort they take to make. I just wonder why everything I make has to be so brown! Feel free to change up the herbs and spices as well as the vegetables to fit your family’s taste buds. I’m thinking next time perhaps I’ll use some garam masala instead of the smoked paprika. Makes 4 burgers.

First, put in the bowl of a food processor:

1/2 large onion (or 1 small onion), chunked

1/4-1/3 cup carrot pieces (I used shredded carrots)

1 medium or 2 small zucchini, chunked

Pulse until riced. Remove to a bowl and add:

1/2 teaspoon smoked paprika

1/2 teaspoon ground cumin

1 teaspoon ground coriander

1 teaspoon roasted garlic granules (or 1 teaspoon finely minced garlic)

1 teaspoon sea salt

1/2 teaspoon ground black pepper

1 pound ground turkey

Mix to combine, I used my hand. Don’t overmix or your burgers will get tough when cooked. Form into 4, 1/2 inch thick patties, they will be soft. Cook in a 10-12″ skillet with 1 tablespoon olive oil over medium heat 5-8 minutes per side until cooked through. Serve with your favorite condiments on your favorite gluten-free buns. I happen to love avocado with my burgers as seen in the photo.

Squash Parmesan, Lasagna Style

This dish is a lot like lasagna but with parmesan cheese between the layers instead of ricotta. I know it’s a little early for summer squashes but they are so tasty and now available year-round so I wanted to make something different, something fairly quick and easy which this dish definitely turned out to be. And so delicious with my favorite pasta sauce and parmesan. The only hard part of the dish is slicing the squash!

First, preheat oven to 450 degrees and line two LARGE baking sheets with parchment paper. Next, trim and slice lengthwise in about 1/4″ slices:

4-5 medium zucchini

4-5 medium yellow squash

About 2 1/2 to 3 pounds of squash. Place in a 9×12-13″ baking pan, and sprinkle with:

3-4 tablespoons olive oil

Using your hands or tongs, mix to coat the squash slices with the oil. Lay the slices of squash out on the prepared baking sheets. Sprinkle the slices with:

1 teaspoon sea salt

1/4-1/2 teaspoon ground black pepper

Bake for approximately 15 minutes or until they are tender. Reduce oven temperature to 375 degrees. In the 9×12″ baking pan (the same one you already used, it’s okay if there’s olive oil in the bottom), spread:

1/2 cup of your favorite pasta sauce

Line the pan with squash slices. Top with more pasta sauce and:

1/2 cup grated parmesan cheese

Repeat once or twice depending on how many squash slices are left. I only had a few so filled some gaps and only had two layers. If possible, end with sauce and cheese. Bake for 35-40 minutes or until cheese in browning and the casserole is bubbling. Let sit on the counter for about 10 minutes before serving so it sets. Serves 6.

TIP: Want a main dish instead of a side? Add 1-pound cooked ground meat, Italian sausage, or vegan protein to the pasta sauce.

As you can see, I ran out of sauce so ended with cheese only on top of the layer of squash.

Carnitas Tacos

I cooked a pork roast last night and had about half of it left so what to do with it? Tacos are so easy to make and tasty to eat, it was a no-brainer. Whether you make soft tacos like I did or prefer the hard ones, this filling is delicious and so easy to make with a food processor.

First, in a 12″ skillet, over medium heat, add:

1 tablespoon olive oil

Heat till it’s simmering and add:

1 small onion, diced

1 small, sweet pepper (any color), diced

1 teaspoon chili powder (Optional) – I’m not crazy about chili powder so I used sriracha instead

1 teaspoon cumin

1 teaspoon smoked paprika

Stir to combine and cook until the onions are translucent and the peppers soften. Add:

3 cups shredded pork (pulse in a food processor for a few seconds until it’s the consistency you want – be sure to cut into chunks before pulsing!)*

1/2 to 2/3 cup salsa (or plain tomato sauce) – enough to moisten the meat

1/2 teaspoon salt

1/4 teaspoon ground black pepper

1/2 teaspoon garlic powder or granules

Stir to combine and heat over low heat for 2-3 minutes until pork is heated through. Makes 8-10 tacos.** Top with refried beans, sliced avocado, cheese, lettuce, salsa, etc., whatever your family likes.

*Don’t have a food processor? Heat the leftover pork roast in a 325 degree oven for about 15-20 minutes and then using two forks, shred the meat.

**There are now a number of tortilla brands available that are gluten free including corn, quinoa, cassaba, cauliflower, etc. I just love the quinoa tortillas. Be sure, if using soft tortillas, to heat them under moist paper towels in the microwave for about 30 seconds before filling.

Creamy Tuscan-Style Chicken and Garlic Mushrooms

This is a great way to use up leftover chicken. I used chicken breasts but 16 ounces of any chicken works just fine. Like mushroom soup, this is a pretty easy recipe to make. It can be done with either whole small mushrooms or sliced ones (I usually buy the cleaned, pre-sliced at the store). For a stronger mushroom flavor, use mushroom stock instead of chicken stock. Makes 4 generous portions.

In a 12″ high-sided skillet, heat over medium high:

2 tablespoons olive oil

When shimmering add:

1 medium onion, diced

Cook for about 3 minutes until onions are translucent before adding:

4 teaspoons minced garlic (about 4 cloves)

1/3 cup sliced sun-dried tomatoes (in oil)

1 tablespoon of the tomato oil

Cook for about a minute so that the tomato flavor comes out. Add:

12 ounces mushrooms

Cook until the mushrooms begin to soften, about 4 minutes, over medium heat. Stir into the pan:

2 tablespoons all-purpose, gluten-free flour

Stir to combine the flour with the fat in the pan before adding:

1 cup chicken stock (or mushroom)

1 cup non-dairy milk (any kind EXCEPT soy which will not thicken)

Stir to combine and continue stirring until the mixture thickens, about 3 minutes. Add:

1 teaspoon dried Italian herbs

1/2 cup parmesan cheese

Salt and pepper to taste (1/2 teaspoon salt and 1/4 teaspoon ground black pepper)

2 cooked chicken breasts, sliced into strips*

Cook the mixture for about 5 minutes to warm the chicken and melt the cheese. Serve over pasta or rice. I can testify that it’s delicious over zucchini noodles! Top with chopped parsley or scallion greens and additional cheese.

*To make this dish vegan, instead of adding the chicken stock, use mushroom or vegetable stock and substitute a 12-ounce can of white beans along with 2 cups of greens (spinach, chard, etc.) along with the stock.

Turkey Sloppy Joes

This was a hit at my house last night so I thought I’d pass on the recipe. Another very easy, quick recipe for a delicious dinner. I recommend serving it with a small side salad! Serves 4.

In a high-sided 10″ skillet, heat over medium high heat:

1 tablespoon olive oil

When shimmering add:

1 small onion, diced

1 small sweet pepper, diced

2 teaspoons minced garlic (roughly 2 cloves)

Cook until the onions soften, about 4-5 minutes. Push the onions and peppers to the side and add:

1 pound ground turkey (94% preferably)*

Salt and pepper to taste (1/2 teaspoon sea salt, 1/4 teaspoon ground pepper)

Cook, breaking up the turkey and stirring frequently until the turkey is cooked (no longer pink), about 5 minutes. In a small bowl combine:

1/2 cup sugar-free ketchup (I use Organicville made with agave nectar)

1/4 cup sugar-free barbecue sauce (again, I use Organicville made with agave nectar)

1/2 tablespoon sriracha sauce (sugar-free preferable, I use Yellowbird Blue Agave Sriracha)

1/2 tablespoon vinegar

2 teaspoons mustard (I used stone ground)

1/2 teaspoon chili garlic sauce (Optional)

1/2 teaspoon fish sauce (Optional)**

When turkey is cooked, pour the sauce into the pan and stir to combine. Reduce heat to low, cover and simmer for about 10 minutes. Serve on gluten-free buns, dairy-free cheese optional.

*This recipe could easily be made vegan by substituting a large can of any type of beans, such as Great Northern, kidney, etc. or some diced firm tofu.

**The recipe I used as a template called for Worcestershire Sauce which has soy in it so for flavor and spice I substituted the sriracha, chili garlic and fish sauces. If your family has no problems with Worcestershire Sauce, go ahead and use that instead.